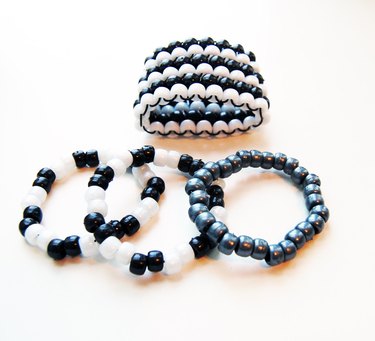
Kandi bracelets create colorful accessories. The beads themselves are typically chunky or plastic pony beads. Once made, you can wear one bracelet or several stacked together. Strand them as single bead bracelets or stitch them into a cuff using the odd-count flat-bead peyote stitch. Show off school colors or the colors of your favorite sports team, or go with basic black and white to add a graphic punch to your work wardrobe.
Things You'll Need
Video of the Day
To make one cuff and six bracelets or just 19 bracelets, you'll need the following elements:
Video of the Day
- 10-inch piece of string
- Scissors
- Ruler
- 197 inches of elastic jewelry cord
- 18 beads in color of your choice per 7-inch bracelet or 108 for 7-inch cuff
Bracelet Making
Sort through your beads as they often come in multicolor packs. Decide on the type of repeated pattern you want such as two white and then two black. Measure your wrist with a piece of string and cut it to fit your wrist. Lay out the string on the ruler to learn the size of your wrist. Cut a piece of elastic this length plus 4 inches. Stretch both ends of the elastic thread to remove the stretchiness at the end so the elastic cord is easy to thread and knot. Insert the first bead onto the thread and loosely secure it by tying it into a knot at the end. This is called the stop bead, as it stops the other beads from falling off as you thread them.
The Repeated Pattern
Thread the beads according to the repeated pattern you decided on. This could be two-by-two colors or two-by-two followed by a third color for visual splash of color. Use a ruler with a groove to line up the beads in a tidy fashion so they don't roll around on the craft table. Continue to thread beads to the dimension of your wrist measurement.
Tie the Bracelet
Finish off the bracelet by tying the ends together in a square knot. For added security and to keep the knot from coming loose, tie it again. Snip off any excess thread, leaving 1/4-inch tails. Push the beads over to hide the knot. Slip the bracelet over your hand and onto your wrist.
Making a Kandi Cuff
Kandi beads are ideal for stitching into a cuff using the odd-count flat peyote stitch. To create this striped look, start with a row of white and add in a second row of black above the white, followed by another row of white. Use the elastic cord so the cuff will fit snugly. It takes about 25 beads per 1 inch of cuff. To create a cuff that fits a 7-inch wrist, cut 14 1/2 feet of elastic cord prior to stitching. As you work the rows, the beads stack up on one another like bricks. When you have finished the creating the cuff, bring the ends to face each other and weave the cord through both sides, pulling the edges toughly together. Knot the ends using a square knot. Repeat the square knot and clip the ends to just 1/4-inches in length, moving the beads over the knot to hide it.