Tunisian crochet is a unique crochet technique that essentially combines knitting and crocheting—so a Tunisian crochet project provides surefire fun for knitters and crocheters alike. Instead of a regular crochet hook, you'll use an elongated hook. Stitches are linked and dependent on each other, much like knitting. However, like crochet, you'll use a hook to loop and connect stitches together. As a result, the crochet stitches create a waffle-like stitch that looks amazing for washcloths, afghan crochet blankets, cowl scarves, dishcloths and more.
Learn how to use the Tunisian Entrelac method in our step-by-step easy crochet tutorial.
Video of the Day
Video of the Day
What Tools Do I Need for Tunisian Crochet?
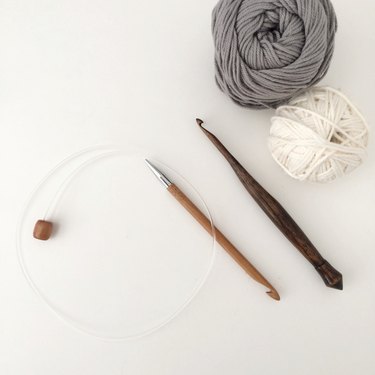
Both Tunisian and Entrelac usually require a Tunisian crochet hook, which is a crochet hook that maintains a consistent diameter for its entire length. You can find both in-line and tapered hooks in the Tunisian style, made with wood, plastic and aluminum at craft supply stores such as JOANN and Michaels as well as on Amazon. Tunisian hooks sometimes have an extended cable, which is convenient to for placing many stitches on the hook at once while crocheting certain patterns. Use a hook two sizes larger than the hook usually recommended for yarn, as using the normal size might result in work that's too tight.
However, some patterns (like our featured pattern) require only seven stitches on the hook at one time, so a standard crochet hook should work. Check the pattern you're following to determine if an actual Tunisian hook is necessary. Our tutorial is a sample of Tunisian Entrelac. It's important to note that in this Tunisian crochet pattern, your hook should always hold seven loops.
The Basics of Tunisian Entrelac
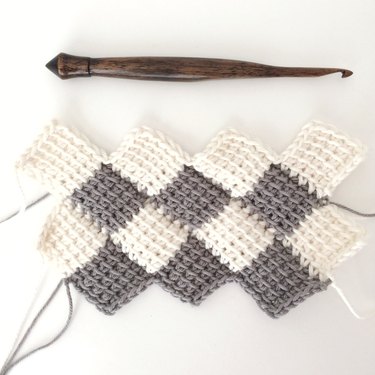
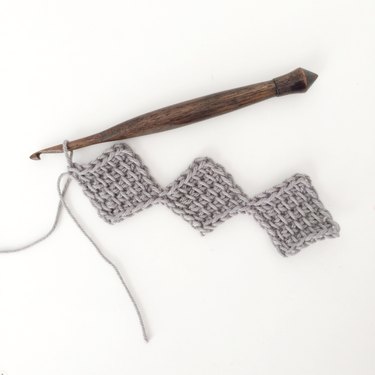
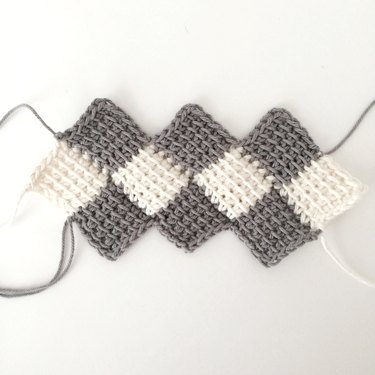
Tunisian crochet creates a waffle-like stitch with a distinct right side—the smooth side—and a "wrong" side—the bumpy side. Entrelac, a technique of Tunisian crochet, is a "join as you go" method that creates a honeycomb stitch design. This makes it convenient for large projects with a lot of color changes, as you won't need to join and weave in as many ends later. Many different shapes can be created and built upon using the Entrelac crochet technique, but square blocks are most common.
Things You'll Need
Crochet hook, Tunisian or regular, two sizes larger than normal for yarn weight
Tapestry needle to weave in ends
Yarn in contrasting colors (consider Lion Brand Basic Stitch Anti Pilling Yarn or a worsted weight yarn like Big Twist Value Yarn)
Tip
Each block row has a forward pass, or a picking up of stitches, and a return pass, which works stitches off the hook. For this pattern, odd-numbered Entrelac rows have an odd number of blocks. In the case of this swatch pattern, it’s the blocks that come in threes.
Entrelac Row 1
Block 1:
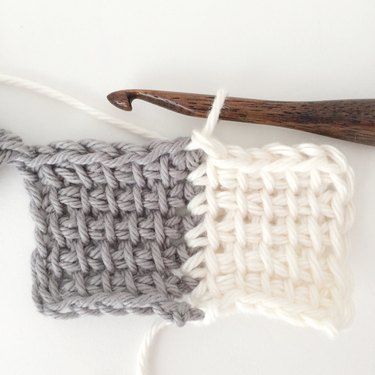
1. Create foundation row
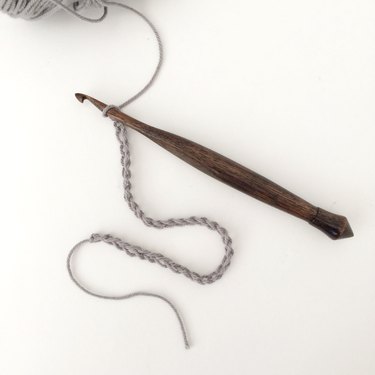
To begin Tunisian crochet swatch, create a loose foundation row with 34 chain stitches (a multiple of 11 plus 1). This will create the foundation for swatch and allow you to add first row of Entrelac stitches within first block.
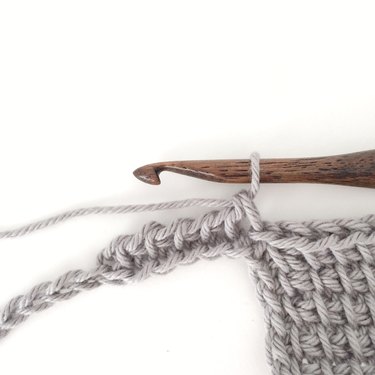
Forward Pass: Working in the back ridges of the chain, pick up six chains by inserting hook and drawing yarn through into each chain. Once completed, you should have seven loops on your hook.
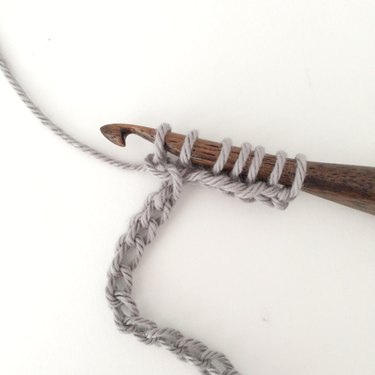
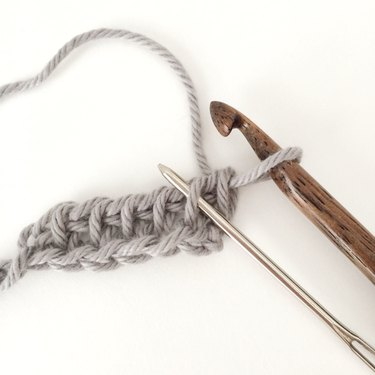
Return Pass: * Yarn over and draw through two loops. Repeat from * across until one loop remains on hook.
2. Complete rows 2-5
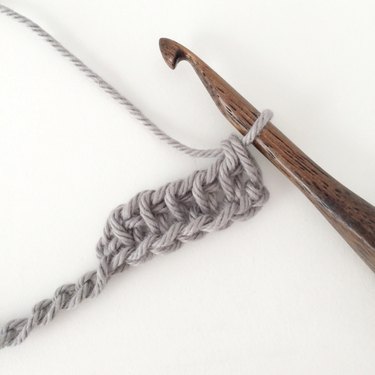
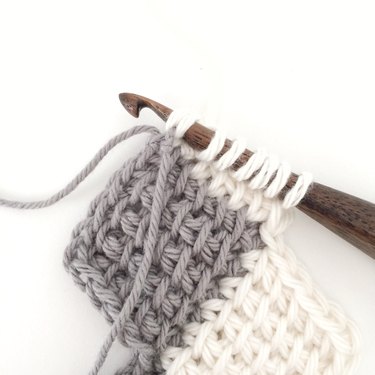
Forward Pass: Keeping all loops on hook, pick up five vertical loops. The first vertical loop picked up is shown with the tapestry needle in the picture. After picking up vertical loops, you have six loops on your hook, so you need one more to reach seven.
The seventh loop is picked up from the back ridge of next unworked chain from the base chain. Yarn over and draw a loop through to achieve seven loops on hook.
Return Pass: Just like you did in the first step, yarn over and draw through two loops. Repeat this from across until one loop remains on the hook.
3. Complete row 6
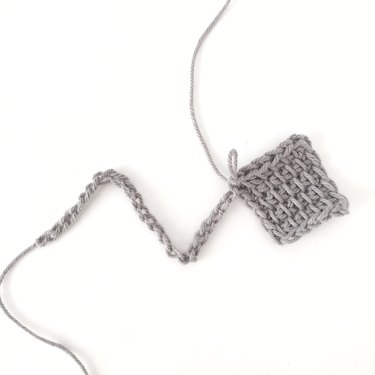
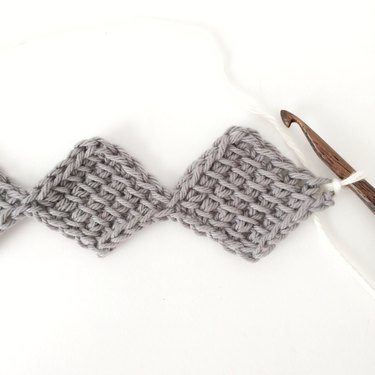
For row 6, loosely slip stitch into five vertical bars across. Slip stitch in last loop of foundation chain where row 5 ended to complete the first block. The photo above demonstrates how the base chain builds sides of blocks.
Block 2:
1. Begin block
Forward Pass: Pick up next six loops from back ridges of the base chain by inserting hook and drawing up a loop for each chain.
Return Pass: ***** Yarn over and draw through two loops on hook. Repeat from * across until one loop remains on hook.
2. Complete rows 2-6
For rows 2-6, repeat steps 2 and 3 from first block.
Block 3:
1. Complete rows 1-5
To create first five rows of third block, follow step-by-step instructions for rows 1-5 of block 2.
2. Complete row 6
For last block of row, loosely slip stitch in each of five vertical bars. Slip stitch in the same foundation row chain as the last loop of row five, then slip stitch in last foundation chain. Fasten off to complete row.
Entrelac Row 2
Block 1:
1. Create first row
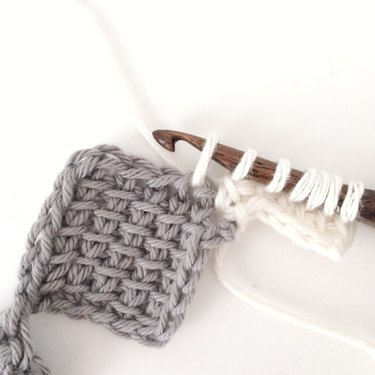
To create first row, begin by joining contrasting yarn on corner of square. You can do this by simply knotting it or by creating a loop knot (which is similar to how you would attach a tassel). See photo above for an example of how to create this knot.
Forward Pass: Chain 6, insert hook in back ridge of second chain from hook and draw up a loop; * insert hook and draw up a loop in the next chain; repeat from * four times. Insert hook under both loops in same spot where you joined contrasting yarn and draw up a loop. You should have seven loops on hook.

Return Pass: * Yarn over and draw through two loops. Repeat from * across until one hook remains on hook.
2. Complete rows 2-5
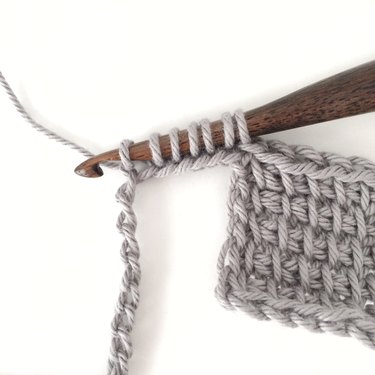
Forward Pass: Draw up loops in five vertical bars across, then draw up loop in next row of block from the previous Entrelac row. Draw it through both loops. For a visual, see photo above.
Return Pass: Repeat row 1, then return pass.
3. Complete row 6
For row 6, loosely slip stitch in vertical bars across five times. Next, slip stitch in first slip stitch of the last row on previous Entrelac row.
Blocks 2 and 3:
1. Create first row
Forward Pass: * Insert hook through both loops of next slip stitch and draw up a loop. Repeat from * five times.
Return Pass: * Yarn over and draw through two loops. Repeat from * across until one loop remains on hook.
2. Complete rows 2-6
To complete rows 2-6, repeat crochet tutorial steps for rows 2-6 of block 1.
3. Complete block 3
For block 3, repeat the steps for block 2.
Block 4:
1. Complete row 1
Moving on to block 4, follow forward pass and return pass instructions to complete row 1.
Forward Pass: * Insert hook in next stitch and draw up a loop. Repeat from * six times until you're left with seven loops on hook.
Return Pass: Yarn over and draw through one loop. * Then, yarn over again and draw through two loops. Repeat this step from * until one loop remains on the hook.
2. Complete rows 2-5
For rows 2-5, pick up and draw loops through five vertical stitches. Insert hook under both loops of chain at end of row and draw up a look. There should be seven loops on hook.
3. Complete row 6
To finish row 6, loosely slip stitch in five vertical bars, then insert hook and slip stitch in both loops of chain at end of row. This completes Entrelac row 2.
Entrelac Row 3
Block 1:
1. Complete row 1

For row 1, follow steps above to join contrasting yarn where hook points in photo above.
Forward Pass: Draw up loops, five vertical stitches, and insert the hook in the row of the last Entrelac row. Draw up the loop to make loops on the hook.
Return Pass: Yarn over and draw through one loop. * Yarn over and draw through two loops and repeat from * until one loop remains.
2. Complete rows 2-6
For rows 2-6, repeat instructions for rows 2-6 of block 1 on Entrelac row 2.
Block 2
Repeat crochet tutorial steps for block 2, Entrelac row 2.
Block 3
1. Complete rows 1-5
For rows 1-5, repeat the steps for rows 1-5 of block 2.
2. Complete row 6
Complete row 6 by loosely slip stitching in five vertical bars. Slip stitch in the same stitch as last loop of row 5 and fasten off.
Repeat Entrelac rows 2 and 3 for a continued pattern.
Now that you're up to speed on all things Tunisian Entrelac, it's time to get stitching! We can't wait to see what you create.