Things You'll Need
Cardboard boxes
Double-sided tape
Cotton balls
Scissors
Glittery spray paint
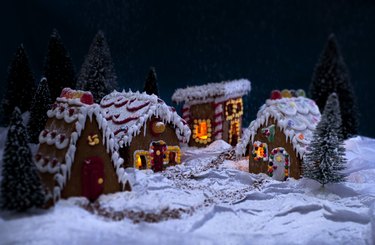
Around Christmas, you may be one of the many that display a Christmas village. The platform is the base of the village where all the buildings and accessories sit. It is also what pulls the whole look of the village together. Creating Christmas village display platform yourself is an easy process using items you most likely already have in your home. With a little time and effort, you can have a beautiful beginning to your Christmas village.
Preparation
Step 1: Pick the Location for Your Christmas Village Display
Choose a flat surface for the Christmas village display. It should be out of the way where the items will not get knocked over but also where you and your guests can see it. There should be enough space to put out all the buildings and accessories without having everything lumped together.
Video of the Day
Step 2: Create Your Village Layout
Make a plan for the layout of your village. Decide which items, such as certain buildings, you want more elevated than others. The plan can be useful when choosing the boxes for the platform.
Step 3: Select the Base
Decide on a base platform. You can put the Christmas village directly on the flat surface or you can put it on top of a secondary flat surface that you can move – for example, a flattened piece of cardboard or a large flat tray. This is useful if you want to rotate your village or want a little extra stability.
Using Cardboard Boxes
Step 1: Choosing the Cardboard
Choose cardboard boxes. You can use ones that are small, such as ones from toothpaste, to ones that are medium-sized. Use thin cardboard boxes for small items in the village you want elevated, such as trees or light posts. Larger, sturdier boxes can be used for heavier and more fragile items such as the buildings.
Step 2: Cut Cardboard Boxes
Cut various sized cardboard boxes. Trim the flaps off or fold them in and leave them intact. For the longer boxes, such as toothpaste boxes, cut the end off and place the cut end down so the accessory sits on the sturdy sealed side.
Step 3: Tape the Boxes Together
Put the boxes together using double-sided tape. They are easy to stick together into one grouping. Put double-sided tape on the tops of the boxes as well so the cotton covering sticks to the boxes and does not slide around. Place them in the formation that you want the village base to have.
Covering the Platform
Video of the Day
Step 1: Cover the Platform
Pull apart cotton balls for the covering over the cardboard. Flatten it out as much as possible so the items can sit on it steadily. In places where there will be no buildings or accessories, leave it a little fluffier. You can leave the cotton loose or stuck to the double-sided tape, but you can also use a strong glue to adhere it to the cardboard.
Step 2: Spray the Cotton
Spray a glittery spray paint. Use it sparingly over certain areas of the cotton. It gives it a shimmering, snowy feel instead of it being a dull white.
Step 3: Test the Stability
Test all the boxes before placing your items on them. Press on the tops of the boxes and move them around a bit to make sure they will not collapse inward or will not fall over when the items are placed on top.
Tip
Before putting the items onto the cotton, shine a flashlight over the platform to make sure none of the cardboard village display base shows through. The buildings that light up, combined with the lighting in the room, can make the cardboard more noticeable after you already have it set up.