No artistic skills whatsoever? No problem! In fact, for this DIY, the less you have, the better. We're not even kidding. That's because, when it comes to recreating the terrifically tacky look of a self-made ugly Christmas sweater on a gift bag (or box), absolutely anything goes. To make it even easier, we're including a free printable PDF template that'll have you churning out gift bags like a champ. So, grab some glue and fasten your seatbelt because things are about to get ugly!
Video of the Day
Things You'll Need
9.75 tall x 7.75 inch wide gift bag(s). We used these.
8.5 x 11 inch colored paper -- two for each bag
Lots of holiday flair of your choice! We used foam stickers, chenille craft stems (a.k.a. pipe cleaners) and pom poms, but the sky's the limit. Other ideas: felt cut-outs, candy canes, holiday flora, glitter, old Christmas cards, etc.
Appropriate glue/adhesive for your chosen decor (see Tip in step 4)
Step 1: Print the Ugly Christmas Sweater Template PDF
Download the template and print both pages onto 2 sheets of 8.5 x 11 inch colored paper. We used cardstock, but if your printer can't handle cardstock, a thinner craft paper will do.
Tip
This template was designed for a gift bags that are 9.75 inches tall x 7.75 inches wide and of any depth. If you'd like to use larger or smaller gift bags, you'll have to adjust the print size (and paper size) accordingly. If resized, this template should work for standard plain gift bags (available at most drug/dollar stores) that are taller than they are wide. This sweater template will also work for rectangular gift boxes with removable lids. Simply follow the same instructions below, but adhere the sweater to the box lid only.
Step 2: Cut Out Pieces
Cut out all three pieces: 1) sweater body 2) left sleeve 3) right sleeve according to the guidelines on the template.Your pieces should look like the ones shown below.
Note that there are tabs on the sleeve cutouts where they will connect to the sweater body.
Step 3: Glue Pieces Together
Apply glue to one of the sleeve tabs (make sure not to apply glue beyond the fold guideline printed on the template).
Then lay the sweater body on top of the tab to adhere it, aligning it with the fold line, as shown below.
Repeat for the other sleeve. Your sweater is ready for flair!
Step 4: Apply Holiday Flair
Now the fun part. There's really no wrong way to do this, so go to town! Here's what we did:
First, we took some sparkly chenille stems, bent them into zig-zags and hot glued them on in rows.
Tip
A word about adhesive—be it glue, paste, or tape. What you use depends on what works best with your flair. If using bulky decor, we recommend hot glue. If using paper or glitter, craft glue or paste will suffice. If using only lightweight paper cutouts, two-sided tape may also be a good option.
Then, we added rows of stickers and pom poms...
...until our sweater was all flair-ed out!
Step 5: Glue Sweater onto Bag
Apply glue to the front of a flattened gift bag, then lay the sweater on top to adhere it. The sleeves, at this point, should not yet be connected to the bag.
Now, turn it to the side, and open up the gift bag.
Fold the sweater sleeves over the sides of the bag.
Then glue the sleeves down onto the sides.
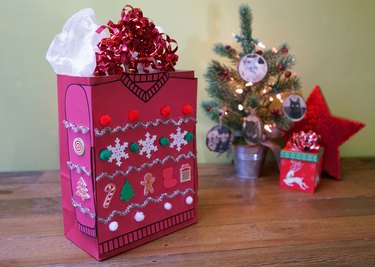
Once the sleeves are glued, you're done!
We recommend using them as party favor and/or prize bags for your next ugly Christmas sweater party. Happy tacky holidays!