How to Display Paper Dolls: Hanging, Magnetic, Shadow Box
"Easy paper doll display" is doing a lot of work. Search that phrase and you'll find everything from scissors-and-string tutorials to builds that require an electronic cutting machine and design software. They're not the same difficulty level, and collapsing them into the same category wastes your time.
This guide covers three ways to display paper dolls, each suited to a different situation. By the end, you'll have chosen a method that fits your actual tools, budget, and goals and you'll have the steps to build it. Read the chooser section first, then skip to whichever method fits. You don't need all three.
Before you start: Have your paper dolls made or printed before beginning any of these methods. Each section below lists its own additional materials.
Choose your method first
Video of the Day
The word "easy" shifts depending on what you already own. Here's the breakdown before you commit to anything.
Hanging is the right call if you want a quick project, you're working with supplies already on hand, or the finished piece is a gift. No equipment beyond scissors and a hole punch. Zoey Paper Hanging Doll DIY demonstrated this approach earlier this year using paper or cardstock, markers, scissors, and glue the lowest barrier of the three.
Magnetic makes sense if you want a rearrangeable, reusable set for ongoing play. The finished pieces behave like small fridge magnets and can be repositioned freely on any metal surface, but producing them requires an inkjet printer, printable magnetic sheets, and an electronic cutting machine. If you don't own a cutting machine, check whether a local library, makerspace, or craft store offers access before ruling this out. The tool requirement is the only real barrier; once pieces are cut, they go straight onto a surface with no further assembly, as Crafting Quine describes.
Shadow box is the choice when you want the result to function as home décor rather than a craft project. The materials are accessible, but the assembly is deliberate. The finished piece is permanent.
| Hanging | Magnetic | Shadow box | |
|---|---|---|---|
| Tools required | Scissors, hole punch | Cutting machine + inkjet printer | Scissors, craft knife optional |
| Permanence | Semi-permanent | Fully rearrangeable | Permanent |
| Best for | Room decor, gifting | Interactive play, rotating display | Keepsake, wall art |
Video of the Day
DIY paper doll display: the hanging method
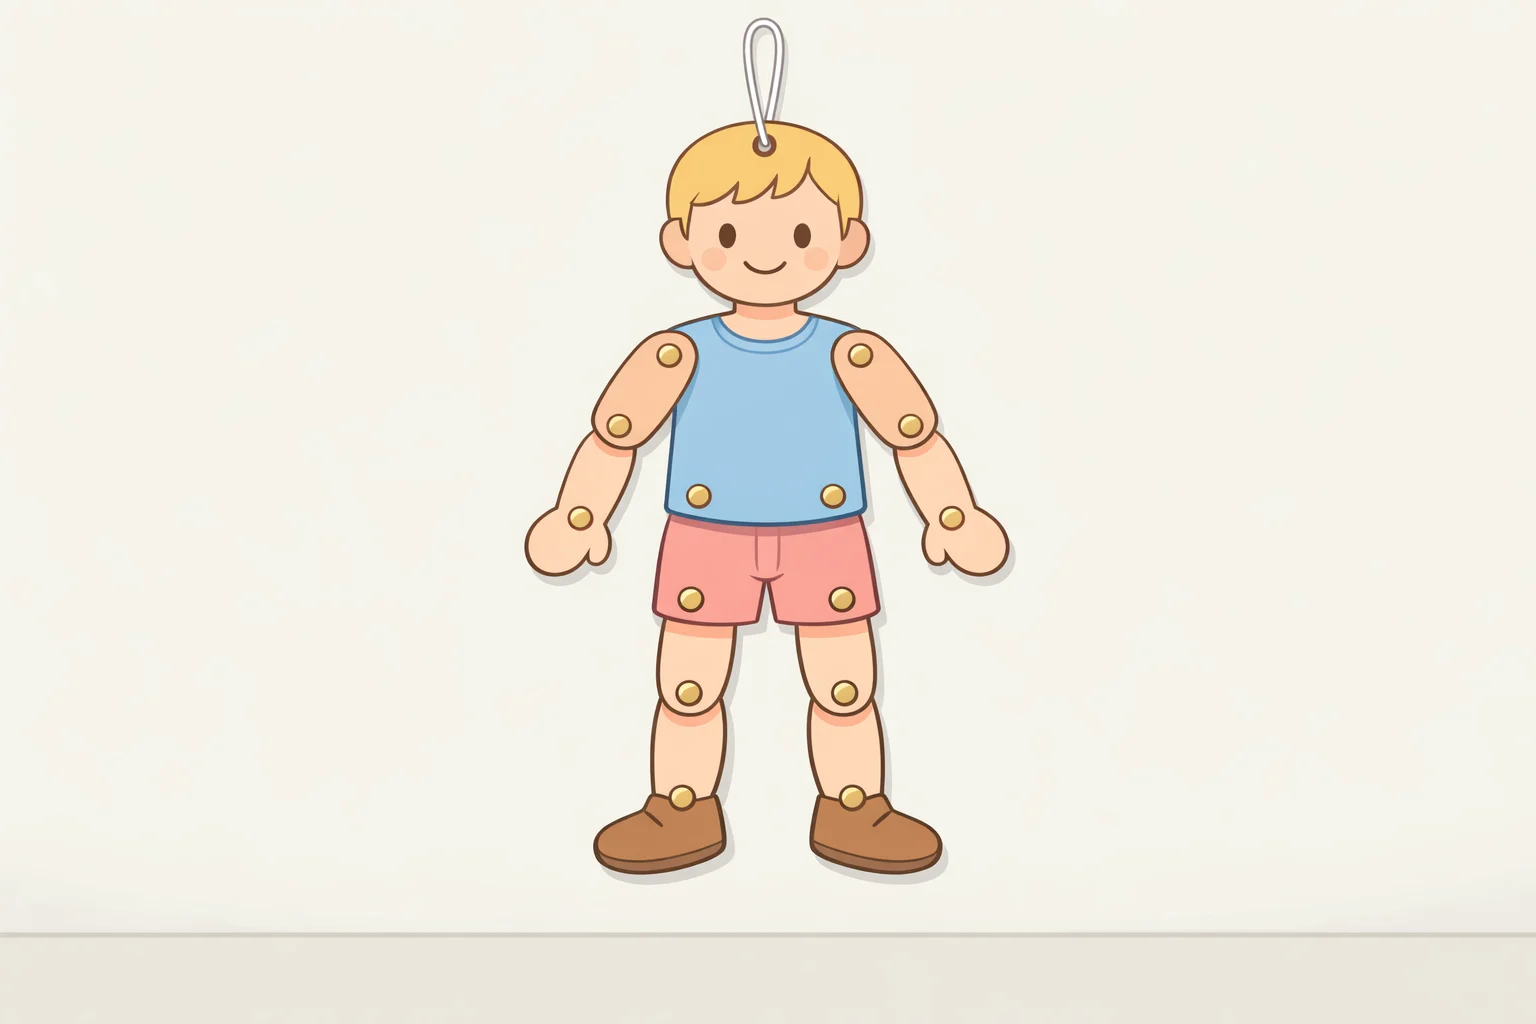
What you'll build: An articulated paper doll that hangs flat on a wall, window, or doorknob, with slight movement at each joint. No permanent adhesive, no equipment beyond what most households already have.
Materials:
- Cardstock (see note on paper weight below)
- Markers or colored pencils
- Scissors
- Glue stick or white craft glue
- Hole punch
- String or thin ribbon
Steps:
-
Draw or print each body part separately on cardstock: head, torso, two arms, two legs. Color and decorate all pieces before cutting. Filling in detail while parts are still on a full sheet is much easier than trying to hold individual pieces steady.
-
Cut out every piece individually. Take your time at the joints clean edges there affect how neatly the finished doll hangs more than almost anything else.
-
Using a hole punch, add connection holes at the attachment points: top and bottom of the torso, top of each limb. Leave the head solid with no hole through the face (DIY paper dolls, earlier this year).
-
Roll two small paper tubes from scrap cardstock, roughly the diameter of a pencil. Glue one to the base of the head, one to the top of the torso. These act as spacers that give the joints slight separation and allow movement when the doll hangs (DIY paper dolls, earlier this year).
-
Connect the pieces by threading a short length of string or a brad through the punched holes to attach each limb to the torso. Keep connections loose enough to allow natural hang.
-
Attach a loop of string to the top of the head. Hang from a nail, pushpin, or removable adhesive strip.
The finished doll hangs flat with slight movement at each joint. Limbs shift with air movement, which is part of the appeal.
On paper weight: Cardstock holds up significantly better than standard printer paper for this build, particularly at the punched holes where thinner paper is prone to tearing. If cardstock isn't available, glue a second identical layer to the back of each piece before assembly it adds stiffness and costs nothing extra.
On joint placement: Punch holes close to the edge of the limb pieces, not centered. Edge placement lets each limb swing freely; centered holes tend to lock the joints up.
If something goes wrong: A joint that won't hang straight usually means the connection hole is too far from the edge, or the string loop is pulled too tight. Loosen the attachment and re-thread before assuming the piece is cut wrong.
Once comfortable with this format, try laminating pieces before cutting. Laminating pouches run through a hot iron between parchment sheets extend the lifespan considerably and give the surface a smoother finish for coloring.
Magnetic paper doll display
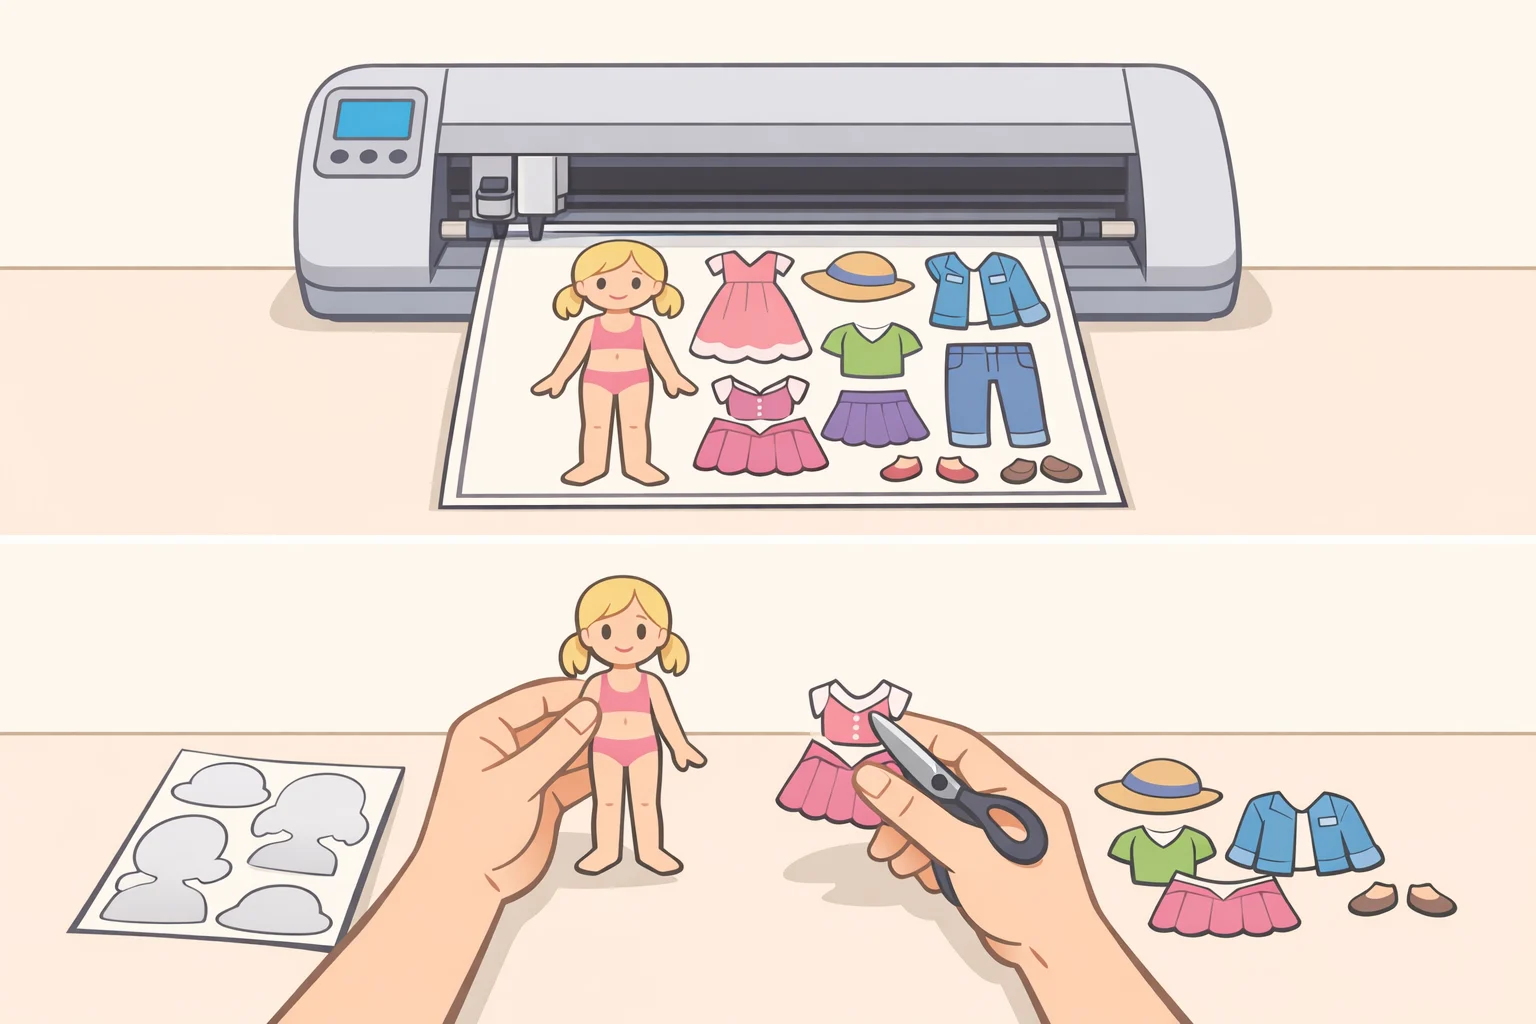
What you'll build: A set of magnetic paper doll pieces that stick to any metal surface and can be repositioned freely. Clothing layers over the base figure the same way a traditional paper doll does, but without folding tabs. It's the most interactive format of the three, and the only one where the setup cost lives in the tools rather than the assembly time.
Tool check first: This method requires an inkjet printer, printable magnetic sheets compatible with that printer, and an electronic cutting machine. If those aren't available, Methods 1 or 3 will get you to a finished display without them.
Materials:
- Electronic cutting machine (Silhouette or equivalent)
- Inkjet printer
- Printable magnetic sheets (check manufacturer specs for printer compatibility)
- Design software (typically bundled with the cutting machine)
- A metal or magnetic display surface
Steps:
-
Open your doll template in the cutting machine's design software. This is where personalization happens: adjust proportions, swap clothing outlines, or incorporate a photo to create a likeness rather than a generic figure (Crafting Quine).
-
Print the doll and clothing pieces onto the printable magnetic sheet using your inkjet printer. Check your sheet manufacturer's specs before printing magnetic media has specific compatibility requirements, and the wrong printer settings can affect how the ink adheres.
-
Load the printed magnetic sheet into the cutting machine and run the cut file. The machine trims each piece precisely along its outline.
-
Remove the cut pieces. No gluing, no further assembly pieces go straight onto a compatible surface (Crafting Quine).
Each piece handles like a small refrigerator magnet: holds firmly, lifts cleanly, leaves no residue.
Watch the detail size: Magnetic sheet stock is heavier than paper and has some rigidity. Very fine cutout shapes thin straps, small facial features, delicate hair wisps may not hold their shape after cutting. Simplify any design with tight detail at small scale before sending it to the machine.
On display surfaces: A dedicated magnetic board keeps the display contained and portable. A refrigerator works, but it fixes where the display lives. Both are valid depending on how the set will be used.
If pieces aren't sticking well: The surface material matters. Painted metal, some appliance finishes, and certain magnetic boards vary in pull strength. Test one piece before cutting the full set.
For a background scene, print a coordinating image on regular paper and tape it behind the magnetic board surface. The dolls play against the scene while remaining fully rearrangeable in front of it.
Paper doll shadow box display
What you'll build: A framed, dimensional paper doll scene mounted inside a shadow box, ready to hang on a wall or sit on a shelf. The doll appears to float in front of the background rather than lying flat against it the difference between a craft project and something that reads as considered décor.
Materials:
- Purchased wooden or cardboard shadow box. Depth matters more than overall size; you need enough clearance between the back panel and the front edge to accommodate the foam-mounted figure
- Patterned or solid cardstock for the background. A 12x12 sheet works well for the back panel; 6x6 sheets are better proportioned for doll-scale clothing and accessories, as Scrap Escape notes
- Your paper doll, printed or stamped twice on identical paper
- Foam adhesive dots or squares
- Scissors
- Dry adhesive (tape runner or glue dots) for flat elements
- Small embellishments or props, optional
Steps:
-
Choose and prepare the shadow box. The inside back panel is your canvas measure it before buying background paper.
-
Cut background paper to fit the back panel and adhere it with a tape runner or dry adhesive. Liquid glue warps thin paper as it dries, and that buckle will be visible behind the finished figure.
-
Print or stamp your doll twice and cut out both copies. Glue them together back-to-back. The double layer adds stiffness and prevents curling (Scrap Escape). If the figure will be posed in a seated position, bend gently at the waist before the adhesive fully sets.
-
Ink or color the edges of the layered figure so the seam between layers disappears into the silhouette.
-
Place foam adhesive dots behind the doll's head and torso only, not the full figure. This lifts those areas slightly off the background and creates the dimensional shadow effect that separates a shadow box from a flat frame (Scrap Escape).
-
Position the doll inside the box and press firmly. Hold or clip for the time recommended on your foam adhesive packaging.
-
Add props or suspended accessories as needed. To hang an element a swing, a banner, a small sign cut two identical layers, sandwich a length of string between them, glue the layers together, then staple or tape the string ends to the inside top of the box. Cover any visible hardware with ribbon or a narrow strip of paper (Scrap Escape).
-
Close the box front. Hang or place.
Adhesive is not interchangeable here: Standard white craft glue will buckle thin paper backgrounds and warp mounted figures. Dry adhesive handles all flat elements. Foam dots are for dimensional mounting only using them throughout flattens the depth effect you're building.
On patterned paper scale: The 12x12 background sheet is the only place in this build where full-sized scrapbook paper makes sense. For clothing and accessories cut to doll scale, most 12x12 pattern repeats are too large to read correctly. The 6x6 format proportions well with the figure (Scrap Escape).
If the figure sags after closing the box: The foam dots likely didn't have enough surface contact on the back of the figure. Open the box, add a second dot beside each existing one, and press again. Thin or lightly coated paper sometimes needs more grip area than a single dot provides.
One technique worth carrying across all three methods
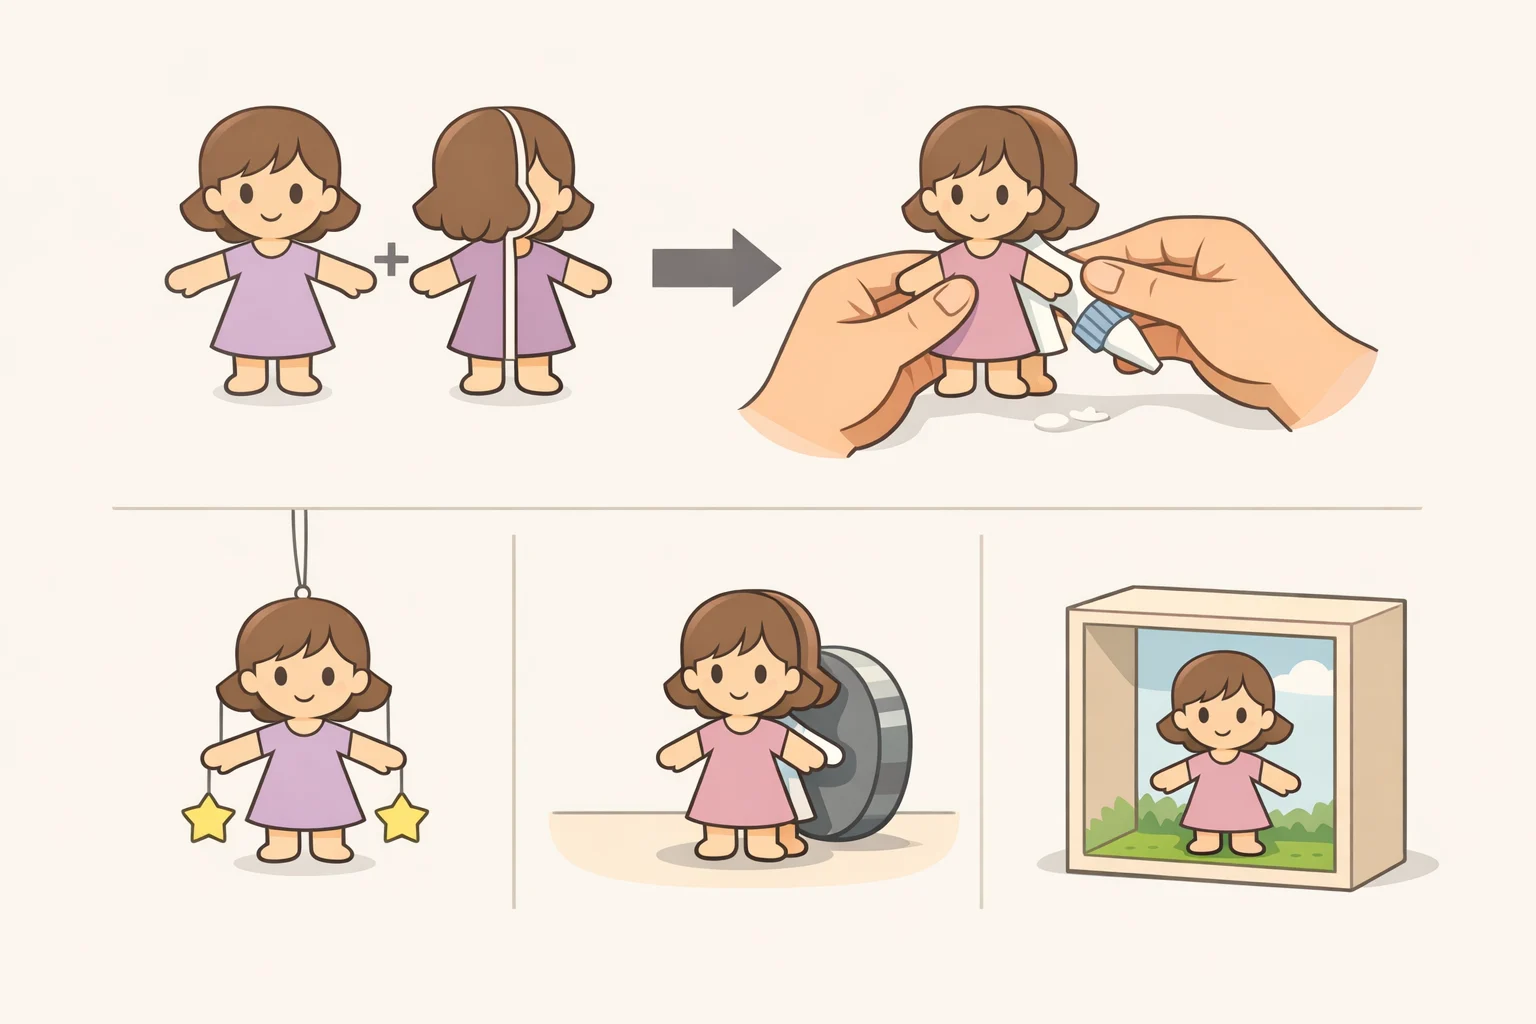
Cut two identical figures and glue them back-to-back. That's it. In the hanging version, this compensates when printer paper is all you have. In the shadow box, it enables posing and provides the rigidity needed to hold a seated shape without sagging. For magnetic pieces, it adds body to the figure if the magnetic sheet alone feels too thin (Scrap Escape).
Scaling up is most natural with the hanging and magnetic methods. Multiple figures can share one string line or one magnetic board without any structural changes to the underlying build (Crafting Quine). The shadow box suits a single composed scene better than a growing collection once it's closed, it's closed.
Start with whichever method matches what you actually have on hand. The skills transfer: what you learn building a hanging doll applies directly when you're ready to build something more permanent.