
This Valentine's Day, swap the cheesy mass-produced greeting card for a handmade version. Not only is a DIY card more meaningful but it's also easy to customize for a personal twist. What's more, with the right approach, you can make a card that costs you next to nothing—we like the sound of that!
Enter pin-prick art, a lovely Victorian craft technique that gained popularity in the United Kingdom during the 1880s. This method, which involves pushing pins through paper to create textured designs, was traditionally used to make Christmas cards with ornate borders. These days, paper crafters have expanded the use of pin-prick cards to include birthday greetings, Mother's Day cards and, of course, Valentine's Day!
Video of the Day
Video of the Day
We gave pin-prick drawings a romantic spin by creating an original Valentine's Day design complete with a free printable template so you can recreate the project at home. Simply scale the image to the size of your card stock and then print and prick away. Just watch your fingers while trying this pretty yet prickly technique!
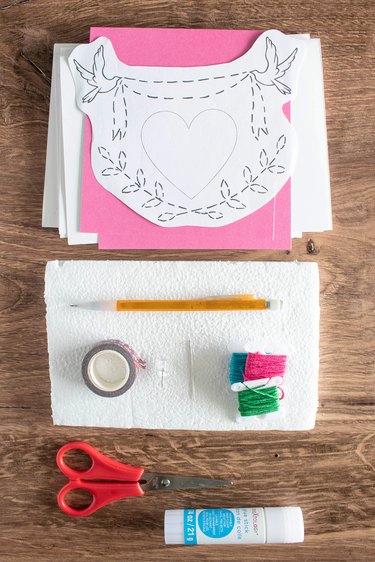
Things You'll Need
Blank greeting cards or card stock
Thumbtack
Washi tape
Pencil and eraser
Scrap foam or cork
Embroidery thread (optional)
Glue stick or double-sided tape (optional)
Tip
To make your own blank card using card stock, simply fold a sheet in half and press down the crease. Trim with scissors or a paper cutter as needed. This is a great way to use paper you already have on hand.
How to make Pin-Prick Valentines:
1. Prepare template
If you haven't already, print the design. Be sure to adjust the scale according to your card; you might need to do a few test runs before achieving the right size. Paper type is not important when it comes to printing the template. You could even snag a sheet of junk paper and print on the blank side.
Once you've printed the design, cut it out. Tape it to the front of the card using a few pieces of washi tape.
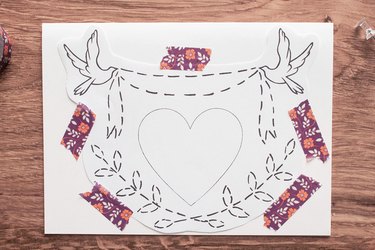
Tip
Washi tape is best because it’s easy to remove and won’t leave marks. But if you don’t have washi tape, masking tape will do the trick.
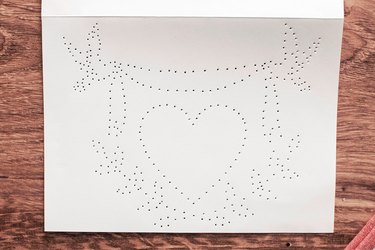
2. Prick pattern in paper
Use a piece of scrap foam or cork as a base for the pricking process. Using a thumbtack, poke holes along the lines. Try your best to evenly space the holes so your finished product comes out looking as neat as possible. Again, watch those fingers!
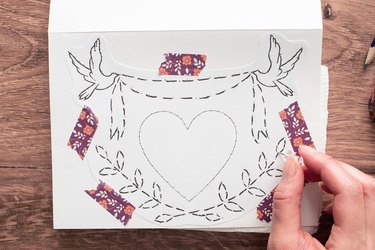
Carefully peel away the tape and remove the pattern. And just like that, you've created a charming Victorian-inspired card!
Tip
Avoid using a flat-topped thumbtack, as this will be too difficult to use and could lead to messy, uneven pin pricks.
3. Customize as desired
For a romantic twist on this fun activity, add a personalized message in the center of the heart. This optional step is ideal for more advanced crafters, as it takes a bit of extra work. We opted for a sweet and simple message of love. Simply write the words in pencil and then prick the card as you did previously. Finish by erasing the pencil marks.

You can also stitch part of the design with embroidery thread. This is a great way to add some color while personalizing the piece. For our card, we stitched the birds, heart and leaves.

Additionally, you can help the rest of the pin-prick design stand out by adding a sheet of bright card stock to the inside of the card. You can use a glue stick or double-sided tape to stick it on. From there, you can write on the card stock and fill the inside with romantic words and sweet nothings.

Tip
If you want to conceal the back side of the embroidery, adhere another sheet of card stock to the back of the card's front flap.
Wishing you a very happy Valentine's Day!