New Year's Eve was one of my favorite holidays as a kid. There's something special about the glitz and glam of it all—and the promise of a fresh start always excited me. While we wore festive NYE hats, blew into noise makers and sipped sparkling apple juice at midnight, my family never decorated for the holiday, instead preferring to savor a few extra days of Christmas decor. I never gave New Year's Eve decorations much thought until I began spending time at my best friend's house during the holidays.
My friend's mom, Christy, was known for holding on to New Year's party hats and masks each year. Over time, she garnered a large enough collection to put together what she called her "New Year's tree." When December 25th ended, she would remove Christmas ornaments from the tree and replace them with sparkling New Year's Eve garb from years prior to create a dazzling display. It created such a simple yet festive way to squeeze out a bit more holiday magic while repurposing Christmas decor from decades past.
Video of the Day
Video of the Day
When I first learned about the tradition, I was completely mesmerized—and to this day, the mere thought of it brings me joy. Sadly, Christy passed away a couple years ago. While reminiscing about her New Year's tree still puts a smile on my face, it also fills me with immense sadness. I'd give anything to see her (and her iconic annual creation) just one more time.
This year, I felt inspired to create something in honor of Christy for the holidays. With her in mind, I made a DIY New Year's tree using a tabletop tinsel Christmas tree, card stock, my Cricut machine and all sorts of embellishments. If you'd like to be part of this unconventional New Year's Eve tradition, read on.
Things You'll Need
Adhesive pearls, gem stickers and glitter (optional)
Tinsel tree (a pine tree or fir tree also works)
Metallic Christmas ornaments (optional)
Floral wire (optional)
How to make a New Year’s Eve Tree:
1. Cut templates from card stock
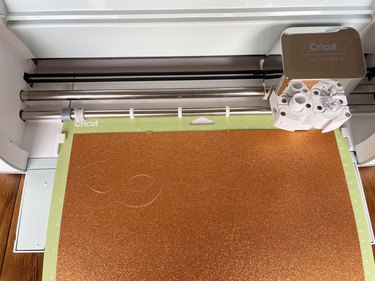
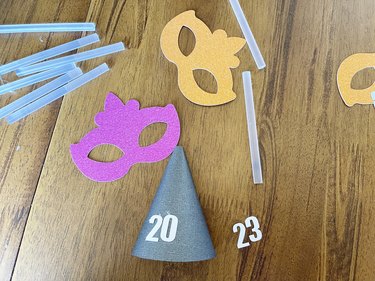
The first step in this DIY New Year's craft is to cut masks and hats out of card stock (unless, of course, you've already been storing items from New Year's Eves past). First, check out these templates and load them to the Cricut Design Space. Add card stock to a Cricut 12 x 12'' StandardGrip Cutting Mat and use Cricut Explore Air 2 (or any other Cricut machine that can handle card stock) to cut. To remove the masks and hats, use a weeding tool.
Don't have a Cricut machine? No problem! Print out the templates on computer paper, cut them out, and use them as a stencil to trace the designs onto the card stock. Then, using sharp scissors or a blade on a cutting mat, cut out each New Year's hat and mask.
Tip
To make the masks and hats bigger or smaller, simply adjust the sizing on the Cricut Design Space or printer settings. The template is big enough to make full-size paper masks and hats but can easily shrink to create mini New Year’s Eve decor. For this project, I shrunk the masks and hats down to 4 in. wide in the Cricut Design Space.
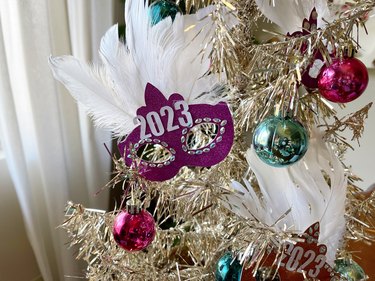
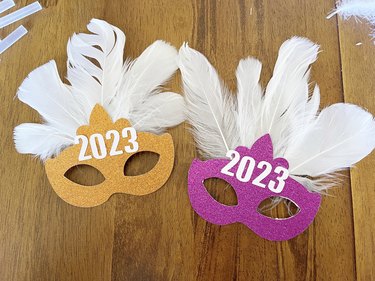
If you wish to add some signage to the masks and hats, use the "2023" and "Happy New Year" templates to create a message out of card stock. For something more customizable, create personalized messaging by adding text in a font of your choice to the Cricut Design Space.
2. Assemble hats and glue card stock pieces together
After cutting out everything, piece the masks and hats together with hot glue. For the party hat template, roll the cutout so its edges slightly overlap and use hot glue along the edges to keep it in place. Add any additional cutouts on top, such as "2023," using hot glue.
The masks won't require much assembly, but if you wish to add "2023," "Happy New Year" or another message, now is the time to do so. Additional options for assembling masks include adding ribbon to either side or a stick on one side to create the illusion of a real masquerade mask.
3. Decorate New Year’s Eve masks and hats
With everything cut out, it's time for the fun part. Decorating mini New Year's hats and masks is all about customizing them to fit your personal style and decor aesthetic. Whether you're a glitter fanatic or you prefer subtle touches of sparkle, you can make each piece your own with the power of hot glue.
I chose to have fun and play with feathered accents, adhesive gemstones and sticker pearls to create some especially festive tree decor. I opted for a single black party hat topper with a collection of mini masks scattered throughout. Because I used glitter card stock as the base of my masks, I opted away from more glitter and jumped right in with embellishments.
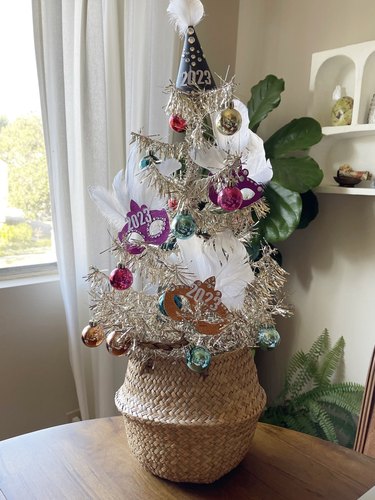
4. Add masks and hats to tinsel tree
Once assembled and decorated, add the masks and hats to a festive mini tinsel tree. Any tinsel tree works for this NYE decoration. If you don't have a mini tinsel tree on hand, repurposing a Christmas tree after the holidays works just as well. For larger green Christmas trees, I recommend filling out the branches with round ornaments in metallic hues (think classic New Year's silver and gold) and wrapping a piece of tinsel garland around the tree for extra glitz.
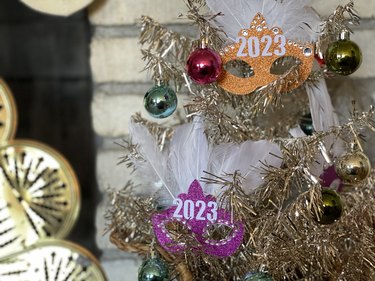
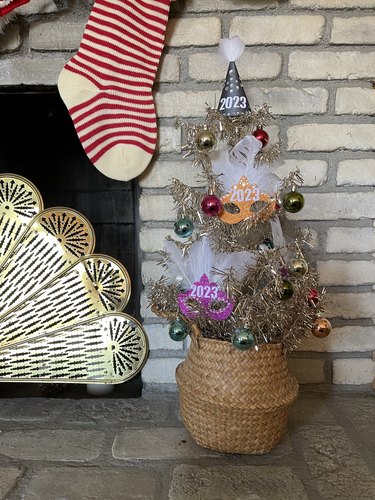
On my New Year's tree, I repurposed the tinsel tree I display during the holidays and left colorful ball ornaments intact for a fun pop of color. Instead of a tree skirt, I repurposed an old planter basket. A terracotta pot would add a stylish touch, as would a section of metallic fabric bunched up around the base. Target is a surefire place to find mini tree collars, including a more rustic galvanized metal option, a gold glitter style and a slick black collar that resembles a top hat—very New Year's chic!
Before attaching masks and hats to the tree, pick a topper. I chose the party hat since it sits perfectly atop my tree without fuss, and the iconic shape feels like a statement-maker. Attach the topper by slipping it over the top of the tree (if using a hat) or hot gluing a strip of floral wire to the back and twisting it around the branch. Next, add masks and more hats around the tree by placing them on branches or securing them in place with the hot glue and floral wire technique.
Tip
Can't get enough NYE decor? Create larger masks and glue them to a large skewer. Decorate masks with gems and feathers and stick them in planters or add them to an evergreen wreath on the front door. (Just be sure the wreath is protected since paper doesn’t mix well with rain and snow.)
Once your New Year's Eve tree is complete, you'll have an eye-catching (and utterly unique) seasonal conversation piece. When the sun sets on January 1, store your tree decor and celebrate the beginning of a tradition that just might endure for decades.
Author's Note: In loving memory of Christy Mayberry, a woman who inspired me to stretch my creative muscles and who always welcomed the new year in style.