Things You'll Need
Wax paper
Pencil
Several feet of 1/2-inch rope, depending on size of letter
Wire cutters or utility knife
Disposable container
4-ounce bottle school glue
1/2 cup cornstarch
1/4 cup water
Craft stick or plastic spoon
Rubber gloves
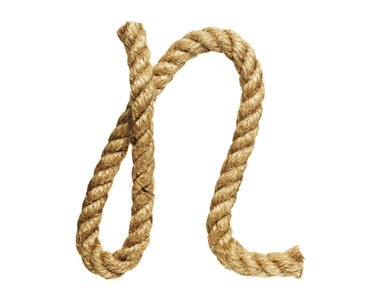
The rustic appearance of rope letters makes them perfect for everything from wall art to embellishments for a gift box lid.The secret to stiff rope lettering is a glue-based mixture that hardens the rope and dries clear. Any clean rope will work for lettering, but a natural rope, such as one made of hemp or jute, has a more organic appearance. Nylon roping is suitable for a project involving bold colors, such as when spelling out a child's name on an art canvas for her bedroom.
Step 1
Cover the work surface with a sheet of wax paper. If you want to create a letter taller than the wax paper you have on hand, put down a second, overlapping layer of wax paper.
Video of the Day
Step 2
Draw a template for the rope letter, such as a capital M, on the wax paper using a pencil. Make a hand motion as if drawing the letter in the air above the wax paper first to help yourself visualize the layout.
Step 3
Set a piece of rope over the letter shape to determine how much rope is needed. Trim the rope at the desired length using wire cutters or a utility knife.
Step 4
Pour the entire bottle of glue into a disposable container. Stir in 1/2 cup cornstarch and 1/4 cup lukewarm water, using a craft stick or plastic spoon.
Step 5
Dip the cut rope into the glue mixture until it is thoroughly coated. Pull the rope out and then squeeze excess glue off by sliding the rope between your fingers while you wear a rubber glove.
Step 6
Place the wet rope over the pencil rope template on the wax paper, adjusting the shape of the rope with your fingers until you feel happy with the design. Allow it to dry and harden overnight. Carefully lift the rope away from the wax paper once it is hard.
Tip
Rope is available in assorted thicknesses, so feel free to use a wide rope for a large letter or a narrow rope for a small letter.
To make letters out of more than one piece of rope, cut and dip one piece of rope for each section, such as the two vertical sides and horizontal bar for a capital H. Overlap the center piece on the other two while the rope dries. A small bit of fishing line tied over the intersections helps keep the pieces together after the glue dries.
To craft rope letters without glue, push a length of thin floral wire between the strands of the rope. You may need to loosen the rope strands to slide the wire through. Wear heavy work gloves and eye protection for safety.
Video of the Day