Everyone has that one drawer or box full of jewelry they no longer wear but can't quite bring themselves to throw away. Christmas is the perfect time to dig out those old necklaces and earrings to create holiday-themed pictures made out of old jewelry. With a little creativity and maybe an assist from your local thrift store, you can produce a stunning Christmas tableau perfect for decorating your home or gifting to a friend.
Supplies for Christmas Jewelry Pictures
Video of the Day
To start with, of course, you'll want to amass your old jewelry. Aim to strike a good balance between larger pieces, like brooches, which can anchor the corners of your picture, and smaller ones, like earrings and pieces of necklaces, to fill in the spaces between. If you don't have enough old jewelry in your own box, swing by a thrift store or two and clean out their jewelry cases. If you plan to place lights around the edges of the tree or integrate them into the body of the tree, you'll also want to purchase small LED Christmas lights on a string.
Video of the Day
At a local craft store, buy some velvet in a seasonal color, ideally a dark color that will show off the sparkle of your jewelry. Pick up fabric glue of a type that's able to provide a safe and permanent attachment for metal being glued to fabric, as well as some flower pins if you're planning to reuse the jewelry after Christmas. You'll also need to buy foam core as a backing for your picture; be sure to buy a soft foam core that pins or earring spikes can easily penetrate.
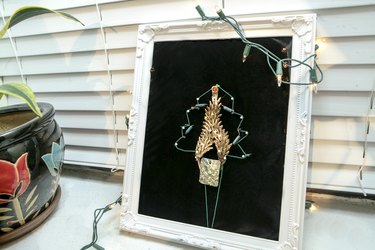
Creating Pictures Made From Costume Jewelry
Start by affixing the velvet to your foam core. Apply the glue to the foam board, place the velvet carefully on top of the board, and press it flat to adhere. When the glue has dried slightly, trim the velvet to match the size of the foam board. If you plan to include lights in your Christmas tree picture, bore small holes in the back of the foam board and through the velvet, where you will insert the LED lights from behind.
For your first attempt, make things a little easier on yourself by starting with an outline for your Christmas tree. Use a long necklace to create an outline, then start filling it in. Don't forget to leave space at the top for a star! When you've laid out a design you're happy with, take a picture with your phone to use for reference. Glue one piece at a time to the velvet, again starting with the outline and larger pieces.
When you're finished with the jewelry, insert the LED lights into the holes you've made and switch them on. This will make the perfect gift.
Helpful Tips for Christmas Tree Art
You don't have to raid your own jewelry boxes to make a vintage Christmas tree. Many thrift stores will give you a steep discount if you buy a large amount of costume jewelry.
If a piece is composed of multiple elements, you can use wire cutters to break them apart and use them separately. Tiny jewelry pieces, like individual rhinestones or pearls, may require you to use a pair of calipers to place them where you want them.
Start with one main color theme, then sprinkle in pieces of other colors as highlights. For a more eclectic look, you can mix and match jewelry of all different colors. Once you've mastered the basic Christmas tree design, using a necklace outline as a guide, you can branch out into other Christmas-inspired shapes, like angels and stars.