Things You'll Need
1/2-inch by 1/2-inch male-to-male compression pipe couplers
1/2-inch brass flare nut
50 1/2-inch carpet tacks
Band saw
Drill with 1/2-inch and 5/8-inch bits
Four-way rasp
Hammer
Sturdy scissors
General purpose glue
2 Boards 1-inch thick by 6-inches wide by 14-inches long
Quality leather and vinyl scraps
Newspaper
Markers
C-clamps
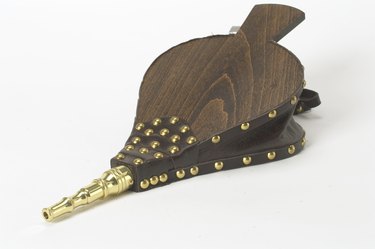
A bellows is essentially two wooden handles and a leather-sealed chamber in which air can be blown out. This handy tool has been used for centuries to stoke fires, forges and furnaces, whether it's for heating, cooking or creating. Older bellows can be found in antique shops, while more modern ones are sold in many home improvement stores. With some key supplies, more adventurous types can also try making their own.
Step 1
Begin by designing your bellows. Lay out a piece of newspaper and draw the outline, from a top-down view, with your marker. There are three basic parts of a bellows: the handle at the rear, the chamber at the center which should be wider than the handle, and the head where the nozzle is. The head should be flat and at least two inches wide at the front. All together the outline is up to you to design, just make sure the very front and rear are flat, the bellows is no more than 6 inches wide at any point, and it is no more than 14 inches long. If your design is much larger than this the bellows will be very unwieldy and difficult to use.
Video of the Day
Step 2
Trace your design onto one of your two boards. Fit that board over the other board and use your C-clamp to secure them one atop another. Use your band saw to cut the outline of the bellows. Smooth and shape the sides of the boards to your liking with the rasp. The four different roughnesses of the rasp will allow you greater control and detail in this task.
Step 3
Unclamp the two boards and set one of them aside for the moment. Use your drill with the 5/8-inch bit to drill two holes into the other board. One hole should be in the center of the handle and the other should be where the center of the air chamber or belly will be. These holes should go all the way through.
Step 4
Take the other board and draw a straight line across the nose where the nozzle would be. This line should be crosswise and about two inches from the end of the board. Cut the nose of the board off and glue it to its counterpart, the board that's been drilled.
Step 5
Use the 1/2-inch drill bit to bore a hole lengthwise down the center of the nose, where the nozzle of the bellows will go. The holes should be center to cut into both the board and the wooden block you've glued to it to emerge visibly out of the rear.
Step 6
Cut a piece of leather 3 inches to each side and lay it over the hole in the center of the bellows on the same side the wooden block has been glued. Tack down two adjacent corners to make your valve flap. It will pull back to suck in air when the bellows expands and cover the hole to prevent air leaking when the bellows contracts.
Step 7
Fit the male-to-male compression pipe coupler to the brass flare nut and slide it into the channel you cut at the front of the board to create your nozzle. Glue the rear against the surrounding wood to seal it into place.
Step 8
Cut another square of leather to create the bellows' outer hinge. Fit the two boards back together so they fit just the way they did when you cut them. The block glued to the one board should line up to the board it was cut from. Place half the leather square on the wooden block and the other half on the board it was cut from and tack the square down into place. Four or six tacks should be sufficient. You now have a hinged bellows; all it lacks is the regulating thong and the leather "boot," which seals the air chamber.
Step 9
Cut a thin strip of leather from your scraps and thread it through the hole you drilled into the handle of one of the boards. Loop it around the other handle and tie it to set the greatest point at which the bellows can expand. This is the regulating loop and without one your bellows would rip when it expands.
Step 10
Now cut the boot, which will form the air chamber of the bellows. This is a very important step. The first thing to do is fit a likely looking piece of leather around the back and sides of the air chamber to make sure you've got the right size when the bellows is at maximum expansion. Cut out the rough shape, making sure that there's a little extra room for error. A thin, high quality leather is necessary for this piece as it will need to fold easily as well as stay airtight. Once you've got the leather cut to the right size paint the edges with glue and push the boot into place. Drive a tack into the lips of the boot every half inch to ensure the leather stays attached and sealed to the wooden paddles. Allow it a full day to dry before testing.
Tip
You should be able to find the leather and vinyl scraps in furniture and upholstery stores. Sometimes they will even pay you to take them away as they are often too small to be of use in furniture, but they are perfect for your needs.
Video of the Day