Leather is simple to sew on a standard sewing machine. Just follow these top tips and you will be well on your way to making the leather project you've always dreamed of.
Note: These tips are also applicable for times when you are sewing vinyl and vegan leather.
Video of the Day
Video of the Day
Suggested Tools:
- Sewing machine
- Leather project
- Matching thread (more details in Tip #2 below)
- Leather needle
- Clips
- Walking/even foot, teflon foot or clear tape Iron, ironing surface and pressing cloth
Tip
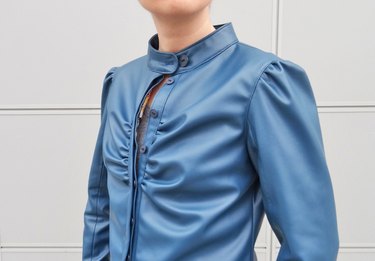
For the purposes of this post, the stitching is red so it is visible. Your stitching should match the project you are sewing.
Tip #1: Choose Your Leather Carefully
Your desired project will determine the type of leather your should use. Detailed projects, gathered leather or close fitting apparel patterns may require a thinner leather with a bit of stretch to accommodate the design. Flatter projects or coats may work better in a thicker, more durable leather.
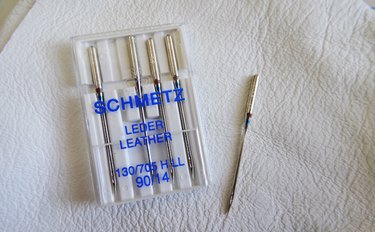
Tip #2: Use the Proper Tools
A leather needle is a must when sewing leather on a sewing machine. The larger needle allows the needle and thread to sew smoothly through the thick multiple layers. Leather needles that fit your sewing machine can be found at any fabric shop.
The thread type is also important. It is recommended that the thread be determined by the project. Projects with lots of use might benefit from a thicker upholstery weight or nylon thread. A thinner leather it is usually fine when sewn with regular all-purpose polyester coated thread.
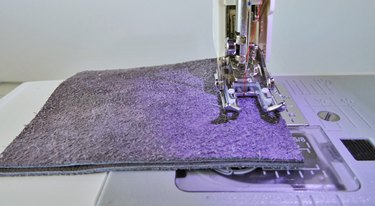
Tip # 3: Slow and Steady Sewing
The power of your machine will determine how you should sew through the leather. Thick seams and topstitching may be harder on your machine. Be sure to guide the fabric straight and try changing your needle or hammering your seam (more on this below!) if your machine sounds overworked.
If your machine is having trouble starting to sew at the edge of a thicker seam, place a folded stack of fabric or leather at the back of your presser foot. If this stack is the same height as the thick seam, the foot will be held in a horizontal position. This will let the seam start more easily.
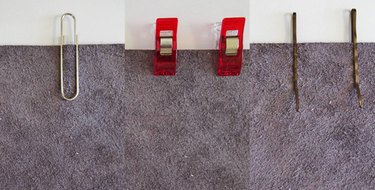
Tip # 4: No Pins Allowed
Any mark made in your leather project is permanent. So care must be taken to only stitch once you are 100 percent certain the seam is correct. Pins will also leave holes in the leather, making it more difficult to hold the fabric in place easily. Instead, substitute sewing clips, paper clips, bobby pins, metal clips or bulldog clips.
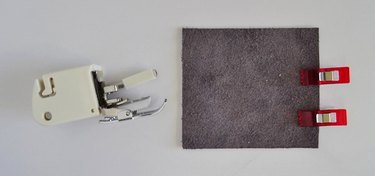
Tip # 5: Slide On Through
On its own, a sewing machine presser foot will tend to stick to the leather rather than slide over it when sewing. The best way to eliminate this is to invest in a teflon foot that fits your sewing machine. Another foot that work well is a walking or even foot. If these are not available, you can temporarily place washi tape or clear adhesive tape on the bottom of your zigzag foot to help it slide more easily.
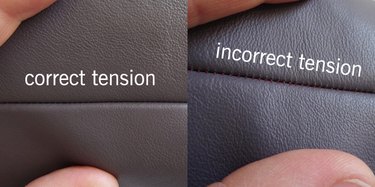
Tip # 6: Test Your Tension
If your machine does not automatically adjust the thread tension, it is best to do a test before beginning your final project. Threads should hold the leather together firmly. When they are pressed to one side and topstitched, the threads should not show. For more information, see our post on how to adjust sewing machine tension.
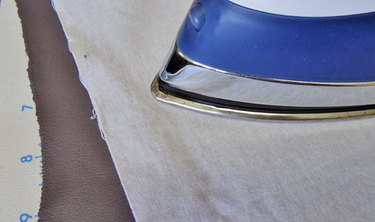
Tip # 7: Press Gently
Leather can be pressed to remove wrinkles. Use the wool, cotton or linen setting – depending on how thick your leather is. Be sure to use a press cloth to ensure your iron and your leather stay clean.

Tip # 8: Use a Hammer
Thick leather seams can be hammered to reduce their height, making them easier to sew through. This is especially nice for topstitched seams and places where you encounter three or more layers of leather. Be sure to cover your leather with a clean press cloth before hammering it.

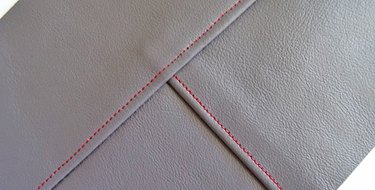
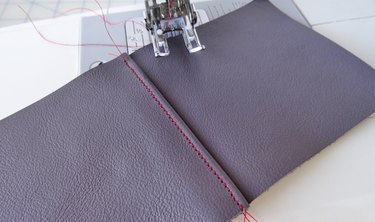
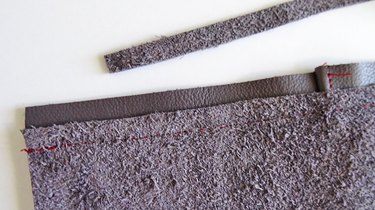
Tip # 9: Topstitch Every Seam
Sewing leather is ideal, because the raw edges do not fray and don't need special finishing. However, projects will lay flatter if they are topstitched in place.Before topstitching, trim the seam allowance of the side that will be covered after topstitching. This helps reduce bulk and allows the seam to lay flatter. It is also ideal to hammer the seam so it will be as flat as possible while you are sewing.
Tip # 10: Lengthen Your Stitch
Leather can be a bit sticky and will tend not to feed quickly through your machine. It is best to sew and topstitch leather with a stitch that is longer than you normally use. This will compensate for the slow-moving fabric by pulling it through faster, creating the perfect stitch length.
More for You: Get special savings on popular sewing classes!
Learn new skills from the world's best sewing instructors. Enjoy up to 33% off HD video lessons you can watch anytime, anywhere. Find sewing classes on sale now >>