
It's time to deck the halls and top the trees! You probably have a Santa hat or angel tree topper in your collection, but there's something so fun about DIYing holiday decor. Our vintage tree topper project makes a perfect craft, and each topper is beautifully inspired by the shapes and lines of art deco, one of the most iconic styles of yesteryear.
If you're feeling inspired, you'll be happy to learn that our tutorial includes three chic designs: a starburst with a mirror center, a star "crown" and a simple (yet shiny) four-point star. Each holiday decor DIY calls for nothing more than basic materials, including jewelry wire, stick-on rhinestones, glittery card stock and even pipe cleaners! It just goes to show that you don't need fancy supplies to make super-stylish Christmas decor.
Video of the Day
And while this twinkling trio of retro tree toppers features gold materials—a classic element of art deco style—don't hesitate to give them your own spin. For example, if you have more natural tones in your home, try using brass supplies. You could even ditch metal finishes altogether and opt for a multicolor look.
Ready to give your traditional Santa tree topper a well-deserved break from his duties? Read on for our step-by-step guide to making holiday tree toppers with an art deco spin.
Video: Art Deco Tree Toppers for a Very Vintage Christmas
1. Starburst Tree Topper
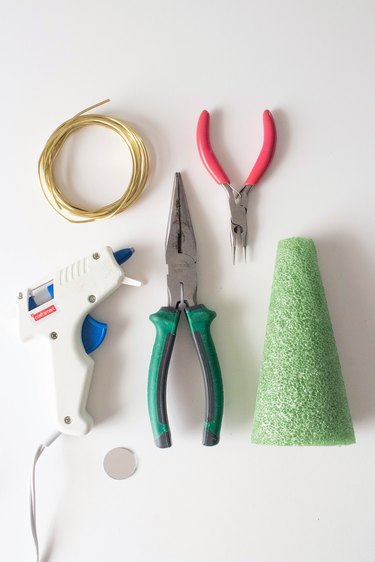
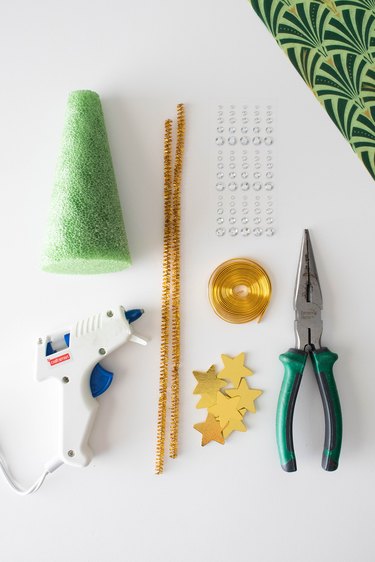
Things You'll Need
12 gauge gold wire
Pliers
Small round mirror
Hot glue
Foam cone
Gold card stock (optional)
Tip
The small mirror will become the center of the starburst, but you can have a lot of fun with this part. Alternative options include a mercury glass mirror (for a more vintage look), a round capiz shell pendant (for a natural touch) or a decorative brass circle (for Victorian vibes). Check out Etsy or flea markets for ideas!
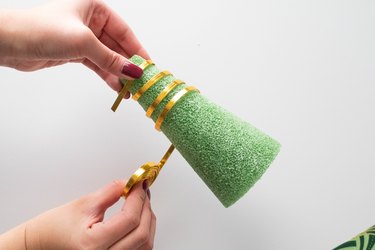
1. Make base
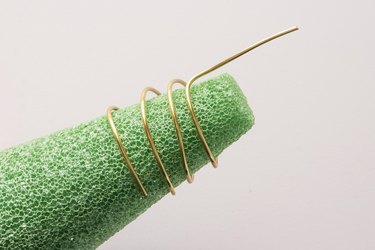
Wrap 12 gauge wire around top of foam cone, leaving about 2 in. at the end. This portion will be glued to tree topper.
Remove spiral base and set it aside.
2. Cut wire

For starburst "prongs," cut wire into 3-in. pieces.
Tip
You might need more or fewer wire pieces depending on size of mirror and how full you make topper.
3. Glue wire
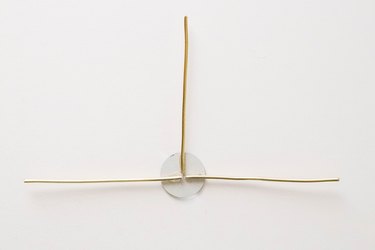
To ensure starburst is symmetrical, you'll need to glue wire in sections. Flip over mirror so back is facing up. Imagine circle in four equal sections, as if there were a cross in the middle.
Hot glue wire on sides and top of imaginary cross. Leave bottom empty, as you'll be gluing spiral base here.

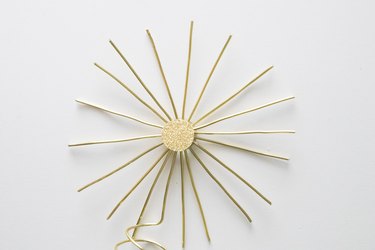
Next, glue a strand of wire between each of straight strands, placing each one in a diagonal position.
Tip
Imagine the circle in four equal sections but separated by diagonal lines. Glue four strands of wire along these imaginary lines, placing them at equal intervals.

Fill out starburst by gluing more wire strands.
Tip
When you glue a piece of wire, always glue another one in opposite spot. This will ensure starburst is symmetrical.
Glue spiral base along bottom of circle.
4. Cover back
If you want to secure wire strands, cover back of mirror with hot glue. You can also conceal it with a gold card stock circle.

To use your DIY vintage Christmas tree topper, place spiral base on top of tree. Pair it with gold, black or turquoise ornaments for an ultimate art deco setup!
2. Star Crown Tree Topper
Things You'll Need
2 gold pipe cleaners
5 mm. flat gold wire
Gold chipboard or paper stars
Adhesive rhinestones
Pliers
Hot glue
Foam cone
Tip
Gold chipboard or paper stars are often available during the holiday season. Alternatively, use a star-shaped paper puncher to cut out shapes from card stock.
1. Make base
Wrap flat wire around top of foam cone, leaving about 1 in. at end. Remove from cone.

Bend top 1 in. upward so it's perpendicular to spiral base.

Using pliers, bend top 1/4 in. to create a hook. Set aside.
2. Twist pipe cleaners

Twist two pipe cleaners together.

Join ends and twist together to create a circle about 3 1/4 in. wide.
3. Glue wire

Using pliers, cut flat wire into five 2 1/2 in. strands and four 1 1/2 in. strands.

Hot glue longer strands around pipe cleaner circle. Again, make sure they're symmetrical and leave space at bottom for spiral base.

Hot glue shorter strands in between.
4. Add stars and rhinestones

Hot glue stars and rhinestones onto wire strands. The exact pattern is up to you!
Tip
For more wintry vibes, add snowflake-shaped rhinestones.
5. Add spiral base

Hot glue hook of spiral base to bottom of pipe cleaner circle.

When styled with Christmas lights and ornaments, your handcrafted topper will steal the show. Tinsel works especially well with this project, as it will match pipe cleaner material.
3. Pointed Star Tree Topper
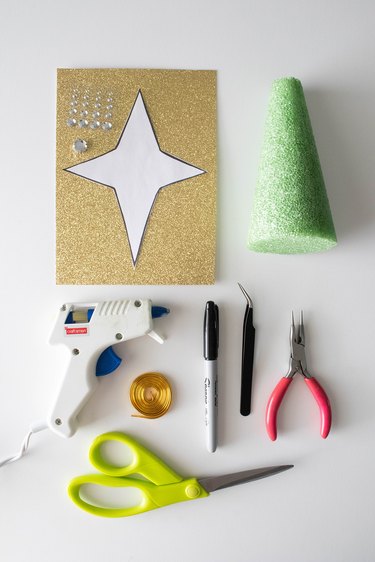
Things You'll Need
Gold glitter card stock
Flat-back rhinestone
Adhesive rhinestones
5 mm. flat gold wire
Pliers
Marker
Scissors
Craft tweezers (optional)
Hot glue
Foam cone
Tip
When choosing glitter card stock for your star Christmas tree topper, remember that you’re not limited to gold. Silver, brass and even red or blue will also look beautiful. Not a glitter fan? Try shiny card stock for a faux glass Christmas tree topper.
1. Make base
Wrap a long length of flat wire around upper portion of foam cone, leaving about 1 in. at the end. Remove from cone and set aside.
2. Cut out star

Print star template at desired scale. (For reference, we printed it at 80% scale.)
Cut out star.

Trace star on back side of glitter card stock.

Repeat so you have two stars.
3. Decorate

Hot glue a large rhinestone to center of star. Accent with smaller rhinestones if you'd like.
Glue two stars together, back sides facing each other. This way, back of star will also be glittery.
4. Finish tree topper

Hot glue spiral base to bottom point of star on back layer.
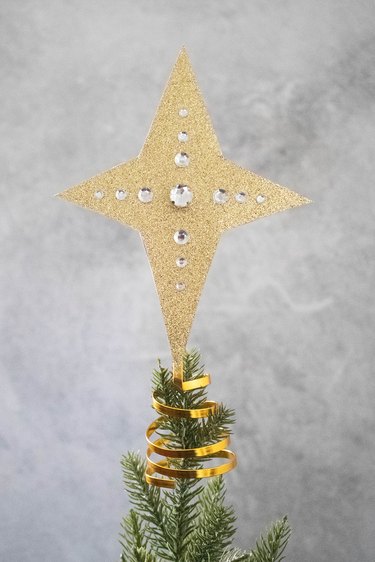
Your star treetop decoration is ready to shine!
Tip
For the perfect ornament/tree topper set, make smaller paper stars and glue ribbon to top. It’s an easy way to make matching Christmas tree ornaments with inexpensive materials.

Although these Christmas tree decorations are designed to be toppers, you can repurpose them as centerpieces. For example, try displaying one in the middle of a tabletop wreath or in a bowl of seasonal fruit. You could even give it a New Year's Eve spin by putting it in a bowl with candy, shredded metallic paper or sparkly vase filler—so versatile!
Merry Christmas and happy crafting all season long!