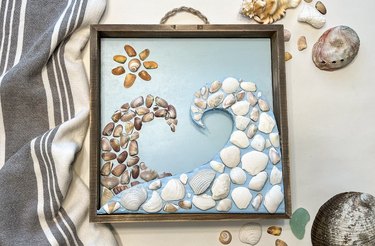
Looking for craft ideas or DIY projects to immortalize summer and add a bit of a beach theme to your decor? Look no further! There's no better way to capture the essence of beach trips and seaside escapes than a seashell craft mosaic. Maybe you brought back seashells from vacation and aren't quite sure what to do with them. Maybe you need an excuse to take another beach trip to collect some more. Or maybe you want to think of the beach every time you enter your family room! Whatever the reason, this mosaic craft project is fun and adds a beachy look to just about any home decor.
Why shell mosaic, you ask? Well, for one thing, we were inspired by the beautiful seashell art and DIY beach crafts of U.K. crafters, like Cornish shell collector @lily_and_sea, British sea glass artist @seaside_gems and Scottish beach art creator @traighalba.
Video of the Day
Video of the Day
And, for more practical purposes, this is one of our favorite seashell craft ideas because you don't need to collect perfectly whole shells. You can also crush and break your shells to fit any oddly sized shape that needs filling. It's also a great kids' craft project—what kid (or adult!) doesn't love collecting seashells on the seashore?
So, what are you waiting for? Grab your seashell collection, some glue and paint and a shadowbox photo frame and let's dive right into the tutorial.
Things You'll Need
100+ shells in different colors and sizes
Tape measure
Shadowbox frame or picture frame with deep edges
Acrylic paints in blue tones
Medium-size paintbrush
Hot glue gun
2-3 sticks hot glue
2 pieces cardboard
Pencil
X-Acto knife
Strainer or mesh sieve
Twine
Hammer
Staples or small nails
1. Prepare the background
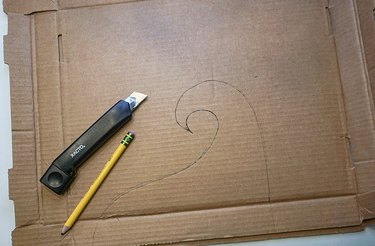
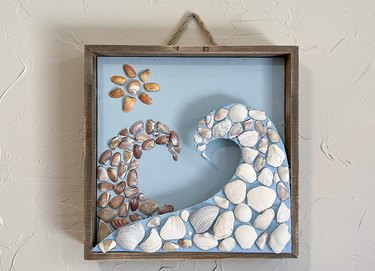
Measure the length of the backdrop of your frame (the space where a photo would be placed). Do not include the frame's outer edge in your measurements. Use a pencil to draw a wave shape that same length onto cardboard. This will be your foreground wave. The curl of the wave should curve toward the left.
Tip
Be sure to choose a frame that has deep edges, similar to a shadowbox. This keeps your shells from protruding beyond the frame. We repurposed an old decorative frame that didn’t have glass and simply painted over the old artwork.
Measure the inner edge of your frame. Draw a horizontal line of the same height underneath your wave shape. For example, we drew a line underneath our wave that ran the length of it and was about 1/2 inch in height. (Once the wave is cut and assembled, this extra edge will sit on the inner edge of the frame.)
Use an X-Acto knife to cut the wave out of cardboard. Paint it in dark blue acrylic paint. Set it aside and let it dry.
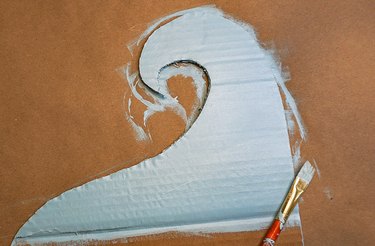
Meanwhile, paint the backdrop of the frame in a lighter blue to resemble the sky. Set it aside and let it dry completely.
Once dry, use your pencil to lightly draw a wave on the left side of the backdrop. This will be your background wave. The curl of the wave should curve toward the right.
Tip
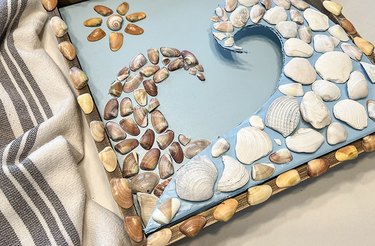
Any seashells will work for this DIY wall art project but be sure to look for a variety of sizes and textures for visual interest. We were able to find mussel shells, clam shells and a few spiraled mollusk shells at our local beach. Don’t worry about finding perfectly whole shells; since this is a mosaic-style craft project, any fragments will do. You can also use sea glass if it better fits your decor theme.
2. Organize your shells
Clean your shells before working with them to remove leftover sand and grime. To do so, place the shells in a fine mesh sieve or strainer and rinse them with water. If they're particularly sandy, you can also wash them with hot, soapy water. Dry them with a towel.
Tip
Lightly tap thicker shells with a hammer to break them into smaller pieces. Then, use these pieces to fill in any empty spaces in your design.
Once dry, group the shells by color and then further divide them into small shells and large shells. This will make finding pieces to fill different parts of your shell mosaic a breeze.
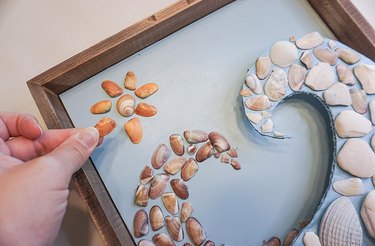
For the foreground wave, group white shells. For the background wave, group gray and purple shells. Lastly, set aside orange shells for the sun.
3. Make mosaic patterns but do a test run first
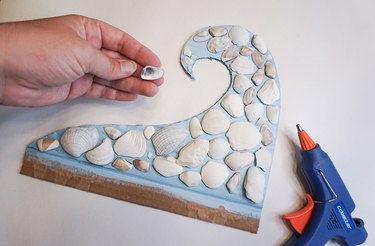
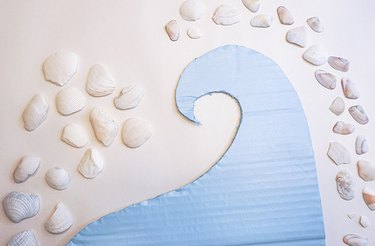
This is the time to let your crafty DIY energy flow! Before you glue the shells, do a trial run by placing shells on the foreground wave and background wave. For the foreground wave, use shells in white and gray tones. Place larger shells toward the bottom and smaller shells up top.
Don't add shells to the extra edge of the foreground wave, as you will need this edge to attach the wave to the frame.
Tip
By placing your shells from largest to smallest going up the wave into the curve, you give yourself more control in creating the perfect wave spiral. Shattered pieces of shell are ideal for creating the curl of the wave.
Moving on to the background wave, begin to place larger gray shells toward the bottom. Add more shells as you go using smaller shells at the top. Again, use shell fragments to fill any gaps and to create the detail at the tip of the wave.
In the top left corner of the frame backdrop, place orange shells to create a sun above the waves. We used a small, spiraled mollusk shell for the center of the sun and seven small mussel shells for the sun rays.
Once you're happy with the layout, it's time to get gluing.
4. Assemble and show off your work!
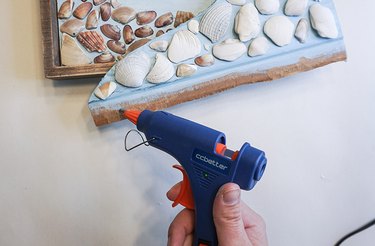
Once everything is dry, it's time to attach the foreground wave to the frame. First, bend the extra edge underneath the wave at a 90-degree angle so it's bent behind the wave. By doing so, the wave should be able to sit upright if you were to set it on a table.
Next, hot glue the extra edge of the wave onto the inner edge of the frame. Hold it in place until it's secure.
Tip
Hot glue is the fastest way to attach your shells. However, if you live somewhere that gets particularly hot in the summer, like Florida, you can opt for a strong super glue. Just be sure to let each shell dry completely before adding the next—and, of course, try not to glue your fingers together!
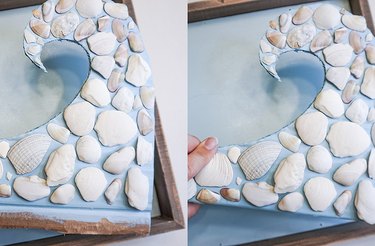
The shells of the background wave will be hidden behind the foreground wave but still visible from certain angles. You can also add glue between the right side of the foreground wave and the right edge of the frame for stability.
Lastly, cut three pieces of twine about 8 inches long and braid them together. This will make the twine stronger and stand out more against the frame. Attach the braided twine to the back of your frame with hot glue. For extra stability, add staples or small nails.
If you have leftover shells, you can glue them on the outer frame.
Then, hang it in your home or share it as a keepsake item and bring on the beach vibes!