Bring a little hygge into your home this season with a cute traditional Scandinavian ornament. In Sweden, they're known as a Tomte. If you're in Norway, you'll hear them called a Nisse. You might even know them as Gnomes. Originally, they were Nordic folklore creatures who were believed to be responsible for protecting the farmstead, but make sure you treat them right or they'll become very mischievous. So grab some old sweater remnants, a sock and a little rice and you'll be hangin' with your "gnomies" this winter, too. (Gnome pun intended. Ha!)

Video of the Day
How to Make Christmas Gnomes

eHow may earn compensation through affiliate links in this tutorial.
Things You'll Need
Sock
Sharp scissors
Rice
Faux fur
Marking pen
Small wooden bead
Sweater remnant or felt
Chopstick or pencil

Step 1: Remove the Toe From a Sock
Cut approximately 5-inches from the toe of the sock. You can adjust this measurement for smaller or larger Christmas gnomes.

Step 2: Fill With Rice
Fill with rice until it is the shape and size you'd like for your gnome.

Step 3: Close the Top of the Sock
Close it up by gathering up the top edges and tying an 1/8-inch piece of elastic cord around the top.

Step 4: Snip the Gnome Beard
To create the beard, draw a triangle on the back side of the faux fur. The top of the triangle should be the same measurement as halfway around the body of your gnome, and the nap of the fur should be pointing down from the top of your triangle.
Use a sharp exacto knife to cut from the back side of the faux fur along the triangle marks. Do NOT use scissors because it will cut all of the nice fur.

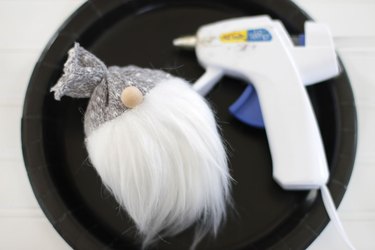
Step 5: Attach the Nose and Beard
Attach the faux fur to create the beard and the wooden bead to create the nose with a hot glue gun.
Step 6: Measure For the Hat
Measure around your Christmas gnome's head and add a 1/2-inch. This will be the bottom measurement of the hat. The height measurement depends on how tall you'd like your hat to be. Use the bottom finished hem of the sweater remnant as the bottom of the hat. Cut a triangle shape.
Tip
If you previously made a pair of mittens from an old sweater, this would be a nice way to use up the rest of the sweater. If you don't have any sweater remnants, you could also use felt for the hat.

Step 7: Sewing the Hat
Fold the triangle in half with the right sides together and sew along the edge. Clip the tip of the hat to reduce bulk. Turn the hat right side out, using a pencil or a chopstick to push out the tip.


Step 8: Stuff the Hat
Cut a piece of craft wire that is the same height as the hat. Place it inside the hat then fill loosely with stuffing.

Step 9: Mount the Hat to the Gnome
Use a hot glue gun to attach the hat to the top of the gnome. The gnome will look better if you pull the hat down over the nose a bit.

Gnome for the holidays!


Buy materials for this tutorial: