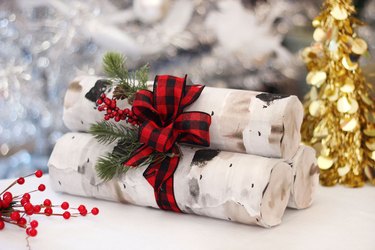
During the winter holidays, we love the sight of logs by the fire. But take a closer look—these aren't logs, they're gifts cleverly wrapped in mailing tubes decorated with DIY "birch bark" wrapping paper. What a fun way to showcase your holiday packages so they stand out under the tree! People will say that when it comes to wrapping presents, you definitely have a gift.
DIY White Birch Gifts
Video of the Day
Things You'll Need
Mailing tubes
Box cutter or saw
White paper
Black tempera or acrylic paint
Water
Plastic cups
Paint brush
Red and green tempera or acrylic paint
Paper plate
Paper towel
Black marker
Glue
Scissors
Ribbon
Sprig of pine
Step 1: Cut the Mailing Tubes
Mailing tubes come in various sizes. I recommend tubes with at least a three-inch diameter so they are large enough to hold gifts. If the mailing tubes you find are long, you'll want to cut them up into smaller sections. The tubes used in this example were 36 inches long, so I cut them into three 12-inch pieces. You can use a box cutter or a saw, which makes slicing through the cardboard tubes very easy.
Step 2: Paint a Gray Base
We'll be painting a birch bark pattern onto white paper and gluing this faux bark onto the mailing tubes. Start by mixing about three drops of black tempera or acrylic paint with two tablespoons of water in a plastic cup. It will look like very diluted watercolor.
Cut a piece of white paper that will cover the mailing tube, allowing for extra paper to extend past the ends of the tube. Use a paintbrush to apply stripes of the diluted black paint along the paper. These stripes will go crosswise, rather than lengthwise, along the logs, so orient your stripes accordingly. Allow the stripes to be uneven, with some being darker than others. The wet paint will cause the paper to crinkle, which will add realism to the bark. The crinkling will also cause some of the paint to puddle, which is also a good thing.
Tip
Use white paper that is matte instead of glossy so the paint gets absorbed into the paper. Butcher or craft paper works well.
Step 3: Add Brown Accents
Birch branches aren't completely white and black. There are usually touches of brown throughout. To add these brown accents, mix a batch of brown watercolor using about a drop each of red and green tempera or acrylic paint and two tablespoons of water in a plastic cup. Examine the color as you mix, and add additional red or green paint to get a dark shade of brown.
Apply random dabs of brown paint in four to six spots of the paper. They do not have to be any particular shape. Allow some of the paint to puddle in the crinkles of the paper. As you can see, the more imperfect your painting, the more like birch it will look.
Step 4: Add Black Markings
Birch bark has black markings, which are technically scars from broken branches. Adding these black spots really makes the faux bark come alive (and it's fun to do). Place some black paint on a paper plate. Then scrunch up a paper towel and dip it in the paint.
Using the paper towel as a stamp, apply black spots in random places along the paper. Make some markings smaller and some larger. Allow the paint to dry.
Step 5: Add Black Notches
The final touch to the faux birch is the small black notches that punctuate the bark. With a black marker, draw rows of notches that go in the same direction as the base gray stripes. Try to make these notches look like skinny capital letter Ds rather than just vertical lines.
Step 6: Tear the Paper Edges
Tear a jagged line around the paper so the faux bark has natural edges. This approximates the peeling bark that is characteristic of birch.
Step 7: Wrap the Mailing Tubes
Wrap the faux bark around the mailing tubes and glue the paper in place. Notice how the uneven edges create a nice design element for the bark.
Step 8: Create the End Caps
Place your gifts in the mailing tubes before sealing the ends. Fold the excess paper on either end to cover up what's inside the tube. If you're like me and have friends and family who will want to peek inside, you'll want to make end caps for the faux logs.
Trace circles with the end of the mailing tube, and paint these circles with the brown watercolor paint. Again, puddling is good.
When the circles are dry, cut them out with scissors and glue one to each end of the log.
Step 9: Stake the Faux Birch Logs
Stack three fake birch logs together for a picture perfect pile of firewood.
Tie a bow around the three logs, then tie a sprig of real or artificial pine to the bow and you're done. I'd have to say that making these faux logs is sure a lot easier than actually chopping wood.