
Beautiful, delicate and modern, these lace votive holders provide elegant lighting for weddings, romantic dinners or outdoor picnics. One would think they were from an expensive boutique, but they are actually easily made from doilies found at a flea market.
Things You'll Need
Video of the Day
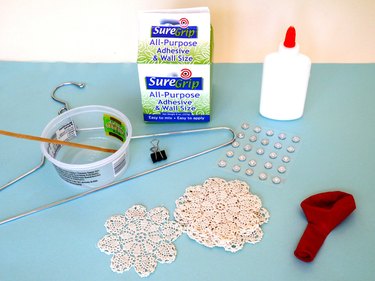
- Wallpaper glue
- Disposable mixing bowl and stirrer
- Balloon
- Wire hanger
- Small binder clip
- Lace doilies, 4-inch diameter, 7
- Pin or needle
- 1/4-inch decorative gems
- White glue
Video of the Day
Step 1: Mix Wallpaper Glue With Water

Mix 2 tablespoons of wallpaper glue and 1 cup of cold water in the disposable container. Mix the ingredients thoroughly. Set the mixture aside to thicken for 15 minutes -- it should thicken to the consistency of cake batter.
Note: The glue will seem thin after mixing but will quickly thicken over a few minutes. If the glue seems too thin or thick after 15 minutes have passed, adjust by adding more water or more glue until a cake batter consistency is reached.
Step 2: Blow Up the Balloon
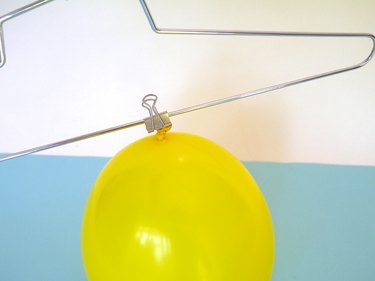
Blow up the balloon to 6 inches in diameter. Tie and clip it to the wire hanger with the binder clip.
Step 3: Glue a Doily to the Balloon Bottom
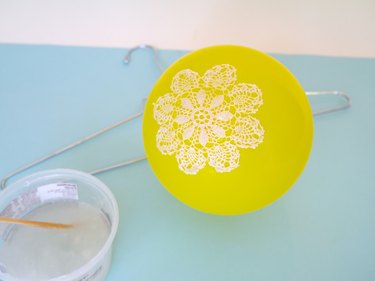
Dip one doily in the wallpaper glue and remove the excess glue with your fingers. Stick the doily to the bottom of the balloon with the right side facing out. Gently smooth out any lumps with your fingers.
Step 4: Attach the Remaining Doilies
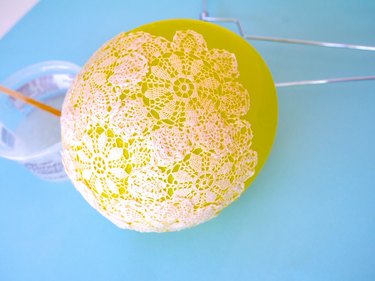
Dip another doily into the glue and place it on the balloon just above the bottom doily. Overlap it with the bottom doily by about 1/4 inch. Smooth out any lumps. Dip and place another doily next to the last, again overlapping it by about 1/4 inch. Continue this process around the middle of the balloon until the doilies are in the shape of a bowl. Double check to make sure all doilies are overlapping one another. The doily "bowl" should be well-saturated in glue and seem quite heavy. However, you should remove any lumps or thick globs of glue.
Step 5: Hang the Balloon Up to Dry
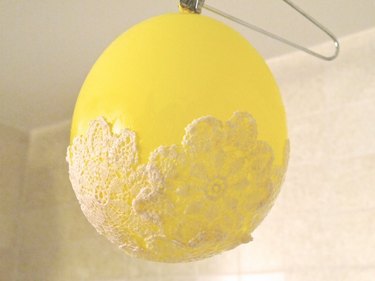
Hang the balloon up to dry inside to avoid drafts. A shower rod works well for this step. Allow it to dry for 24 to 36 hours.
Step 6: Pop the Balloon
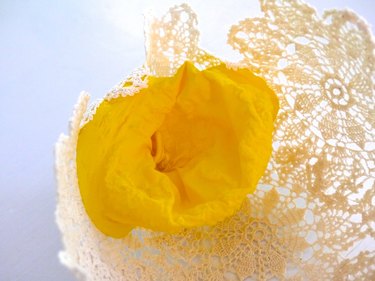
When the doilies are completely dry, pop the balloon with a pin or needle. Carefully pry the balloon away from the sides of the doilies. The doilies may bend in a little, but will straighten out when the entire balloon is removed.
Step 7: Add Decorative Gems
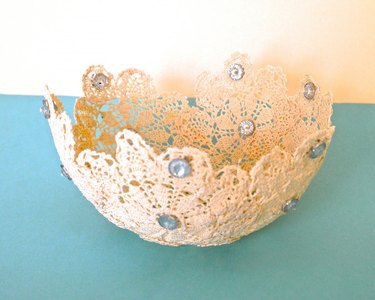
Add decorative gems or sparkly embellishments to the inside and outside of the doily candle holder with a small amount of white glue. Then, add a votive tea light to the inside of the lace bowl. Add a small dab of white glue to the bottom of the tea light and let it dry before lighting. This will keep the candle securely in place so it doesn't burn the edges of the lace. Alternatively, you could use a flameless tea light.