Angle iron has been around for years. It's used in all kinds of construction projects including most industrial and commercial buildings. Due to it's angular shape -- which is 90 degrees -- angle iron is strong and resists bending or warping. It's available in almost length and can be cut by hand with a hacksaw.
Definition
Video of the Day
Angle iron looks like a flat piece of steel that's bent lengthwise in the middle at 90 degrees. For example; if 1-inch angle iron were smashed out flat, it would be 2 inches wide. The bend in the angle iron gives it tensile strength. It won't bend unless extreme force is applied to it. Angle iron comes in a variety of widths, but the most routine is 1/8-inch thick with sides that are 1 inch wide. Angle iron is used to build industrial-strength tables, shelves and framework of all kinds. It's sometimes installed in concrete to give it strength or as mounting hardware for a multitude of uses. It can be drilled or cut by hand, but a power hacksaw or reciprocating saw is best if you plan on making angled cuts. Pick up angle iron at any scrap yard in miscellaneous sizes or go to a home supply store with measurements and they can cut what you need to build a table.
Video of the Day
Miters
The best angle-iron tables use 45-degree mitered corners, just like carpenters use on wood. Measure out the length and width of your table, cut the pieces to length and then miter the corners a 45 degrees to form the frame for the tabletop. You can also order the angle iron with mitered corners. The 90-degree lip on the frame provides the perfect place for the plywood, particleboard or solid wood top. For an indestructible angle iron table, cut a 1/4-inch steel plate to fit into the lip, or on top of the plywood. The legs do not need miters. The corners of the frame fit flat inside the angled corners of the legs. After the tabletop frame is completed, place it upside down, and clamp the legs at the corners.
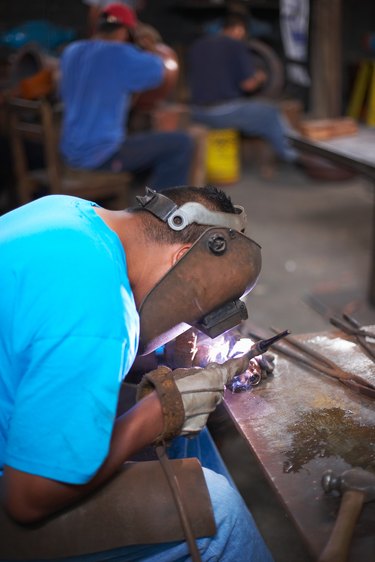
Joining the Parts
Arc welding is the best option for assembling your angle-iron table. Angle iron welds permanently and fills voids. If you're joints are not perfect, you can easily fill the cracks with weld and nobody will notice. Another option for assembly is drilling holes and bolting the pieces together. This works well for the legs, and you could feasibly bolt the tabletop frame together as well, but your table would lack the integrity of a welded table. If you're going to all the trouble to build a steel table, don't skimp. Use the welder. Other options for welding include acetylene torches, but arc welders are easier to operate and more user friendly. Rent one at your local equipment-rental store.
Top
To make your table look more presentable, paint it black or any other color that goes with your decor. Cut strips of oak hardwood to fit along the sides of the legs, the tabletop or anywhere you like. Drill a few holes through the angle iron and bolt or screw the pieces directly to the table for a designer look, or use brass accents for a "steampunk" look, which is a combination of brass and machinery. Top it off with a 1/4-inch thick glass tabletop inside the lip on the frame. Other options include gluing fabric to the table, or painting it bright colors. Or you could just use the table as a welding table. This type of table is particularity suited to welding because it grounds the welder, and it's almost indestructible.