Things You'll Need
1 gray union suit (full body)
1 sheet blue felt
Scissors
Gray flannel fabric, 3 inches by 24 inches
Sewing machine
Gray thread
Fiber fill
Safety pin
2 packages sticky-back hook-and-loop fastener dots
Measuring tape
Chalk
2 packages 1/2-inch elastic
Gray knit cap
Hot glue
Hot glue gun
2 skeins white fur yarn
4 gourds, various sizes and shapes
1 tall stick, 5 foot tall,1 1/2 inches in diameter
8 ounces black craft paint
4 ounces red craft paint
4 ounces yellow craft paint
Flat-edged paint brush, 1-inch
1 spool 1/2-inch hemp rope
Orange-red face paint
Red face paint
Blue face paint
Black face paint
White face paint
You're sure to make everyone do a double take when you sport your handmade Rafiki "Lion King" costume. Whether you want to be the life of the party, the star of the stage or just a party animal, this Rafiki costume is sure to deliver. The costume can be made in just a few hours, and both new and experienced crafters can make it with ease.
Rafiki’s Bodysuit
Step 1
Cut two ovals from the blue felt that measure 6 by 8 inches.
Video of the Day
Step 2
Remove the protective plastic from one side of the hook-and-loop fasteners. Press this side against the felt oval. Don't remove the protective plastic on the other side. Place one fastener onto the top and bottom of the oval and add three along each side. Repeat this step onto the other felt oval.
Step 3
Lay the gray union suit onto a flat surface. Measure 3 inches upward from the center inseam. Mark that spot with a chalk X.
Step 4
Remove the protective plastic from the sticky-back hook-and-loop fasteners on the back of the felt ovals. Using the X-mark as a guide, place one oval to the left of the X and the other one to the right of the X, long sides horizontal. Press the pieces down to create a strong bond.
Step 5
Create Rafiki's tail. Fold a 3-inch by 24-inch piece of gray flannel in half so that the right sides are together. Sew along the long edge and one bottom edge. Turn the tail piece right side out. Stuff the tail with fiber fill. Turn the unfinished edge inside and stitch the opening closed. Center the tail above the blue ovals and attach it with a safety pin.
Rafiki’s Hair and Beard
Step 1
Measure your head from below your chin to the top of the back of your head. Cut a length of elastic equal to that measurement.
Step 2
Hot glue the elastic end pieces together to create a large circle. Hot glue one end of the circle to the top and sides of a gray knit cap.
Step 3
Cut several 8-inch lengths of white fur yarn. Hot glue the yarn to the elastic piece glued to the knit cap. Make sure to cover all of the elastic. Cut more pieces of yarn as needed. Amounts will vary depending on the size of your circle.
Rafiki’s Staff
Step 1
Paint four various sizes of gourds. Paint three red and one yellow with craft paint. Set the gourds aside to dry.
Step 2
Paint a 5-foot tall stick with black craft paint. Use at least two coats of paint for complete coverage. Allow the paint to dry.
Step 3
Cut four 24-inch sections of hemp rope. Wrap one end of each section 5 inches below the top of the staff. Wrap the ropes around the staff at least three times. Secure them to the stick with a knot. Add a dab of hot glue for more stability.
Step 4
Wrap the loose ends of the hemp rope around the gourds. Use one section of rope for each gourd. Tie them in place and add hot glue to the gourd just below the edge of the rope. Press the rope onto the glue. Trim any excess rope.
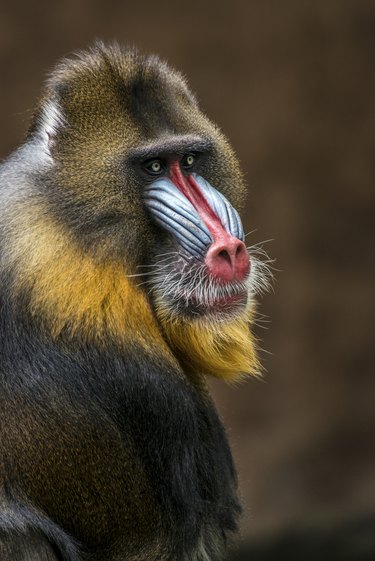
Rafiki’s Makeup
Step 1
Paint the space between your eyes, along the top and sides of your nose and the tip of your nose orange-red. Extend the paint from the bottom side of your nose outward half 1 inch on each side and down between your top lip and nose.
Step 2
Paint the bottom portion of your face red. The paint should follow the sides of your face and extend upward to the bottom of your cheeks. Make sure to paint the area beneath your nose and around your lips.
Step 3
Paint your cheekbones blue from beneath your eyes to right above the red face paint. Add three horizontal black lines across the blue paint.
Step 4
Paint black circles around your eyes. The circles should cover your eyelids and your eyebrows.
Step 5
Paint your forehead white.
Video of the Day