Things You'll Need
Thread
Bobbin
Brother sewing machines in the VX700 range date from the 1980s and early 1990s. They are all similar machines, and all are threaded in the same way. The Brother VX710 is a basic model that sews 8 different stitches: straight, zigzag, a few ornamental stitches and a buttonhole stitch. You can control the stitch length and width, along with the upper and lower tension on the Brother VX710. Threading the machine properly is key to making sure the machine functions well and creates even stitches.
Step 1
Turn the take-up lever, which is located on the far lefthand side of the machine. It makes the needle move up and down. Move the take-up lever until the needle is in its highest position. Locate the small metal lever just above the needle and flip it up. The presser foot should raise up when you flip this lever.
Video of the Day
Step 2
Place a spool of thread into the thread holder on the top right-hand side of the Brother VX710. The thread holder is a metal pin that is about 3 inches long and stands straight up. Pull thread from the spool to create a tail 6 to 8 inches long.
Step 3
Pull the thread through the upper thread guide on the lefthand side of the machine. The upper thread guide is a piece of metal that holds up the bobbin tension guide, the thing that looks like a screw, and it has an eye to hold thread. The upper thread guide is below this screw-like tension guide. Push the thread through the thread guide's eye and pull it toward you.
Step 4
Pull the thread down and through the upper tension disks, which are just below the upper thread guide. Make sure the thread is secured between the disks by pulling it slowly and moving the tension wheel, the wheel right next to the tension disks, to a higher number. The higher the tension is set, the more slowly the thread will pull through.
Step 5
Pull the thread down and wind it up through the thread guard, a piece of hooked metal sticking out below the tension disks. Pull the thread up from left to right. Inside the thread guard is a small spring. Pull the thread into the spring so that it catches.
Step 6
Pull the thread up through the thread take-up lever. This is a small lever above the upper tension disks. Pull the thread around the back of the lever, from left to right. There is a small slit in the take-up lever with an eye at the end of it. Pull the thread through the slit and into the eye.
Step 7
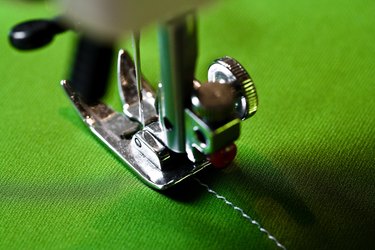
Pull the thread down through the first thread guide, a little piece of metal below the thread guard. Secure the thread in the first thread guide's slit by pulling it into the slit from right to left. Pull the thread into the second thread guide, a small slit of metal just above the needle. Secure the thread into the second thread guide by pulling it into the slit from left to right.
Step 8
Push the thread through the eye in the needle, the small hole at the top of the needle, from front to the back. Pull the thread away from you, leaving a tail about 2 inches long.
Step 9
Open the bobbin holder under the needle plate and remove the bobbin case, the metal object inside, by pulling up on the lever on the front of the case. Place the bobbin in the case and the pull its thread out to create a tail 4 to 5 inches long. Run the thread through the slot in the side of the case and pull it to the left until it enters the bobbin's eye, the small hole at the bottom of the spring case. The spring case is the piece of metal that wraps around the side of the bobbin case to control the bobbin's tension.
Step 10
Lift up on the latch on the front of the bobbin case and place it into the bobbin holder. Wiggle it into place until it is stable. Let go of the bobbin lever. Pull on the bobbin case lightly. If it does not come loose it is secure.
Step 11
Hold the thread extending from the needle and lower the needle by turning the take-up lever slowly into the bobbin holder until the needle's thread catches the bobbin thread and pulls it above the sewing plate. Pull both threads out about 4 inches.
Video of the Day