
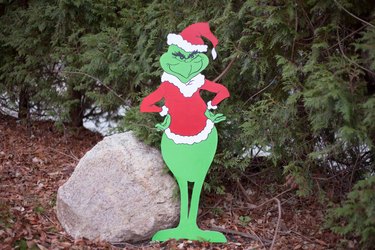
Perhaps you've been online or have driven by someone's house and seen a cleverly placed Grinch wood cutout. These fun and festive decorations can add a sense of humor and a familiar, comfortable character to your yard's holiday feel.
As you can imagine, buying a wooden Grinch from a craft store or an individual vendor can be expensive. There's no need to break the bank or search high and low, because you can make your own DIY Grinch with just a few simple materials.
Video of the Day
Video of the Day
Things You'll Need
Sheet of plywood for outdoor use
White paint
Picture of the Grinch
Overhead projector (optional)
Pencil
Jigsaw
Protective gloves and eyewear
Outdoor latex paint: white, black, green and red
Brushes
Clear acrylic paint
How to make a Grinch wood cutout
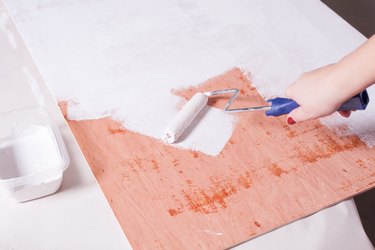
Gather the materials and paint the plywood
First, refer to the comprehensive list and gather all of your materials. Next, paint the front and back of a large piece of plywood white. This will give you an excellent blank canvas on which to start, and your pencil markings will also show up to guide you. Allow the paint to dry completely.
Transfer the image of the Grinch
The next step involves transferring the actual image of the Grinch onto the dry, white plywood. How you go about doing this depends on your artistic abilities and what is easiest for you. The simplest method is to draw the Grinch onto the plywood with a pencil by hand. You'll need to have some artistic talent, and it's recommended to look at a picture of the Grinch as you go.
If you're not a great artist, you can print out an outline of the Grinch to trace onto your piece of plywood. There are many Grinch plywood cutout patterns that are free and available online. First, make sure the dimensions are correct for the size that you want. If not, you can download it and try to blow it up. Either way, tape down the paper onto the plywood while you're tracing so that it doesn't slide around.
You have one other option for transferring the image of the Grinch onto your plywood. You can actually use a projector to shine the Grinch cutout pattern onto the plywood and then draw it from that. Once again, make sure that the plywood is stable and won't wiggle around while you trace.

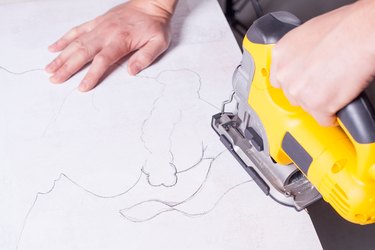
Cut out the shape
Now that you have your Grinch all traced and ready to go, it's time to cut him out. The best tool for this job is a jigsaw. You can try to use a handsaw, but it probably won't be very precise, and you won't necessarily end up with the exact look you want. Similarly, a larger saw would be too unwieldy and unable to make the sharp corners around the outline of the Grinch.
Be sure to take proper precautions when using the jigsaw, including wearing protective gloves and eyewear.
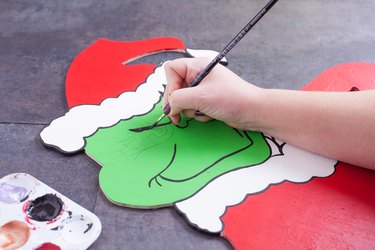
Paint the DIY Grinch
Next, paint your Grinch. You just need basic colors, like red, green, white and black. Just be sure to test the colors to make sure they're the ones you want. You may need to do more than one coat.
Finish your Grinch cutout
Once you're finished and the last coat is completely dry, cover the entire thing with another coat of clear acrylic paint. You can even use a spray, and this will protect it from the elements.
Tip
Make a sleigh, Cindy Lou Who and Max the dog to create a Grinch party for your outdoor Christmas decorations. Throw in some life-size candy canes just for fun.
Other indoor and outdoor holiday decor ideas include using this craft to create DIY Christmas wall decor, door hangers and Christmas tree ornaments.