Roller shades are some of the easiest window treatments to install. Most shades are mounted with a simple metal or plastic bracket at each end of the shade, and the brackets are installed with two or more screws. The installation process varies only slightly with the different mounting options: inside mount, outside mount and ceiling mount. But there are a few things to consider before you get started.
Tip
Remember, the fabric you select will affect the amount of light that filters into your room, or the amount you want to keep out. For homes with babies or young kids, roller shades with blackout fabrics are an easy way to keep sunlight from creeping into rooms and waking kids up. (Moms and Dads, you’ll love this choice… especially on the weekends!)
Video of the Day
Mounting Options
An inside-mount shade fits inside the window opening and installs with the brackets screwed into the window itself or into the wood or drywall jambs around the window — either the side jambs or the top jamb. The shade is wider than the glass area of the window but is smaller than the window opening.
Video of the Day
A outside-mount shade typically is wider than the window opening and installs with brackets on the window casing (the wood molding that overlaps onto the wall) or directly onto the wall surface around the window.
Ceiling-mount shades also are wider than the window opening, and they mount to the ceiling directly above the window. The main advantage of a ceiling mount is that the shade doesn't cover any of the window opening or the casing when the shade is rolled up.
Roller Shade Installation Basics
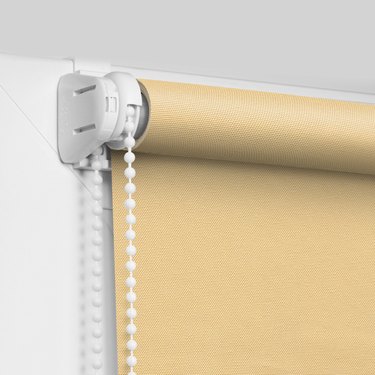
The two main types of roller shades—spring-loaded and sidewinder—install almost identically, with one minor difference. On spring-loaded shades (the kind that retracts with an internal spring), one of the mounting brackets has a hole that accepts a round pin on one end of the shade; the other bracket has a slot that accepts a flat tab on the opposite end of the shade. The tab is connected to an inner coil spring that tensions the shade roller. Sidewinder shades, on the other hand, are rolled up and down with a chain or cord. Because they don't have an inner spring, they don't have a special tab bracket.
When installing either type of shade, drill pilot holes for the bracket screws if they are going into wood. This helps to prevent splitting the wood and makes it easier to drive the screws. If the brackets will mount to the wall or ceiling drywall and there is no wood framing behind the drywall, install hollow-wall anchors and drive the bracket screws into the anchors. Screws alone aren't secure enough in drywall. The best type of anchor for this application is a screw-in type drywall anchor, which installs easily with a power drill.
How Close to the Window?
With most roller shade installations, you can decide how close to mount the shade to the window (or to the casing, for outside and ceiling mounts). The closer the shade is to the window glass, the more light it will block. However, the shade must be far enough away from the glass to easily clear any locks, handles or other obstructions on the window itself. Measure how far the obstruction sticks out from the window, and account for this when locating the shade mounting brackets.
Installing Your Roller Shade
The easiest, most foolproof way to install a roller shade is to fit the mounting brackets onto the ends of the shade and hold the assembly up to the window (or wall or ceiling, as applicable) to mark the bracket locations:
- Hold the shade in the desired position, then fit both brackets against the mounting surface. Make sure the shade is parallel to the top of the window and has plenty of room to roll without touching the window, jamb or molding (the shade should be completely rolled up).
- Mark the insides of the screw holes in the mounting brackets, using a pencil, then remove the shade and brackets.
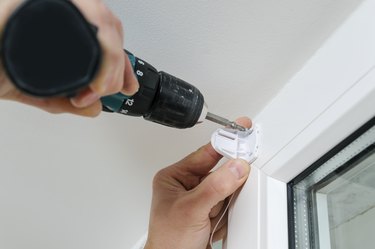
- Drill a pilot hole for each screw, using a power drill and a bit that is slightly smaller than the threaded portion of the screw. If you're using screw-in drywall anchors, drive an anchor at each hole location, using a drill with a Phillips screwdriver tip; there is no need for a pilot hole.
- Install each bracket (without the shade), using the provided screws. If you're using drywall anchors, you may be able to use the provided bracket screws; or, you can use the screws that come with the anchors, which are guaranteed to fit. Drive the screws with the power drill or a standard screwdriver.
- Fit the shade into the brackets, as directed by the shade manufacturer. Open and close the shade to test its operation.
Adjusting Spring-Loaded Shades
Spring-loaded roller shades should be easy to pull down to the bottom of the window and should retract all the way up with moderate tension—not too slow and not too fast. If the shade stops retracting partway up the window, adjust the spring tension by pulling down the shade about 16 inches and letting it catch so it stops moving. Remove the tab end of the shade from its bracket, leaving the pin end in place. Roll up the shade all the way by hand, then fit the tab end back into its bracket. This will add tension to the spring when the shade is pulled down.