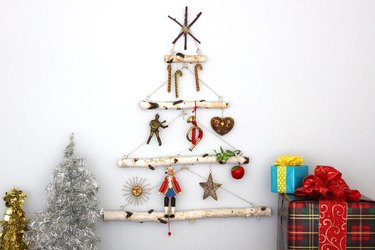
Birch tree branches and twigs are very popular for crafts and decorating any time of year. However, the birch tree's snowy white, paper-like bark makes it ideal for holiday arts and crafts projects. This charming wall decoration made with ascending birch branches in the shape of a Christmas tree is an attractive alternative to a live or artificial tree — a perfect holiday solution for those who are looking to branch out from the norm.
Things You'll Need
Birch branches
Saw
1 3/16" screw eyes
String or twine
Thin sticks
Video of the Day
Step 1: Cut the Birch Tree Branches
Most people don't have birch branches waiting to be cut down for holiday projects, so what's one to do? Fortunately, most crafts stores sell them because they are so popular. Many local craft supply stores sell 5-foot lengths. Using a saw, cut the 5-foot branch into four sections: 24 inches, 18 inches, 12 inches, and 6 inches. Birch cuts very easily.
Video of the Day
Step 2: Add Screw Eyes to the Bottom Branch
Starting with the 24-inch piece of birch, which will serve as the bottom of the tree, attach a screw eye about 2 inches from both ends.
Step 3: Add Screw Eyes to the 18-inch Branch
Moving up to the 18-inch birch branch, add screw eyes one to two inches from both ends. In addition, attach a screw eye on the bottom of the branch at the midway point. This bottom screw will connect to the screw eyes in the 24-inch branch.
Step 4: Add Screw Eyes to 12-inch Branch
Repeat with the 12-inch branch, attaching screw eyes to the two ends and the midway point at the bottom, which will connect to the screw eyes in the 18-inch branch.
Step 5: Finish with the 6-inch Branch
In a similar fashion for the 6-inch branch, attach screw eyes to the two ends and the midway point on the bottom.
Step 6: Connect the Branches
Starting at the bottom 24-inch branch, tie pieces of string to each screw eye and connect the strings to the screw eye at the bottom of the 18-inch branch. Make sure the two branches are parallel, about 7 inches apart. Then tie strings to each screw eye in the top side of the 18-inch branch, and connect them to the screw eye at the bottom of the 12-inch branch. Again, make sure the branches are parallel.
Finally, tie strings to the screw eyes at the top side of the 12-inch branch, and connect them to the screw eye at the bottom of the 6-inch branch.
Step 7: Make a Hanging Loop
Tie a string to connect the two top screw eyes in the 6-inch branch to make a hanging loop. When hung on a hook, the loop will become triangular to form the top of the tree.
Step 8: Create the Star
Tie together three 6-inch sticks with string to form a star.
Step 9: Decorate Your Birch Hanging Christmas Tree
Hang the birch branch tree and the star on a hook, and decorate the tree with ornaments. You can also add tinsel and even some aerosol spray flocking to resemble snowy birch branches, if you wish.