Things You'll Need
Ruler
Scissors
Pencil
Carbboard
Permanent epoxy
4 2-liter soda bottle caps
Silver and black acrylic paint
Paint brushes
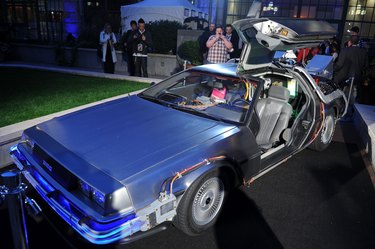
Making a cardboard DeLorean is a creative way to display your passion for cars. Known for its role as the time machine in the 1985 Robert Zemeckis film, "Back to the Future," DeLoreans were manufactured from only a short period of time between 1981 and 1982, according to DMC News. The DeLorean included a slick, silver-colored body with doors that opened and closed vertically. Once your DeLorean is complete, show it off to family, friends and the "Back to the Future" fan in your life.
Step 1
Measure and cut the main pieces of the DeLorean -- the 10-by-12-inch cardboard body; the 3-by-4-inch cardboard backside panel; the 4-by-8-inch cardboard windshield and front end piece and the 4-by-20-inch shipping box cardboard underside. Label each piece with a pencil.
Video of the Day
Step 2
Draw a 3-by-5-inch four-sided polygon onto a piece of cardboard. Cut out the polygon. Place the polygon onto another piece of cardboard. Trace the polygon and cut out a second identical piece. Label each piece as a door for the DeLorean.
Step 3
Measure and cut three 3-by-3-inch cardboard squares. Two squares will act as front side panels. One square will act as the front panel -- or radiator grill. Label each piece with a pencil.
Step 4
Place the 10-by-12-inch body onto a flat surface. Adjust the piece on of the 12-inch sides is facing you. Bend the lower edge of the body downward 3 inches. Bend the upper edge of the body downward 3 inches. The body will form an upside-down "U" shape.
Step 5
Fit the 3-by-4-inch backside panel flush against the right end of the "U." Bond the panel to the "U" with permanent epoxy.
Step 6
Position the 4-by-8-inch windshield and front end piece onto a flat surface so one of the 8-inch edges is facing you. Bend the left edge of the piece 3 inches upwards. Pre-crease and unfold the bend. Form the piece so the left edge is flush with the flat surface and the five inches to the right side of the crease are angled upward at 45 degrees.
Step 7
Bond the right side edge of the piece from Step 5 to the top left edge of the upside-down "U" shape with permanent epoxy. The shape from the hood to the windshield to the top side of the upside down "U" should form a letter "Z" shape.
Step 8
Bond one of the 3-by-3-inch squares in perpendicular position below the left edge of the hood. Bond a second 3-by-3-inch square in perpendicular position below the right edge of the hood. Bond the third square to the left front end of the car.
Step 9
Cover the long, 5-inch edge of each 3-by-5-inch polygon-shaped door with permanent epoxy. Bond one of the doors to the left edge of the windshield at an upward 45-degree angle. Repeat with the second door on the right side of the windshield.
Step 10
Bond the underside piece to the bottom of the DeLorean. Glue each bottle cap into position on the car to act as wheels.
Step 11
Paint the cardboard DeLorean with acrylic paint. Paint the body of the car silver and the tires black. Paint the letters "DMC" on the front of the grill at center. Use various shades of silver and grey, if you like, to add depth to the design. Allow two hours for the craft to dry before handling or displaying.
Video of the Day