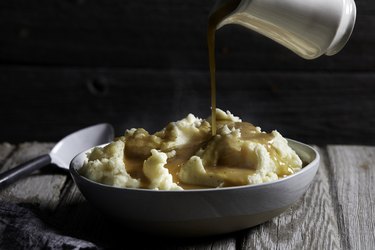
Gravy is a must-have in the world of comfort food. Spooned over sliced turkey, poured over mashed potatoes, mopped up with biscuits or sampled by the spoonful (we don't judge!), it makes any meal just that much more satisfying. But have you ever wondered how you can make homemade gravy? Like the really, really good kind? Never fear: No professional training or fancy gravy recipe is needed here. In fact, even a first-time cook can make great gravy with just a few simple ingredients and techniques.
Ready to learn how to make gravy for Thanksgiving, Christmas or a delicious everyday meal? Read on for the answers to your biggest gravy questions.
Video of the Day
Video of the Day
1. Does all gravy require fat and flour?

In short, no! Most easy gravy recipes start with a roux, a mixture that's equal parts fat and flour, but it's not 100% necessary—and some cooks prefer to work with a slurry mixture instead. A roux-based gravy will be silkier and richer, while a slurry-based gravy will be lighter. Here are the basics for both types of gravy:
Roux gravy: The fat for roux can come from pan drippings, melted butter or cooking oil. Measure out the amount you'll need (about 2 Tbsp. each of fat and all-purpose flour per cup of gravy) and cook, stirring regularly, for 3 to 5 minutes, until the mixture loses its raw-flour smell and browns slightly. Finally, add liquids and whisk them into the roux, scraping up tasty browned-on bits, then cooking and whisking until gravy thickens.
Slurry gravy: For a lighter gravy style, pour off pan drippings and separate out the fat to discard. (It's easiest with a fat separator, but you can also let it sit in a measuring cup and spoon fat from the top.) Add water, broth, wine or other liquid into the roasting pan and stir over medium heat to dissolve browned-on bits, then add enough broth to make up the quantity of gravy you'll need. For each cup of gravy, whisk 2 Tbsp. flour or 1 Tbsp. cornstarch into a small cup of cold water or broth. Slowly add this slurry to the hot pot of broth, whisking vigorously. Wait a few moments before adding the last few dribbles so you can judge whether it needs more thickener.
Whichever method you choose, finish by straining to remove lumps or stray bits of brown crust from the roasting pan, then transfer to a gravy boat or other serving dish.
2. Which is better, flour gravy or cornstarch gravy?
There's no definitive "best gravy" type—it just comes down to what you like. A flour-based gravy will have an opaque appearance, while a cornstarch gravy will be lighter and clearer. Both styles of gravy thicken as they cool, but cornstarch gravies will become gelatinous and have an uneven texture when reheated. Flour gravies retain their consistency; you'll just need to thin them slightly with added water or broth. Special dietary needs might also make your decision for you. For instance, a corn allergy would steer you to flour-based gravy; but if you need something gluten-free, you can look to cornstarch.
There are alternative thickeners you can use, as well. These include:
Instant mix flours: Sometimes spoken of as "gravy flour," these include brands like Wondra. They're specially processed to mix into gravy and sauces without clumping, but they're still wheat flour and give you the same end result.
Potato starch: Gluten-free like cornstarch, potato starch makes an opaque gravy that resembles a more traditional flour-based gravy. As with cornstarch or arrowroot, cook time is shorter because it's a quick-thickening purified starch.
Arrowroot: Using arrowroot will provide a clear gravy the way cornstarch does, but with better consistency when cooled (or even frozen) and reheated. It's also gluten-free.
3. Can I make gravy without pan drippings?
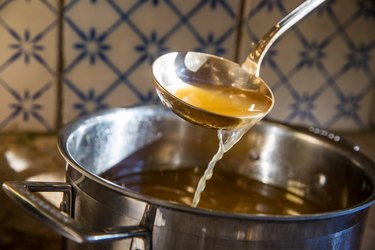
When you're prepping a holiday dinner or a Sunday roast, you'll have flavorful pan drippings to serve as a basis for your gravy. That won't always be the case, though, and there may be times you want gravy but don't have meat drippings on hand. That's fine! You can make a perfectly acceptable gravy with broth alone. The roux method and slurry method both work here—just use all broth instead of "pan juices plus broth."
It's best if you can use beef broth for beef gravy, chicken broth for chicken gravy and so on, but there's some wiggle room. You could start a beef gravy with vegetable broth, for example, or a turkey gravy with chicken broth. Simmering some trim pieces (bones, wing tips, etc.) in the broth will help establish a base of flavor that can be reinforced with add-ins like onions, garlic or mushrooms.
Tip
Browning adds flavor through two processes: caramelization of starches and Maillard reactions in proteins. Starch and protein molecules are broken down into fragments, which recombine in complex ways, creating flavors that weren’t there before. (Picture the difference between plain sugar and caramel.)
You can simulate the browned flavors of roasting by pouring a few spoonfuls of broth into a saucepan on the stovetop over medium heat and letting them brown and stick. Repeat the process 3 or 4 times, then add remaining liquid and scrape up browned-on parts (“deglaze the pan”) just as you would with pan drippings. It’s remarkable what a difference it makes.
4. What’s the ideal gravy texture?
The correct (if maddening) answer to this question is "not too thick and not too thin." It helps if you start off knowing how much gravy you're going to make so you can judge how much flour or cornstarch to use. Even if you're winging it, though, there's a simple test.
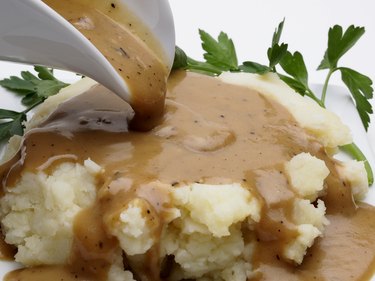
Once the gravy looks thick enough, dip a spoon into it. Gravy should pour off in a smooth stream, rather like heavy cream or pancake batter. If it glops from the spoon, it's too thick and needs more broth. Next, turn the spoon over and run your finger through the gravy clinging to its back. If gravy flows back and fills in the line left by your finger, it's not thick enough yet. At the perfect consistency, it will coat ("nap") the back of the spoon and your fingertip will make a clean line that barely fills in at all along the edges.
5. How can I enhance my gravy?
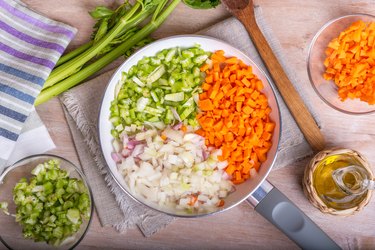
Want to tweak or improve the flavor of your gravy? Try a mixture of 2 parts chopped onion to 1 part each of chopped celery and carrot (aka mirepoix), put into the pan under your bird or roast before beginning. This combo will add flavor to the pan drippings, which carries through to the gravy. You can also simmer mirepoix in store-bought broth to improve its flavor. Other savory ingredients such as garlic or mushrooms also pack some oomph that elevates gravy flavor.
Alternatively, enhance the savoriness of gravy by adding onion powder, garlic powder or small splashes of liquid seasonings, such as soy sauce, Worcestershire sauce or fish sauce. If your gravy needs a more fundamental flavor boost, jellied bouillon products can help make up for a lack of pan juices or bland broth.
Other additions to elevate your gravy include meal-appropriate fresh herbs, such as rosemary with a roasted chicken or sage and thyme with your turkey. Spices are often overlooked—but you might want to experiment with options like allspice in a beef or pork gravy, chipotle or smoked paprika for a hint of smoke on meats or even a whiff of nutmeg in pork or sausage gravy. Of course, classic black pepper and salt to taste go a long way.
6. Can I make gravy ahead of time?
Good news: Making gravy in advance of a gathering doesn't require any special steps or extra prep time! It works best with roux-based gravy because fat coats starch particles and helps provide a more consistent texture during cooling and reheating. Cornstarch, potato starch and arrowroot can all work, though.
Start by preparing your gravy. Separate the amount you'll set aside for later and pour it into a flat, shallow container. Let cool, uncovered, for 20 to 30 minutes before transferring to the refrigerator. In an hour or so, when it's cooled, seal up your airtight container with a lid and refrigerate or freeze for later use.
7. How long does gravy last in the fridge?

Under normal circumstances, if you're refrigerating leftover gravy that has been out at room temperature during the meal, you can expect it to remain food safe for 2 to 3 days. Remember, any perishable food (including gravy) should spend less than 2 hours total at room temperature before you put it away.
If you've made gravy for the express purpose of preserving for later and have immediately cooled and refrigerated it, you can expect a solid extra day of refrigerator time. If you need to store your gravy for longer than a few days, though, it's better to freeze it.
8. Can gravy be frozen and reheated?
Yes, absolutely. Cornstarch gravy can be challenging because its consistency will seem "not quite right" when thawed and reheated, but gravies made with flour, potato starch or arrowroot work just fine. Package and refrigerate gravy as described above, then freeze once cold. For long-term storage in a freezer container, press a piece of parchment or plastic wrap to gravy's surface to protect it from contact with air. Alternatively, once frozen, pop gravy out of its container and seal it airtight in a freezer bag (or better yet, a vacuum-sealed bag) for long-term storage. You can also measure out gravy in one-cup portions, scoop it into zipper-type freezer bags and squeeze out excess air before flattening and freezing.
Reheat gravy in your microwave, over low heat in a saucepan or in an oven dish with your actual entree. Whichever method you choose, your gravy must come to a temperature of at least 165°F (like any other leftovers) to be considered food safe. Stir gravy frequently as it thaws and reheats, and monitor its consistency. You may need to thin gravy with a little extra broth or water or, in the case of cornstarch gravy, add a small amount of extra thickener. If the finished texture is slightly uneven, you can "buzz" it quickly with an immersion blender to bring it back together.
Whether you're on "gravy duty" at this year's holiday celebrations or simply looking for delicious knowledge to enhance your skills in the kitchen, we hope our comprehensive guide has answered your most pressing questions and set you up to make perfect gravy every time.
Now what are you waiting for? Get started on that roux!