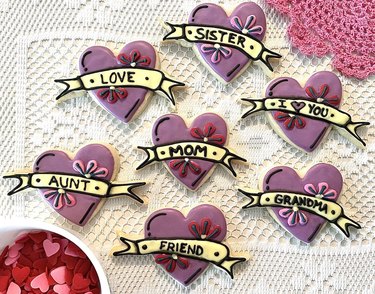
We've all seen them: proudly displayed heart tattoos paying homage to mom. And while many of us agree with the loving sentiments represented by such tattoos, some of us simply aren't game for getting inked. Never fear! We have a fun, edible solution to kick this year's Mother's Day celebrations up a notch and add some sugar to the mix.
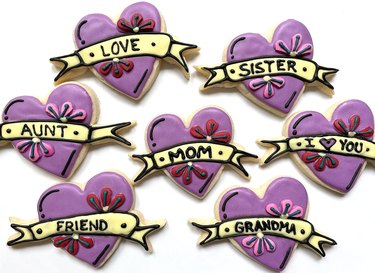
Our a-dough-rable homemade sugar cookies, designed to resemble those tough yet sweet mom tattoos, make a tasty handmade Mother's Day gift for any mama, grandmother, aunt, sister or friend. After all, the world is full of nurturing figures from diverse backgrounds. Celebrate them with a batch of these decorated cookies, which can easily be personalized. Caregivers don't even have to be blood relatives to deserve recognition each May (and every day!).
Video of the Day
Video of the Day
We'll walk you through the whole process, from whipping up dough to creating icing to decorating each colorful confection. No matter whom you gift them to (even if it's yourself!), these homemade Mother's Day cookies will surely make a sweet impression.
Things You'll Need
1/2 cup granulated white sugar
1/2 cup unsalted butter (room temperature)
1/2 egg
1/4 tsp. almond extract
1/2 tsp. vanilla extract
1 1/2 cup all-purpose flour
1 tsp. baking powder
1/4 tsp. salt
Medium mixing bowl
Baking sheet
Tip
It helps to have a stand mixer to thoroughly mix ingredients. This also saves your arms from several rounds of mixing. Invest in a good one that lasts. You (and your arms!) will be thankful.
1. Preheat oven
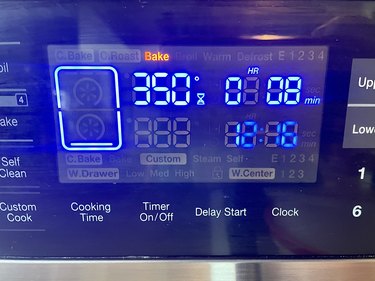
It might sound obvious, but this step is important when it comes to concocting homemade sugar cookies. Prepare and save time by preheating the oven to 350°F.
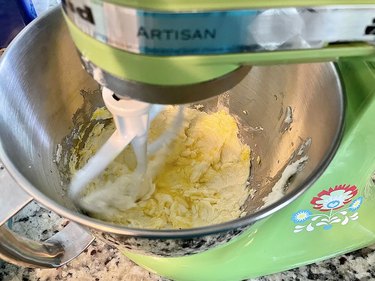
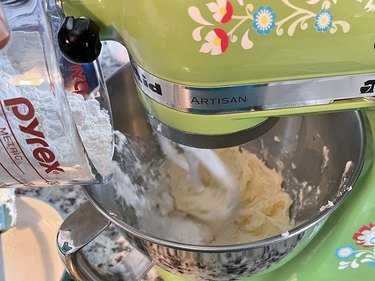
2. Cream butter & sugar
Place butter and granulated sugar in a stand mixer and then mix until you achieve a creamy, whipped consistency. The mixture should look a bit like mashed potatoes.
3. Mix in egg, almond extract & vanilla extract
Mix until ingredients are fully combined with creamed butter and sugar mixture. This should take one to two minutes.
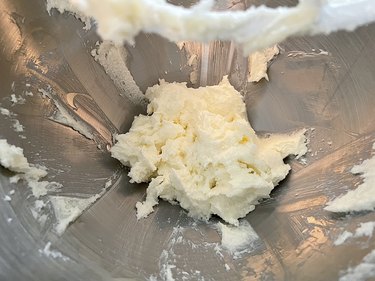
4. Combine dry ingredients
Using a mixing bowl, stir together flour, baking soda and salt. Then, slowly add to wet mix.
This step will take a few minutes, as you'll want to mix in dry ingredients a little at a time. The finished dough should have a Play-Doh consistency.
5. Form dough into hearts
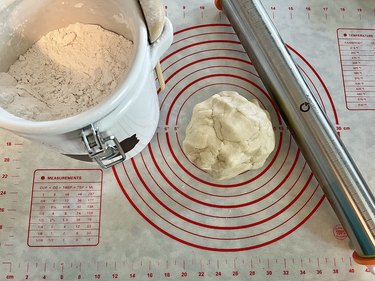
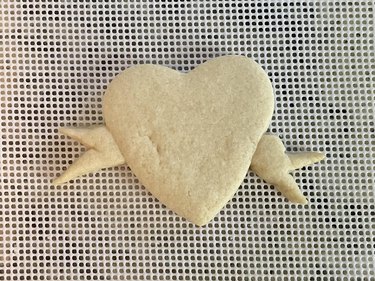
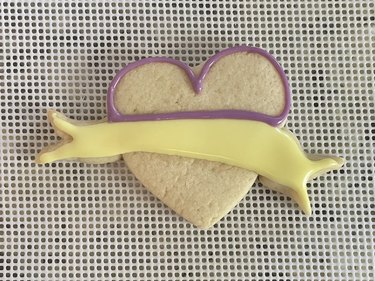
Now you have a dough ball! It's time to roll it out and start forming shapes for your heart tattoo cookies. A rolling pin with size rings helps to achieve consistent thickness. However, any rolling pin is fine as long as you make sure not to roll the dough too thin. Aim for 1/4 in. thickness. Use heart-shaped cookie cutters to form hearts.

Remove the heart cookie cutters. Using a knife, cut separate "banner" shapes out of excess dough and gently press to adhere to the sides of the hearts; they will attach while baking. These banner pieces don't have to be perfect. You'll be covering them with icing, after all!
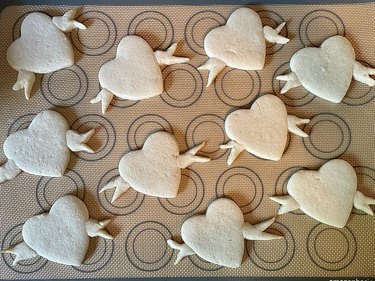
Carefully place the cookies on a baking sheet and set it in the preheated oven. Bake for eight to 10 minutes, keeping an eye on the cookies once eight minutes approaches. We left ours in for the full 10 minutes to ensure they were fully baked through. For crispier sugar cookies, feel free to leave them in a few extra minutes.
Part 2: Make Royal Icing
Things You'll Need
1/2 cup powdered sugar
1 1/2 Tbsp. meringue powder
3-4 Tbsp. warm water
Spoons for mixing
Extract/flavoring of your choice (optional)
1. Combine ingredients
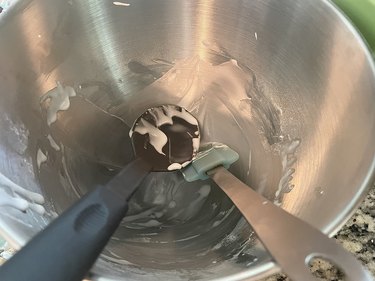
This icing will be used for both piping (outlining) and flooding (filling in). To start, combine all ingredients in one bowl. Add more powdered sugar to thicken (or water to thin) until the desired time and texture are achieved. You can add a few drops of vanilla extract or other flavoring for extra melt-in-your-mouth flavor, but it's not necessary.
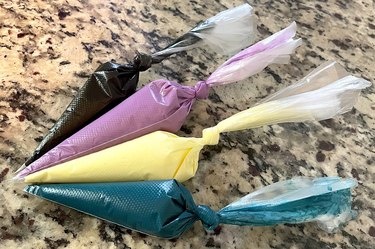
When finished, separate icing equally into four smaller bowls.
Tip
This icing is also known as 15-second royal icing. If you slice a knife through the icing while still in the mixing bowl, it should blend back together in 15 seconds.
2. Add food coloring
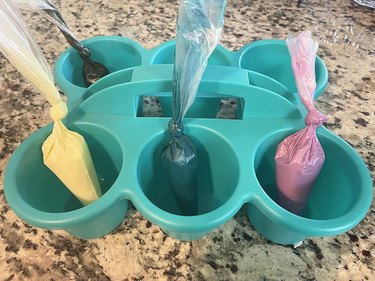
Carefully add gel food coloring to each of the four bowls until you're satisfied with the colors. Spoon it into tipless piping bags. Some people like to purchase miniature clamps or rubber bands for piping bags. We find it's easiest (and free!) to simply tie them off.
Tip
Trying to keep your countertops clean? Office organization caddies work well for holding all of your filled piping bags in one place.
Give the completed cookies ample time to cool before icing. Adding icing to a warm cookie will cause the icing to thin and melt.

Finally, it's time to decorate your yummy Mother's Day cookies. Cut a tiny hole in the tip of the piping bags. Outline the banner area with light yellow icing.
Tip
Try not to put the tip of the piping bag right on the cookie. Instead, hover it right above and let a line of icing fall into place as you outline. This helps with straighter lines and more accurate curves.
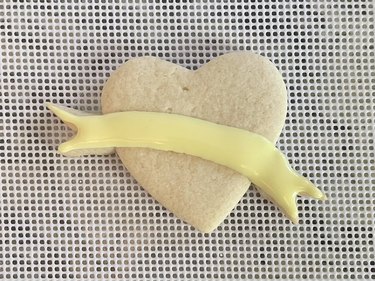
Next, fill in the banner outlines with icing. This is also known as flooding and is easy once your outline (piping) has been created.
3. Outline heart area with purple icing
Again, we're piping first before flooding the inside area.
4. Fill in heart area with icing

Use icing to fill in the outlined space until fully covered.
5. Add black piping
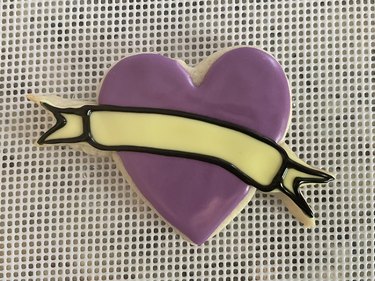
Wait for the icing to harden a bit and then outline the banner with black piping.
The icing doesn't need to be fully hardened before adding black piping but wait at least 20 minutes before starting so black lines don't bleed in with the surrounding colors.
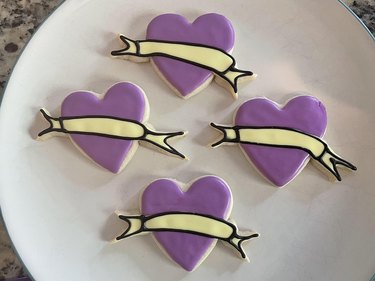
Allow the icing-topped cookies to dry for one to two hours before adding details.
Royal icing should be hard before adding additional decorations atop the base flooding. This helps with color bleed, smudging and cratering (small holes or pits formed in dried icing).
7. Add decorative details
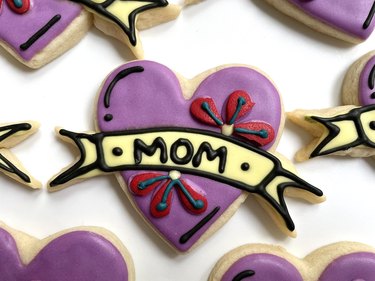
It's time to get creative! After writing a name (or short message) on each banner with black icing, decorate the cookies with colorful, creative details. How about flowers, polka dots, stripes or a combination of designs? You could even adhere large sprinkles or candy on top by using leftover royal icing as "glue."
8. Let dry overnight
If you plan on stacking or packaging these delicious cookies in a gift tin or other cookie gift box, be sure to let them sit for a full eight to 10 hours first so they don't stick together or smudge. These mini Mother's Day desserts are best presented when fully dry.
Well, all good things must crumb to an end. This creative sugar cookie recipe can be used for a number of occasions, not just for Mother's Day gifts. Cut-out cookies (whether or not they're tattoo-inspired) are the perfect treat for any special day: Valentine's Day, Easter, Father's Day, a birthday brunch...you name it. The best part? Our tattoo heart cookies offer the opportunity to proudly display love for the moms (and motherly figures) in your life—no real ink required!