If you haven't had the pleasure of experiencing pan de coco, you're missing out.
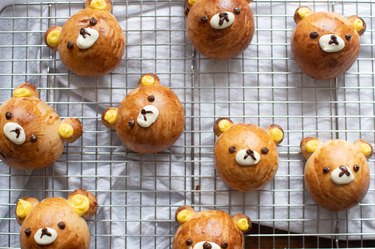
This soft bread from the Philippines is packed with a not-too-sweet brown sugar coconut filling and is delicious paired with tea, coffee, hot chocolate—just about anything. Pan de coco was one of my favorite childhood snacks, but it was admittedly a rare indulgence. Now that I bake for myself, I simply had to put my twist on the nostalgic Filipino bread by creating pan de coco in the form of Rilakkuma, an adorable Sanrio character.
Video of the Day
If you're eager to make your own pan de coco, I've got you covered with step-by-step instructions and a surprisingly straightforward bread recipe. These delectable pan de coco buns can be made with a stand mixer or completely by hand, so there's room for adjustment. While Rilakkuma-shaped buns make a fun (and totally mouthwatering) weekend project to tackle with friends or kids, let creativity guide your baking endeavors. Pan de coco can be molded into all sorts of dreamy designs!
Video: Adorable Rilakkuma Buns With Pan de Coco Filling
Quick Recipe Overview
SERVINGS: 12 buns
PREP TIME: 30 minutes
COOK TIME: 15-20 minutes
PROOFING TIME: 1 hour 30 minutes
DECORATING TIME: 10 minutes
TOTAL TIME: 1 hour 25 minutes to 1 hour 30 minutes
Part 1: Make Buns
Things You'll Need
Stand mixer fitted with dough hook
Large mixing bowl or bowl of stand mixer
Plastic wrap
3/4 cup milk, warmed
1 tsp. active dry yeast
1/2 cup sugar
1 1/4 cup all-purpose flour
1/2 tsp. salt
1/4 cup butter, room temperature and cut into tablespoons
Tip
If you don’t have oil-based food coloring, dyed white chocolate will become clumpy. To counter this, stir in 1/2 tsp. of neutral oil (canola or vegetable oil work great) in small increments until it smooths out.
1. Combine first five ingredients
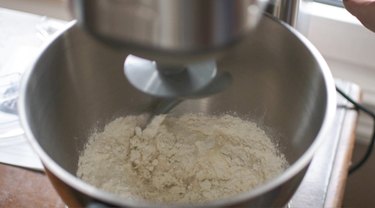
In a large bowl or in the bowl of a stand mixer fitted with a dough hook, combine milk, yeast, sugar, flour and salt.
2. Gradually add butter
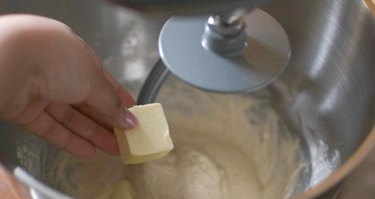
While mixing, gradually add butter one tablespoon at a time. Continue mixing for about seven minutes. The dough will be sticky, but it should come together and come off the sides of the bowl after the seven-minute mark. If kneading by hand, work on a lightly floured surface. Try not to add too much flour or the rolls will be dense.
3. Knead until windowpane stage
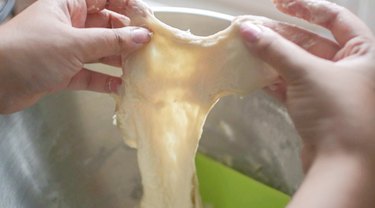
Stretch a piece of dough as thin as possible. If you can see light through it, it has reached the windowpane stage, and you can stop kneading.
Tip
The windowpane stage lets you know that the dough is elastic, and enough gluten has formed from kneading. This helps bread rise better, giving buns their soft structure.
4. Cover and rest dough
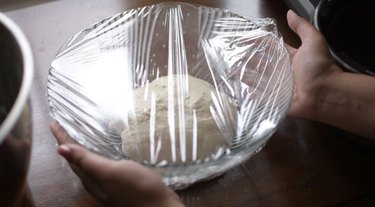
Allow the dough to rest in a warm place until it doubles in size, about one hour.
Part 2: Make Sweet Coconut Filling
Things You'll Need
Saucepan
Rubber spatula
1 1/2 cup unsweetened coconut flakes, desiccated coconut or shredded coconut
2 Tbsp. butter
1 cup coconut milk
1/4 cup brown sugar
1 Tbsp. vanilla
1. Combine all ingredients
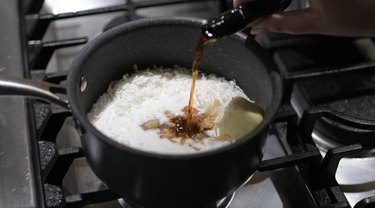
Add all ingredients to a saucepan and cook on medium heat. The mixture will begin to simmer and then boil. Stir the mixture every now and then, scraping the bottom of the pan.
2. Cook until thickened
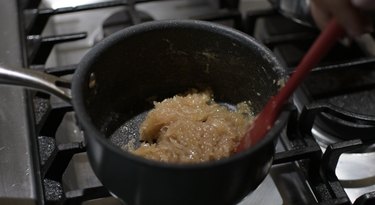
Continue cooking and stirring until most of the liquid evaporates, about 10-15 minutes. Cover and set aside to cool.
Tip
Coconut oil might begin to separate from the mixture. You can simply transfer this to another bowl to save or discard it.
Part 3: Fill & Decorate Buns
Things You'll Need
Plastic wrap
2 baking sheets
Parchment paper or silicone mats
Kitchen towel
Wire rack
Egg
Piping bag
3 Tbsp. white chocolate, melted
1 Tbsp. milk or dark chocolate, melted
Yellow oil-based food coloring
1. Deflate and divide dough
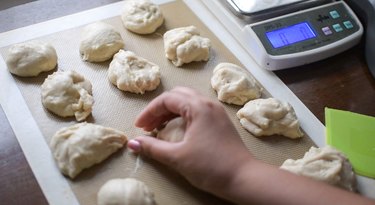
Punch dough down and separate into 13 equally sized portions (slightly smaller than a baseball, or about 45 g. each). One ball will be used solely for bear ears.
Shape the dough into balls on a floured surface by cupping your hand, placing your palm over the dough and moving your hand in a circular motion. Cover the balls with plastic wrap for about 10 minutes to relax the gluten so they will be easy to work with.
2. Flatten dough and add filling
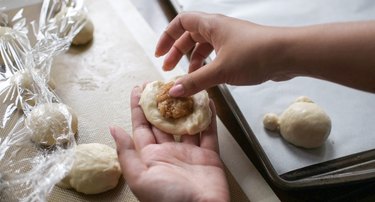
Flatten the dough, making the edges thinner than the middle. Add about a tablespoon of coconut filling. Pinch the edges together and place it onto a lined baking pan.
3. Add bear ears
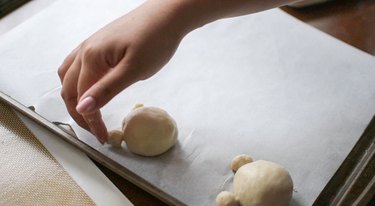
Take about a teaspoon of dough from the 13th dough ball and split it into two. Roll it into balls and place it on top of the bears' heads. Repeat steps for the remaining dough to make 12 bears.
Lightly cover with a kitchen towel and let it rest for 20 minutes. Toward the end, preheat the oven to 350°F.
4. Egg wash bears
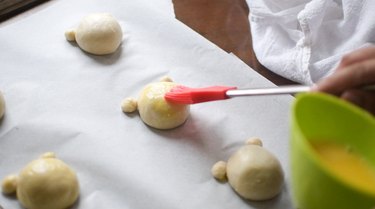
Lightly and evenly egg wash all of the bear buns.
5. Bake buns
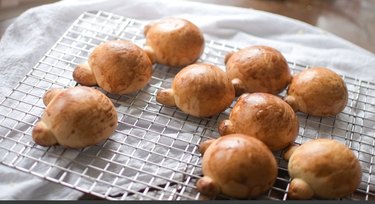
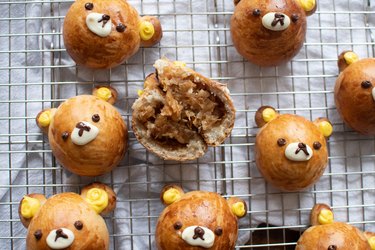
Bake the buns for 15-20 minutes or until the tops are golden brown. Let them cool on a wire rack.
6. Decorate with melted chocolate
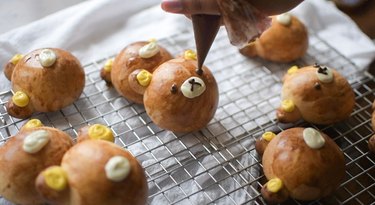
Using a piping bag, add white chocolate on the snouts of each bear bun. Dye the remaining white chocolate yellow with oil-based food coloring and use this for the ears. Use milk or dark chocolate for the eyes, nose and mouth.
Store the bread rolls in an airtight container at room temperature for up to four days. I recommend reheating them in the microwave for about 15 seconds before eating.
Now that you're acquainted with the many wonders of pan de coco, you might count it among your favorite sweet treats. May all your baking endeavors be this adorable!