My favorite flowers are hydrangeas. The big, round hydrangea blooms are so dramatic, and I love them in every room of the house. But in lieu of the real thing, a beautiful painting of hydrangea flowers can add just as much joy to a living space.
Instead of buying a flower painting, you can get even more enjoyment by creating it yourself. How does one paint hydrangeas? With bubble paint! By mixing paint with dish soap, you can fashion realistic-looking hydrangeas by blowing bubbles and transferring those bubbles to paper. This bubble art tutorial is one of the most fun craft ideas to try, and it's a great DIY project to share with kids.
Video of the Day
Video of the Day
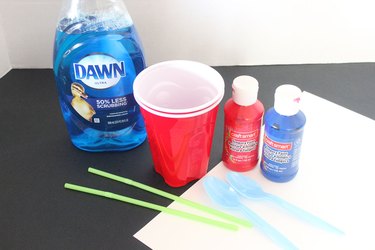
Things You'll Need
Tempera or acrylic paint
Dish soap
Plastic cup
Plastic spoon
Drinking straw
White cardstock or poster paper
Paintbrushes
Paper towels
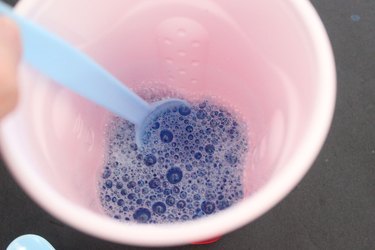
Step 1: Mix the Paint and Dish Soap
In a large plastic cup, mix equal parts of paint and dish soap, about a tablespoon of each. You don't need to measure exact amounts, just eyeball them. While you can use either tempera or acrylic paint, I find that tempera paint mixes better than acrylic. You can also vary the size of your mixing cup to create different sizes of hydrangea blooms. The size you choose will also depend on the size of your paper.
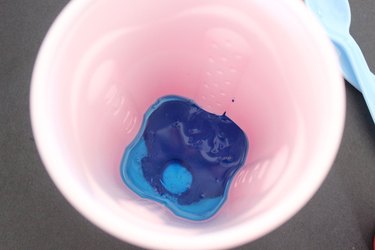
Step 2: Add Water
Add a few tablespoons of water to the mixing cup, approximately two parts water to one part paint and one part dish soap. The more water you add, the more the solution becomes diluted and the less intense your bubble paint hydrangeas will be. In fact, if there is too much water, the colors will not even register when the bubbles are popped, so err on the side of less water. Stir with a plastic spoon until the paint, soap and water are mixed thoroughly.
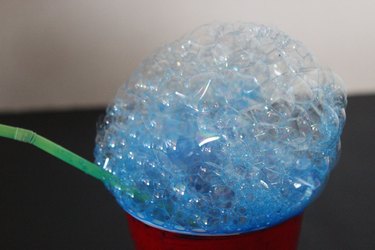
Step 3: Blow Bubbles
Now comes the fun part of this DIY: blowing bubbles. With a straw, blow into the paint and soap mixture until bubbles rise above the rim of the cup and form a dome. Be sure to blow into the straw and not accidentally drink the bubble paint.
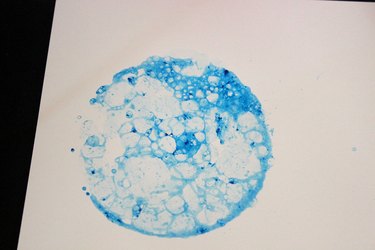
Step 4: Pop the Bubbles With Paper
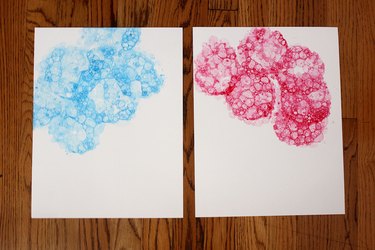
Hold a piece of white cardstock or poster paper above the dome of bubbles. Then, slowly lower the paper over the bubbles. As the paper makes contact with the bubbles, the bubbles will pop, creating random circular paint patterns that look amazingly like hydrangea blooms.
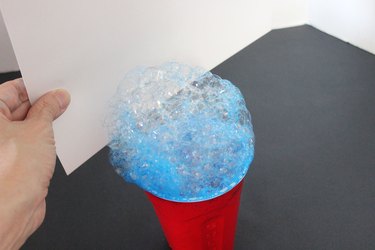
I like to bend down so I am eye level with the paper and cup, keeping track of the paper as it pops the bubbles. Try not to let the paper make contact with the rim of the cup. When all the bubbles are popped before the paper touches the rim, the edges of the bubble paint flowers will be irregular, just like real hydrangeas.
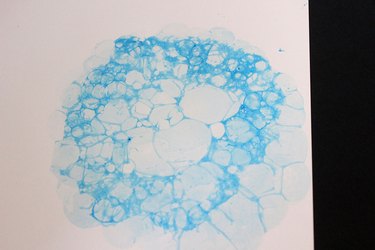
However, if your paper touches the rim, the paint on the rim will transfer to the paper and create a perfect circle, which looks more like a planet than a hydrangea. Don't make your flower craft look like this.
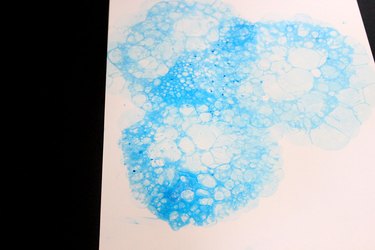
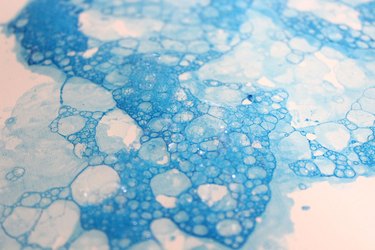
Step 5: Layer Additional Hydrangeas
Once you've created one bubble paint hydrangea, add additional blooms to the paper, repeating the process of blowing bubbles and pressing the paper against them. Overlap the hydrangea blooms to add more realism. You can even position some that go off the edges of the paper.
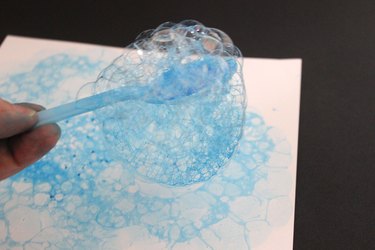
Step 6: Fill in Gaps
If there are areas of the bubble paint hydrangeas that are more sparse than you'd like, it's easy to fill in any gaps. Blow bubbles in the cup and then scoop them up with the plastic spoon.

Lower the spoon over any areas you want to fill in. As the bubbles make contact with the paper, they will pop and add additional color and patterns.
Step 7: Let the Paint Dry
Some of the bubbles may not pop right away, so let them sit on the paper and they will naturally pop or evaporate. Allow the paint to dry completely, typically in about two hours.
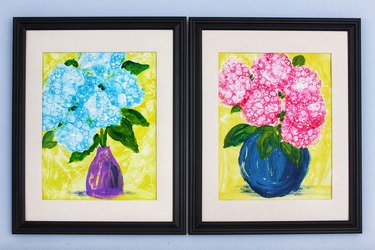
Try making hydrangea blooms in different colors, as hydrangea flowers in nature come in an array of colors. You can mix and match different colors in the same painting or keep them monochromatic as I've done.
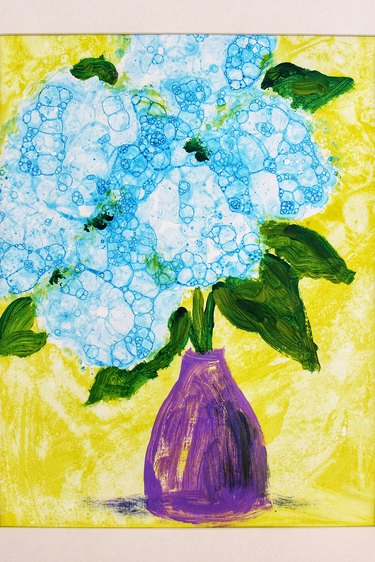
Step 8: Paint a Background
Although you can keep the background white, adding a color makes the flowers jump off the page. With a paintbrush and the color of your choice, paint around the bubble paint flowers. It's perfectly OK to overlap the background paint into the edges of the hydrangeas. For best results, dilute the paint with water so it's slightly transparent when applied with the paintbrush. Watercolor paints are also ideal to use as a background.
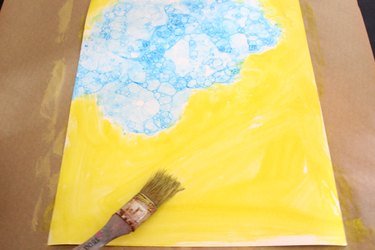
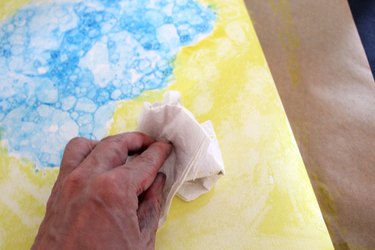
One trick I use to create a more artistic effect is to blot a paper towel against the paint to remove some of it while it's still wet. The background becomes more uneven and impressionistic.
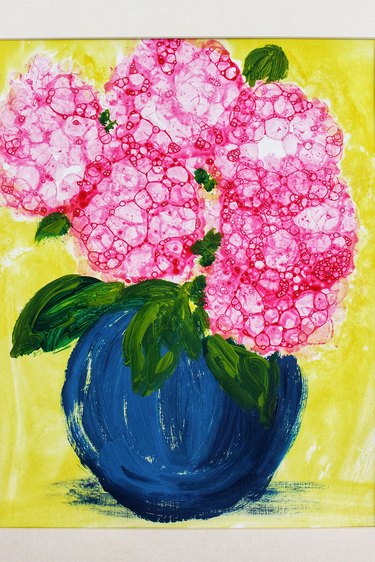
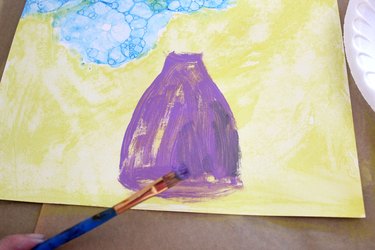
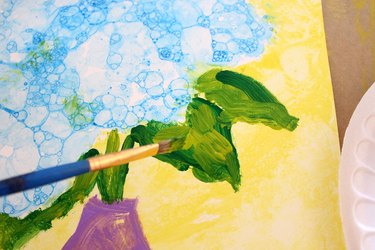
Step 9: Create Context
Sure, you know these are hydrangeas, but will other people know that? The key to a successful flower painting is to give it context, such as by showing the blooms amidst leaves and a vase. Start by painting a vase below the bunch of blooms. It can be any shape: round, tapered, square or abstract. As you can see, you don't need to paint a detailed vase for people to understand what it is. I even like to let some of the background color show through because it looks like reflections on the vase.
Finally, paint leaves around the blooms. Mix two to three shades of green to give the leaves some visual interest. Don't worry about the actual shape of the leaves. Any sort of greenery around the flowers helps them pop and provides enough context to help establish that these are indeed hydrangeas.
It's incredible that even if you do not consider yourself an artist, creating a masterpiece like this is as easy as blowing bubbles.
What a thoughtful gift a DIY flower painting would be for birthdays or holidays, like Valentine's Day and Mother's Day. You can also have the artwork printed on greeting cards, making this one of the most versatile craft projects that you can do.