Oh no! You've snagged your favorite sweater, and now there's a rip! What do you do? Do you have to give it away or – even worse – throw it away? Nope. We're here to show you that fixing a hole or a rip in a sweater doesn't have to be as intimidating as it sounds. You can save that sweater and wear it for years to come with this simple trick. All you need is a needle, some coordinating thread and a couple of minutes to make that sweater good as new again.
![ripped sweater and needle and thread](https://img.ehowcdn.com/375/cme-data/2/9/5351478a35c44b8fb2426508a25f92cd.jpg)
Video of the Day
Step 1
Thread a needle with thread that matches your sweater. Knot the end of the thread.
Tip
Use coordinating thread to conceal the stitches. Contrasting thread was used here for demonstration purposes.
![thread the needle and knot the end](https://img.ehowcdn.com/375/cme-data/2/9/cc36b656d57843bf93101b811205a751.jpg)
Step 2
Run the needle and thread up through a sweater stitch at the bottom of the rip. Tuck the knot inside so it's not visible.
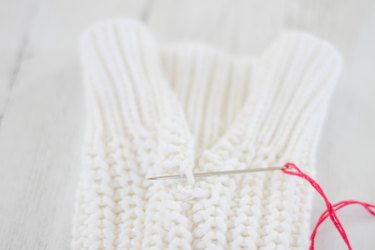
![first stitch](https://img.ehowcdn.com/375/cme-data/2/9/88601b08c28f4d83b4c6dca93ce01aae.jpg)
![bring the thread through the bottom of the rip](https://img.ehowcdn.com/375/cme-data/2/9/9573658d3e38428bac335d88f8910550.jpg)
Step 3
Bring the needle and thread across the rip to the other side and run it up through a sweater stitch on that side. Pull the thread gently so it lays flat across the rip. Don't pull the thread too tightly; you should be able to see it across the rip.
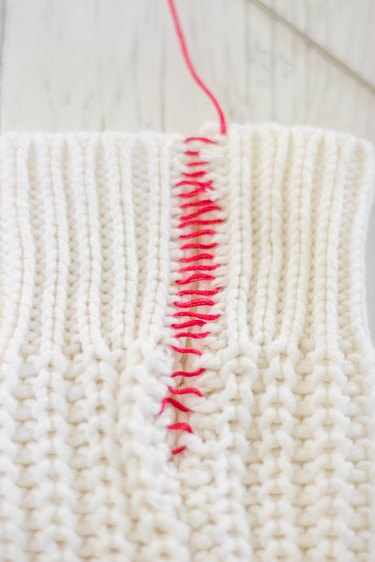
![second stitch](https://img.ehowcdn.com/375/cme-data/2/9/3b10fbde79924b9a8dd888c87de66f05.jpg)
![go across the rip with the thread](https://img.ehowcdn.com/375/cme-data/2/9/2f1b8153a07540cd9d050793bfebb895.jpg)
Step 4
Continue bringing the needle and thread back and forth across the rip and through a sweater stitch. Pull the thread gently.
![bring the needle and thread back through the next stitch](https://img.ehowcdn.com/375/cme-data/2/9/65b4eda0ab7341d2a6d1a840de669aea.jpg)
![thread going back and forth](https://img.ehowcdn.com/375/cme-data/2/9/d0e4c8b7b991485e9259fdaedaeec5fa.jpg)
![thread going back and forth again](https://img.ehowcdn.com/375/cme-data/2/9/0d53d0a061de458d989780cb23296bb8.jpg)
Step 5
When you get to the end of the rip, pull gently on the thread until the stitches disappear into the sweater.
![finished stitches](https://img.ehowcdn.com/375/cme-data/2/9/87acdc03a5d04695a77fa2d72164f8d4.jpg)
![pull on the thread](https://img.ehowcdn.com/375/cme-data/2/9/054421d19a08460ca302dcf760fd09b2.jpg)
![pull tighter on the thread](https://img.ehowcdn.com/375/cme-data/2/9/60411430fe7c44349fd9c9f1a3106922.jpg)
![pull even tighter on the thread](https://img.ehowcdn.com/375/cme-data/2/9/c35d4b93146c43f9bef37a9e077efb72.jpg)
![pull on the thread until the thread disappears](https://img.ehowcdn.com/375/cme-data/2/9/b3b4e0f3593d4cc7bc6314c49e1a22ad.jpg)
![ripped sweater repaired](https://img.ehowcdn.com/375/cme-data/2/9/d248d4b20a6c4e3a87a4d3cb10266d45.jpg)
Step 6
Attach the thread to the end by tying a knot and then snip off the extra thread.
Your sweater is as good as new!
![knot end of thread and cut](https://img.ehowcdn.com/375/cme-data/2/9/36229adb204147bc864c8a82a4637ce9.jpg)