Whether you're gearing up for a holiday Star Wars themed party or gathering or just searching for a creative handmade gift idea, a DIY illuminating lightsaber Christmas sweater is sure to turn heads. This DIY lighted Christmas sweater is all you need to put together an eye-catching outfit for that upcoming holiday event. Learn how to make this flashy sweater below!
Video of the Day
Things You'll Need
Black loose-knit sweater
Blue neon battery operated LED tube light
Red neon battery operated LED tube light
White or multicolored battery operated fairy lights
Aluminum foil
Red sequin trim
Cotton balls
Black felt
Hot glue gun
Scissors
Tip
Choose a sweater that is loose fitting. If the sweater is too tight, the lights will rub against you and the battery pack pocket will bulge.
Step 1: Create LED Lightsabers for Your Star Wars Holiday Sweater
Slip the tip of the blue LED tube light through the front side of the sweater, from the inside out. Then pull it diagonally to the top left and fold the tip back down to meet the spot where it comes through the sweater, creating a diagonal line that's about 6 to 7 inches long.
Hot glue the light to the front of the sweater in this position.
Tip
Insert a piece of cardboard into the sweater before gluing to prevent the front and back from sticking together.
Repeat this with the red LED light in the opposite direction to create an "X" effect.
Step 2: Add Lightsaber Handles
Cut small rectangles of aluminum foil and fold them into thinner pieces. Then hot glue them to the bottom of each light strip to create handles for the lightsabers.
Step 3: Add Galaxy Lights
Slip the first fairy light bulb through the front layer of the sweater from the inside out, starting at the top of the sweater. Then hot glue the bulb to the sweater so it will stay on the surface.
Repeat this with each individual bulb from top to bottom, leaving a couple inches of space in between each until you reach the bottom of the sweater. Your galaxy is now complete!
Step 4: Add Trim to Collar and Bottom
Hot glue your sequin trim around the collar. I chose to only add it to the front, but you can add it around the entire neckline if you'd like.
Next, stretch your cotton balls and glue them along the sequin trim to really emphasize that wintery look! Then repeat this along the bottom of the sweater.
Step 5: Add the Battery Pack
Flip your sweater inside out and place your felt rectangle toward the bottom on one side. Fold the felt to create a pocket big enough to fit your battery packs and hot glue the pocket to the sweater.
Tip
If you don't want all three battery packs in one pocket, you can create two pockets to even things out and reduce bulging. Just create one pocket on each side of your Star Wars holiday sweater.
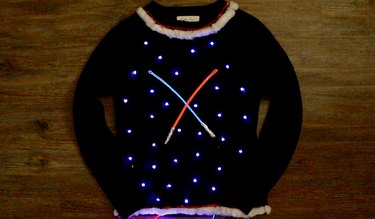
Step 6: Light It Up!
Now your show-stopping Star Wars holiday sweater is complete. Play around with the light settings to make the lightsabers flash, change the color of the stars and more. The possibilities are out of this world!