Pine ceiling boards add a classic country style look and feel to your room. Just like wood flooring, the boards, sometimes called beadboard, come in strips about 3/8-inch thick and 3 to 5 inches wide, depending on the style you choose. With a tongue and groove assembly, you can hang the boards without the nails being visible. In order to install the boards, you'll have to locate the ceiling joists.
Before Installation
Video of the Day
If you're installing new pine boards that you plan to refinish, paint them first on both sides. Alternately, you can stain the boards and apply a surface product; but if you choose to stain them, you'll have to apply a pine sealer first. Pine has an open wood grain and a high resin content that can look blotchy if stained without a pine sealer. Treating the boards on both sides will reduce the risk of warping due to humidity.
Video of the Day
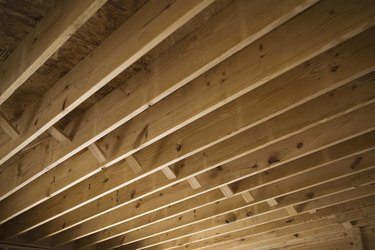
Prepping the Ceiling
Locate the ceiling joists. If the ceiling currently has a layer of drywall, you don't have to remove it, but you'll have to find the joists that lie beneath. A stud finder can pinpoint a joist through drywall. After snapping chalk lines over each joist, you can easily see where you need to drive in the nails.
Aligning the Boards
The pine boards must run perpendicular to the direction of the joists, with the groove side facing the wall. When you install the boards on the perimeter of the ceiling, leave a 1/4-inch expansion gap between the boards and the wall. Even if you paint or refinish the boards, they may later swell; and if the boards have nowhere to expand, they can buckle.
Nailing the Boards
A pneumatic finish nailer is just right for attaching pine ceiling boards to joists. Use 18-gauge finish nails and position the nailing tip at a 45-degree angle where the tongue meets the flat edge on the side of the pine board that faces you. Shoot the nail through the thickest part of the tongue and into the ceiling joist beneath. The pneumatic nailer should shoot each nail so that the head is slightly below the surface of the pine. If a nail sticks out, even a little, use a nail set to countersink it.
Fitting the Boards
The tongue and groove assembly isn't only on the long sides of the boards; it's also on the ends. As you install each subsequent pine board, you'll fit the ends of the boards together in each row. At the end of a row, measure and cut the last board so it is 1/4-inch less than the remaining space and nail it in place as with the others. You'll use the cutoff section to start the next row. This reduces waste and naturally staggers the board joints for a professional look.
Finishing the Look
Trim the last row of pine boards lengthwise to fit the remaining space. Since you can't nail through the tongue on the last row, just shoot one nail into each joist within 1/4-inch of the edge of the board. To give your ceiling a finished look, install ceiling cove or quarter-round trim along the edges of the ceiling.