Things You'll Need
3/4-inch diameter 10-ft PVC pipe
1-by-2-inch wood strips
Tape measure
Power saw
Power drill
Drill bits
Two 1/2-inch-by-8-inch external hex-head lag screws
Adjustable wrench
Screwdriver
1 1/4-inch wood screws
Christmas lights
Outdoor tape
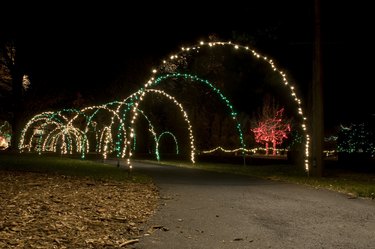
Make your outdoor space a holiday show stopper this season with an electric light show of illuminated Christmas arches with lights. Whether you install them over walkways, driveways or along walls or fences, lighted Christmas arches can transform your home into a stunning visual display of light and color. Create leaping arches by placing them in a single line with sequential lights or create tunnels by anchoring them consecutively in a row. Whether you're a new homeowner or you've never ventured past the porch to decorate, with a basic understanding of outdoor Christmas light installation you can design and build spectacular lawn decorations.
Create the Arch Assembly
Determine the Height of Your Christmas Arch
Lay the polyvinyl chloride pipe flat on the ground and bend it to determine the desired height of the arch. Measure the distance between each of the pipe ends. Cut a piece of 1-by-2-inch wood based on this measurement.
Video of the Day
Build the Wood and PVC Frame
Wear safety goggles when using power tools to create your Christmas archway. Attach an external hex-head lag screw to each end of the wood strip about 1 inch from the end and at a depth of 1 inch to anchor the PVC pipe ends. If you cannot find 8-inch external hex-head lag screws, you can try 1/2-inch-by-10-inch external hex-head lag screws for a snug fit, but don't go below 8 inches.
Measure and cut three 4-feet pieces of 1-by-2-inch wood. Predrill pilot holes in the wood before fastening the wood screws. Attach the three wood strips at their center point to the underside of the first 1-by-2 inch wood strip at both ends and in the middle in a using 1 1/4-inch wood screws for stabilization.
Bend and Form the PVC Arch
Place one of the PVC pipe ends over one of the lag screws sticking up from the end of the 1-by-2 inch strip of wood. Bend the pipe over to the other end and place it over the lag screw to form the arch.
Video of the Day
Paint the Christmas Arch Assembly
Spray paint the wood and PVC pipe green or white for better blending based on the color of the Christmas light wire.
Add the Lights and Install
Wrap the Arch
Wrap the Christmas lights around the PVC arch tightly. Do not unnecessarily bend or pinch the lighting wire.
When wrapping and installing the lights, follow all the manufacturer's guidelines for outdoor installation and use.
Secure the Light Strings
Use outdoor tape every few feet to secure the light strings to the arch frame.
Install Your Christmas Archway
Place the Christmas arch in the desired location of the yard or driveway area. Lean the arch upright and test it for stability. Extend the length of the stabilizing cross pieces if necessary by removing the existing 1-by-2-inch strips and replacing them with longer pieces.
The length of the wood strips used to stabilize the light assembly may need adjustment based on the height of the arch. To avoid damaging the wire, remove the lights from the arch or wood strip when attempting to drill or attach further hardware or wire for anchoring purposes.