Things You'll Need
Cloth
Bleach
Alcohol
Serrated knife
Pruning saw
Hand shears
Container
Potting mix
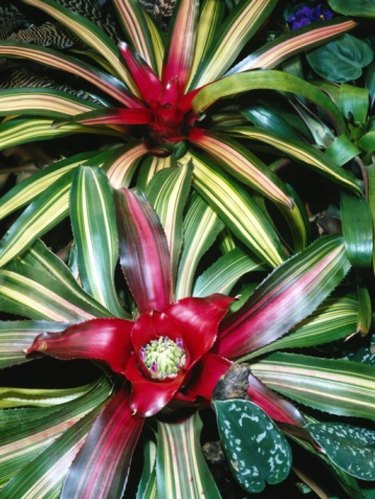
Bromeliads are flowering, tropical perennials that belong in the family Bromeliaceae. The plants perform well throughout frost-free areas and come in a variety of shapes and sizes, as well as flower and foliage color. Foliage is vase-like and grows from a central rosette. Flowers bloom from the center and range in bright colors of red, yellow, orange and blue. Once a bromeliad blooms, the plant slowly starts dying. This process takes up to two years, according to the University of Florida IFAS Extension. New pups develop around the parent, and gardeners can propagate new bromeliads by dividing and removing the pups.
Step 1
Remove a bromeliad pup from the parent plant after full leaf development. Wait until the pup is approximately half the size of the parent before removing it.
Video of the Day
Step 2
Disinfect the cutting tools before using them on the plant. Moisten a cloth in bleach or alcohol. Wipe down the blades of a serrated knife, pruning saw or hand shears with the treated cloth.
Step 3
Brush away any mulch or excess soil from around the parent bromeliad and the chosen pup. Clear the area so you can see where to make the cut.
Step 4
Cut between the parent and pup with your tool, cutting into the soil and slicing through the roots.
Step 5
Pull the bromeliad pup gently from the soil. Use your tools to cut more roots to release the pup from the ground, if necessary.
Step 6
Fill half a 1-gallon container with a lightweight potting mix that drains well. Use containers that drain or the bromeliad pup can rot. Water the container before planting the pup.
Step 7
Place the bromeliad pup into the container. Cover the roots with potting soil. Plant the pup at the depth it was originally growing in the ground.
Step 8
Water the bromeliad pup. Saturate the container's soil until it runs from the drain holes.
Step 9
Place the container in a partially shady location outdoors. Situate indoor containers in an area receiving bright, filtered light. Water only when the top 2 to 3 inches of soil is dry to the touch.
Tip
Bromeliad flowers grow on stalks of various heights, or develop in the plant’s center, almost level with the foliage and inconspicuous. More than 2,400 species are considered bromeliads, according to the University of Arkansas Division of Agriculture.
Warning
Do not overwater containerized bromeliads or the plants can develop root rot and die.
Video of the Day