Things You'll Need
14/2 awg NMC wire cable
Utility knife
Wire stripper
Utility knife
Pliers
Red wire nuts
Green wire nuts
Crimping tool
3 single-pole switches
Wiring a new home or residence requires you to install numerous types of electrical devices, light switches being one of the most common. Before installing these types of devices, it is important to determine how many of each you need at a certain location. When you want to control numerous lights from one specific area, you need to have more than one switch. When you encounter this situation, you use a larger box to house the added devices and completing the circuit requires specific steps.
Step 1
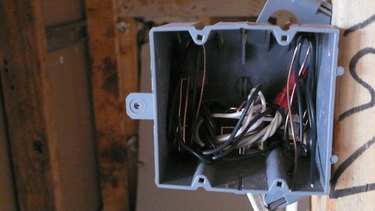
Calculate and insert the correct number of cables into the box. You need one power supply wire coming from your electrical panel to the box. Also, you need one cable per switch, traveling from the box out to each light. This gives you a total of four cables. Leave approximately 6 to 8 inches of cable extending from the opening of the box.
Video of the Day
Step 2
Strip the sheathing from each cable in the box with a utility knife. Reach into the back of the box where the cables enter, and insert the knife blade into the center of one of the cables about 1/16-inch deep. Slice the cable down the center until you reach the end. Remove and cut off the excess sheathing. Repeat this process for each cable.
Step 3
Cut three pieces of ground wire approximately 6 inches long from the extra cable that you have to complete the project. Set the wires aside.
Step 4
Gather together the bare copper or ground wires from inside the box. Hold these wires and the wires you prepared in the previous step together, making sure the ends of all the wires are even. With your pliers, twist the ends of the wires together in a clockwise direction. Place a green wire nut on the end of the wires, and twist in a clockwise direction until secure.
Step 5
Strip 3/4-inch from the ends of the white wires. Hold the wires together, with the stripped ends even. Using a pair of pliers, twist the ends together in a clockwise direction. Place a red wire nut over the ends and twist in a clockwise direction until secure. Fold the wires, and push them to the back of the box.
Step 6
Cut three pieces of black wire that are at least 6 inches long from the extra cable that you have not used. Strip 3/4-inch of sheathing from one end of each wire. Set the wires aside.
Step 7
Strip 3/4-inch of sheathing from the end of the power wire. Hold the stripped ends of the three wires from Step 6 together evenly with the stripped end of the power wire. Using a pair of pliers, twist the stripped ends together. Place a red wire nut on the end of the twisted wires. You now have one main power wire altered to supply power to three separate switches.
Step 8
Attach the wires to the switches. One power wire attaches to the gold screw on the side of the switch. One black wire, traveling to the light, attaches to the remaining gold screw. One bare copper ground wire attaches to the green screw. Repeat this process for the other two switches.
Step 9
Secure the switches in place with a screwdriver, using the provided holes in the box and the attached screws on the switches.
Tip
It can be difficult to hold the wires while twisting them together in steps 4, 5 and 7. Use your crimping tool to hold the wires in place as you twist the ends with pliers.
Video of the Day