
Lights and light switches are among the most common wiring elements in a home. A single pole light switch is a fairly simple circuit. There are many variations and different ways that it can be wired, but the most common (and most basic) variation has the power supply to the switch box and a switched line from there to the light.
Basic Wiring Concepts
Video of the Day
When wiring a single pole switch, it is only necessary to connect the black (power side) cable to the switch. The white (neutral) wire and the ground connection are always "on" or always connected to the light, even when it is turned off. When the switch is in its upper position (on), the power line is connected to the switch line, completing the circuit so the light is on. When the switch is in the lower position (off), the switch line is not connected to the power line, creating an open circuit where electricity cannot flow.
Video of the Day
Safely Working with Electrical Circuits
When working with electrical circuits, it is critical for your safety that you make sure that the power is off. If there is more than one switch in the box, be extremely cautious of the screws on the side of the other switches. These are often on separate circuits and can be energized even when the circuit you are working with is turned off. It may take more than one circuit breaker to remove all power from the box.
Light Box Connections
For information on running cable into the wall, see References. Once the cable is run, install a plastic or metal box for the light and for the switch, if they are not already installed. Ceiling lights will always have a metal box because of heat buildup. Wall lights may have a metal or a plastic box. Make sure you know what kind and size of box you have and verify that it is compatible with the selected fixture. You may need to purchase an adapter (fixture bar) in order to mount the fixture to the electrical box. If you are installing a fan or a fan and light combination, the box must be solidly mounted in the ceilings. Ordinary light boxes are not sturdy enough to hold up to the weight and vibration of a heavy fan.
Wiring the light is simple. Connect the ground wires first. Most light fixtures must be grounded. Metal electrical boxes must be grounded, so you will likely need to connect three grounds together (from the box, from the light, and from the switched power line) with a wire nut. Then push the ground wires to the back of the electrical box so they will be out of your way. Connect the two white wires together, and the two black wires together, then attach the fixture to the wall or ceiling per the instructions that came with the fixture.
Switch Box Connections
Wiring the switch is not that difficult. Ground the box as you did for the light. There should be four ground wires in a metal box or three in a plastic one. Push the ground wires into the back of the switch box to be out of the way and to keep them clear from exposed screws on the switch. Connect the two white wires together. Then connect the black wire from the power supply to one terminal of the switch, and the black wire going to the light to the other terminal on the switch. Most light switches have two ways of connecting wire. Solid number 14 or number 12 wire can be stripped about 1/2" and pushed directly into holes on the back of the switch, or you can connect them to the screws on the side of the switch.
Now fold the wires into the box as you push the switch into place. Make sure the ground wire is well clear of the back of the switch and the screws on the side of it. Use the screws provided with the switch to attach it to the wall box. Only tighten it until the switch is flush with the wall surface. If you tighten two much to where the switch is recessed, the cover will not fit properly. Install the cover and you are done; turn on the circuit breaker and test the circuit.
Alternate Wiring
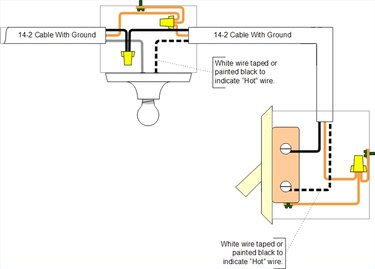
In some cases, people just want to add a switch to an existing light currently controlled by a pull chain. In that case, there is already power to the light, we just need to run it down to the switch and a line from there back up to the light. The black wire will carry power down and the white will bring the switched power back to the light. In this case the white wire is not a "neutral" wire. It carries power back up to the light. But we are never supposed to use white wires to carry power, so the national electrical code requires us to tape or paint the entire length of the white wire wherever it is used this way. Black electrical tape works great for that, so does just about any other color of electrical tape but white or green.
To make up the boxes we connect the ground wires in both boxes just as we did above. In the switch box both the black and the white wires (taped so that it is no longer white) are connected to the switch. In the light box we leave the white wire connected to the light. The black wire with power coming into the light box is connected to the black wire going to the switch. The white wire that is taped black is then connected to the black wire or power connector from the light. We now have a light that is switched. If you are not replacing the pull chain fixture, It is a very good idea to remove the string from the pull chain. If someone pulls on it the light won't come on at the switch.