Things You'll Need
Red paint
White paint
Black paint
Orange paint
Old board or easel
Mixing board
Pot of water
Paintbrushes (different sizes)
Paper or canvas
Masking tape
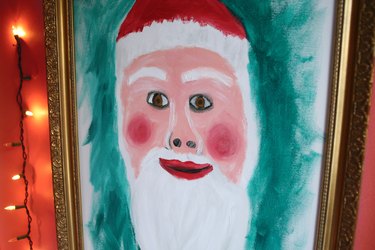
Painting a Santa Claus face is fairly simple to achieve with a little patience, care and skill. You can use any kind of paint -- poster, oil, acrylic or watercolor. Your painting of a Santa Claus face can be used on a Christmas card -- you can make multiple copies on a color photocopier or scan it into your computer and print it. You could use it as part of your Christmas decor or you could laminate it, cut it out, and hang it on your front door.
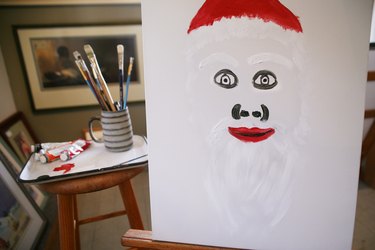
Using the Black Paint
Step 1
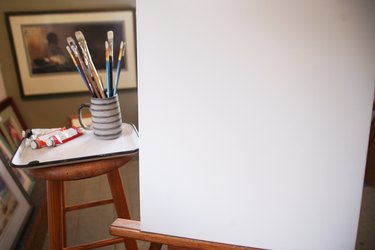
Set out your paint colors, mixing board (this can be an old piece of wood or board that you don't use or just plastic yogurt cartons) and water. Set up your paper and canvas so that it is in front of you on a stand or just a bit of old board or wood. Use masking tape to keep the paper or canvas in place. Place you paper or canvas in "portrait" orientation.
Video of the Day
Step 2
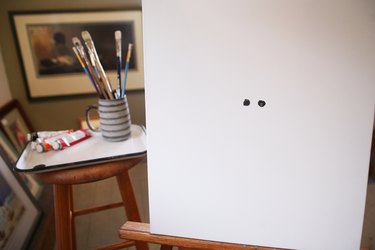
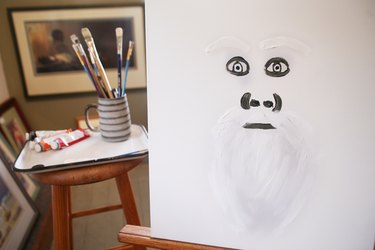
Dab the tip of a thin brush in the black paint. Go right to the very center of the page and make two small dots about a 1/4 inch apart. These will be Santa's nostrils.
Step 3
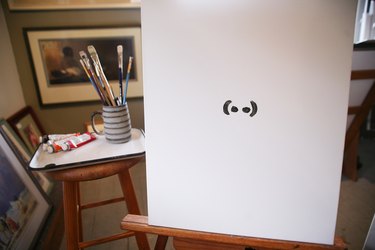
Dab a little more black paint on the paintbrush and on each side of each nostril, make a semicircle shape, painting inward (toward the nostril); this will be the side of Santa's nose.
Step 4
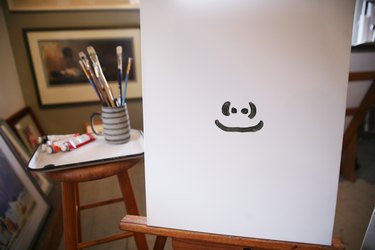
Dab the paintbrush again in the black paint, and about 1/2 inch underneath the nostrils, draw a black line and curve it upward slightly at both ends. The line will be Santa's mouth. You can make this about 2 inches long.
Step 5
Dab your paintbrush again in the black paint. Go up above the nose and about 1 inch to one side, make an eye shape. Paint a slightly upward curved line about 1 inch long, and then paint a slightly downward curved line about 1 inch long above your first line so that the ends meet. In the middle of your eye, paint a black dot (Santa's pupil) and then paint a semicircle facing toward the dot on each side of it to create the shape of his iris. Repeat this step on the other side of the face.
Using the White Paint
Step 1
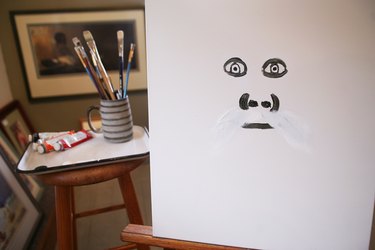
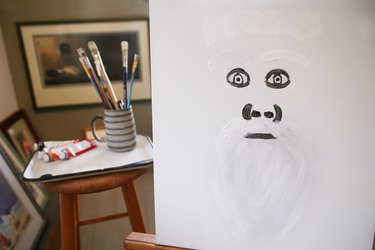
Dab a medium-sized brush with white paint. Go to the point in the middle of Santa's nostrils and make a curved line going downward and slightly outward on each side of the face. This will be Santa's mustache. With broad stokes of your brush, add lines slightly on top of each other, avoiding painting over the mouth. The mustache should be getting thicker and layered on both sides.
Step 2
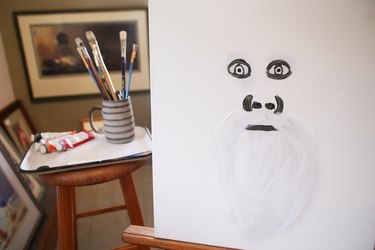
Add more white paint to your brush, and about 1/2 inch under the line of the mouth, start making downward lines with your paint. This will be the beard. How long you make the beard is up to you, but you need to make it go right to the outer edge of the mustache. Keep making downward, slightly wavy lines, layering them to give the appearance of thickness.
Step 3
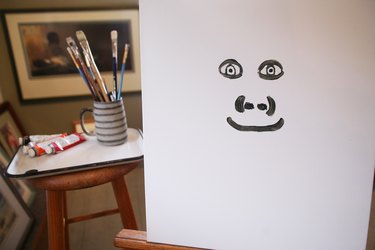
Go about 1/2 inch above each eye and paint white slightly curved lines, curving downward, that are slightly longer than each eye. These will be Santa's eyebrows. Layer theh lines to make them thicker.
Step 4
Add more white paint to your brush, and about 1/2 inch above the eyebrows, start dabbing your paintbrush, making lots of little dots in a straight line across Santa's head. The line should end just past the edge of each eyebrow. This is the edge of Santa's hat. Make the hat edge about 1 inch thick. Go over the whole band with white dots; this should give the effect of fur.
Step 5
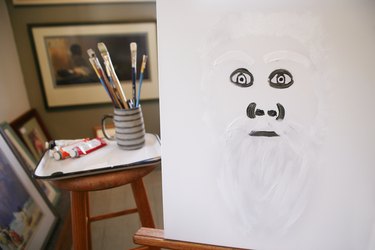
Fill in any gaps at the side of Santa's head with downward strokes of white paint to make hair. You should now really be able to see the shape of his head and the hair, beard and eyebrows completed.
Using the Red Paint
Step 1
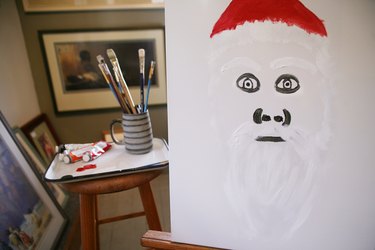
Dab a medium-sized brush into the red paint. Paint a line going diagonally inward from the top edge of each side of the white band on Santa's head. This will be the rest of his hat. Paint the lines about 3 inches long and then paint a line going straight across to join them. Smoothly fill in this outline with red paint.
Step 2
Dab a thin paintbrush into the red paint. Go to the black line you painted as a mouth. Paint from the edge of the left-hand side, above the line, a bow shape of a mouth. Underneath the line, just go from left to right, making a slightly curved red line of paint. With short, vertical strokes, paint in the mouth above and below the black line.
Step 3

Put a little more red paint on your paintbrush and lightly paint two circles, one on each side of Santa's face. These are his rosy cheeks. Don't worry if they look too bright; you can always tone them down with a little white paint later on.
Color Mixing
Step 1
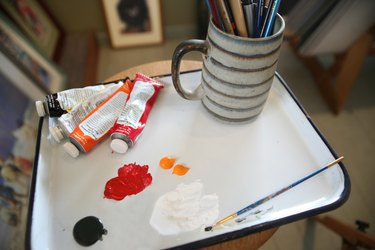
Mix together on your mixing board a small blob of red paint, about three drops of white paint, and about two drops of orange paint. You are trying to create a skin coloring, so if you prefer the skin to be lighter, add more white. If you want the skin darker, add a little more red, For a kind of peachy color, add more orange.
Step 2
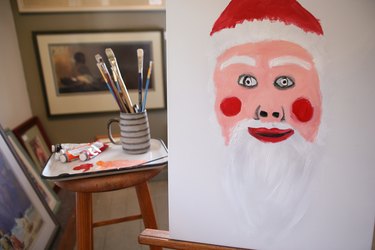
Start gently painting in with small brushstrokes all the areas of his skin, using a thin paintbrush -- on his forehead, around his eyes (not inside them), his cheeks and anywhere around the mouth that is visible. At the moment it will look as if he has no nose -- don't worry, we will make a nose shape in the next step.
Step 3
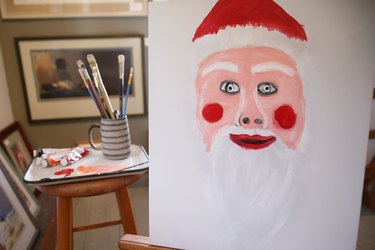
Add a little more white to your skin color so that it is slightly lighter. Put some on your thin paintbrush, and from between Santa's eyes to just above the middle of the two nostrils, make long, thin brushstrokes to give the impression of his nose. At the side of each nostril, make a semicircle going toward the nostril, with the same color. Santa should now have a nose.
Step 4
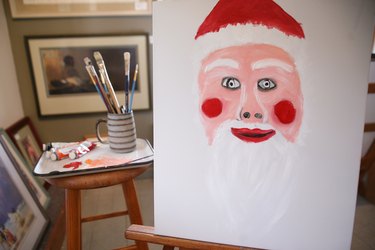
Use the same color to make a couple of brush strokes just above each eye. This will make them stand out a little better.
Step 5
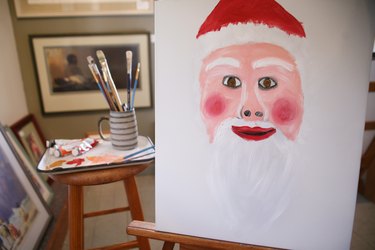
Mix together a blob of orange with a couple of drops of black; this should make a brown color for Santa's eyes. With a thin brush, starting from the pupil, go around in a circle with straight brush strokes to the edge of the iris you painted earlier. Do this for both eyes. If the cheeks look a little too red, simply put a little white paint on the tip of your thin brush and gently, going around in circles, mix a little white into his cheeks.
Tip
The type of paint you use will give different results. For instance, oils will layer and give a more textured finish, whereas watercolors may be very light. Experiment with color mixing until you get the color that you really want to put on the canvas. Wait until the paint is completely dry before doing anything with your painting.
Warning
Do not let young children use oils or acrylic paints, as they can cause skin and eye irritation.
Video of the Day