Things You'll Need
Paper
Pencil
Ruler
Scissors
Leather, 8- to 9-oz. thickness
Utility knife
Contact cement
1/8-inch hole punch
Rivets
Rivet set tool
Hammer
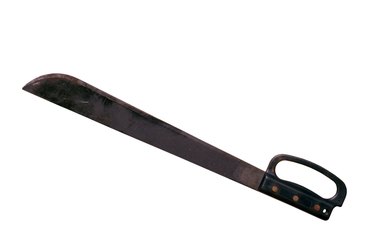
The machete is a large cutting tool similar to a cleaver, with a thin blade 18 to 24 inches long. It is frequently used as a camping and survival tool. Most machetes are sold with a nylon or leather sheath, but if you buy a cheap or second-hand machete, it may not come with one. Making a simple leather sheath for your machete is easy, requiring only a few tools and supplies.
Making the Pattern
Step 1
Fold the paper in half vertically, making sure the edges line up. Crease sharply and unfold.
Video of the Day
Step 2
Place your machete on the paper flat on its side, with the back of the blade parallel to the fold and at a distance of approximately 1/2 inch from it. Trace the machete's shape on the paper with the pencil.
Step 3
Draw a line 1 inch from the outside of the outline, beginning from the fold in the paper. When you reach the widest part of the blade, stop following the blade outline and just draw a straight vertical line, using the ruler to help.
Step 4
Draw a horizontal line crossing and perpendicular to the one you just drew. This line should be approximately 2 inches above the place where the handle of the machete meets the blade.
Step 5
Draw a vertical line parallel to and at a 1/2-inch distance from the fold in the paper. This line should begin from the horizontal line you just drew and be at least twice as long as the remaining length of the machete's handle. Draw a second vertical line, parallel to the first and at a distance of 1 inch from it. This line should be as long as the first. Draw a horizontal line perpendicular to and connecting these two lines. The long, thin rectangle formed by these lines will form the belt loop when folded in half.
Step 6
Cut out the pattern using the scissors. When you reach the center fold, stop and fold the paper along the fold. Finish cutting the pattern, following the already-cut portion, but ignoring the long thin rectangle at the top.
Making the Sheath
Step 1
Place your pattern on the leather and outline it with the pencil. Remove the pattern and cut the leather along the outline with the utility knife.
Step 2
Thin the inside surface of the top 3/4 inch of the belt loop piece. Use the utility knife to shave off part of the leather.
Step 3
Fold the belt loop in half and glue it together using the contact cement, leaving a loop wide enough for a belt to pass through.
Step 4
Punch four holes into the portion of belt loop you just glued using the 1/8 inch hole punch. The holes should be positioned in a rectangle, two on either side.
Step 5
Place four rivets through the holes you just punched. Position the rivet set tool over each rivet and hit it with the hammer several times to set the rivet.
Step 6
Place the machete on the sheath, with the back of the blade towards the center and fold the sheath closed. Check that the machete can easily slide in and out of the sheath without being too loose.
Step 7
Glue the sheath together with the contact cement. Trim any uneven edges with the utility knife.
Step 8
Punch a series of evenly-spaced holes along the edge of the sheath with the 1/8 inch hole punch.
Step 9
Insert rivets through the holes you just punched and set them with the rivet set tool and the hammer.
Video of the Day