Things You'll Need
Glass bottles
Glass cleaner
Glass paint
Artist’s brush
Measuring tape
Seed beads
4mm glass beads
Beading wire
Wire cutters
Crimp beads
Crimping pliers
Viscous glue
Copper foil
Star template
Sharp household shears
1/4-inch diameter wooden dowel
Craft knife
Copper spray paint
Battery-operated string lights
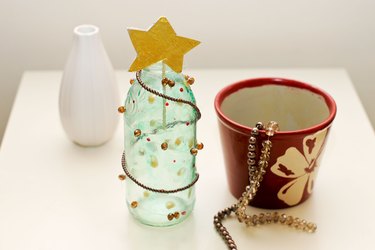
Clear glass bottles with long necks are prime candidates for making Christmas decorations. The shape of the glass bottle already resembles a tree, so it's not much of a stretch to decorate it like one. Make several glass-bottle Christmas decorations, add string lights inside the bottles to create empty bottle Christmas trees. Line them up on a windowsill or down the center of your holiday-dining table.
Step 1: Remove the Paper
Remove any paper or plastic advertising from the outside of the glass bottles to create your empty bottle Christmas trees. Clean the outside of the glass bottles with glass cleaner. Dry the bottles.
Video of the Day
Step 2: Paint the Bottles and Air Dry
Cover the outside of the glass bottles with green glass paint. Glass paint is designed for slick surfaces. It's also more translucent than acrylic paint, so the light from inside the bottles will shine through better. Place the painted bottle in a sunny location and allow the paint to dry.
Step 3: Decorate the Bottles
Dot the green glass-bottle tree with different colors of glass paint to simulate hanging ornaments. Place the bottle in a sunny location to dry the paint. You can also bake the painted bottles in the oven to cure the paint. Follow the glass-paint manufacturer's directions for baking painted objects.
Step 4: Cut and Crimp
Cut a 2- to 3-foot strand of beading wire. Thread a crimp bead and a single glass-seed bead over one end. Wrap about 1 inch of beading wire around the seed bead and back through the crimp bead. Press the crimp bead with crimping pliers to close it around the wire.
Step 5: Thread the Beads
Thread 4mm glass beads and seed beads over the wire strand in any type of pattern that you like. Leave about 4 inches of wire open at the end of the strand. Make a wire loop with the excess that will fit over the top of the glass bottle. Thread a crimp bead over the loop, thread the end of the wire through the crimp bead and crimp it closed.
Step 6: Secure the Wire to the Bottle
Fit the wire loop over the top of the bottle. Wrap the beaded wire strand around the painted bottle to resemble garland. Glue the end of the strand to the bottle with viscous craft glue. Let the glue dry.
Step 7: Trace the Star
Trace the shape of a star onto copper foil. Cut out the star shape with sharp household shears.
Step 8: Cut and Paint
Cut a 4-inch section of 1/4-inch diameter wooden dowel. Spray paint it copper. Let the paint dry. Glue the dowel to the backside of the star with viscous craft glue.
Step 9: Insert the Light String
Insert string lights inside the decorated glass bottle. Place the star atop the empty bottle Christmas tree.
Tip
Wrap 22-gauge craft wire around the top of the glass bottles, make a loop on one end of the wire and hang them on your holiday tree or from a tree branch in your garden.
Video of the Day