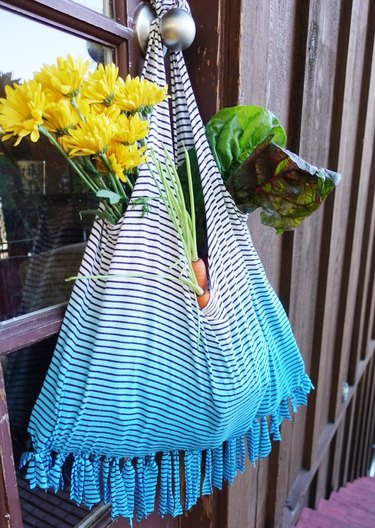
Can't bear to part with the oversized tee you bought at your first concert? We totally get it. So give it new life as a reusable market tote! This environmentally friendly, no-sew project will save your T-shirts from the dumpster and save our landfills from unnecessary shopping bag waste. Go dig those old tees out of your dresser and get started!

Video of the Day
Watch the Video Tutorial
Things You'll Need
Jersey knit t-shirt (the bigger the better as you'll have more fabric to work with)
Fabric shears
Yardstick or ruler
Cut Handles
Step 1
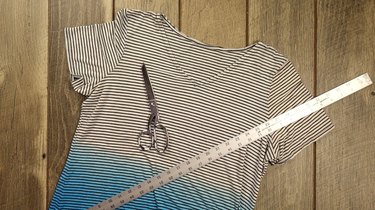
Fold your shirt in half lengthwise.

Place the end of your yardstick or ruler where the shoulder meets the neck edge and measure 11 to 12 inches down diagonally to the fold (see image below). Use your fabric shears to mark this point along the fold line with a small notch. The length you measure (between 11 and 12 inches) depends on how long you'd like your tote's straps to be as well as the overall length of the shirt itself. If you're unsure of how much to cut, start with 11 inches. You can adjust later.

Tip
Since jersey knit fabric is extremely elastic, your tote will lengthen a lot when in use. When checking for your desired strap and body length, make sure to stretch out your fabric to better gauge its final appearance.
Step 2
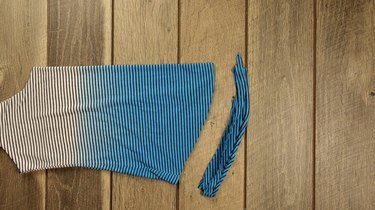
Now cut a curved line from the notch you marked to where the shoulder meets the neckline (see the arrow in the image below).

Here's how it will look after cutting.

Step 3
Cut off the T-shirt sleeves following the sleeve seam line. Make sure to remove the bulky seam stitches along with the sleeves.

Cut Fringe
Step 1
Before cutting your fringe, trim off the hem of your shirt. If your shirt is short on length, cut as close as possible to the hemline stitches to conserve fabric. Note that the particular shirt I used here has a curved hemline which gave me a curved fringe. If you like this particular look but your shirt has an even hem, just emulate the curved cut shown here when trimming off your hem.
Step 2
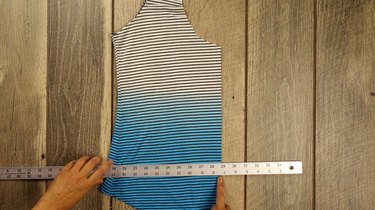
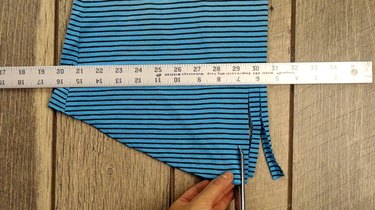
With your shirt still folded in half, measure 11 to 12 inches down from the point where you cut your first notch in Step 1. This will be the length of your tote's body. Bear in mind that you will need enough material -- at least 2 inches -- below this point for your fringe.

Rotate your yardstick or ruler along the 11- to 12-inch point you just measured so that it's perpendicular to the fold line. This will be your fringe cutting guideline.
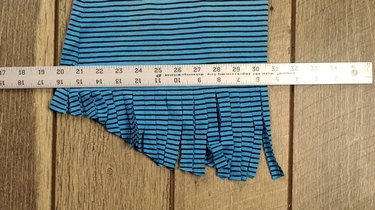
Step 3
Cut 1/2 inch strips of fringe from the bottom of the shirt to your guideline.
Knot Fringe to Seam the Bottom
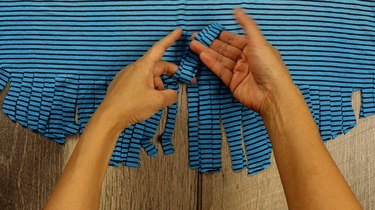
Step 1
Unfold your shirt. You're now going to seam the bottom of your tote by knotting the front and back pieces of fringe together. With your unfolded shirt laid out flat in front of you, simply take a matching front and back piece of fringe (as shown below) and tie both together using a simple knot. Before tightening, push the knot up so that it sits where the fringe begins, then pull firmly to ensure that it doesn't come undone.
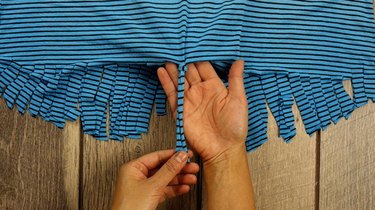
Step 2
Next, pull the fringe pieces as far as they'll go to stretch them out. The stretched fringe will become longer and thinner, and will curl in at the edges.
Step 3
Repeat until the entire bottom is seamed and fringed.

Finish Handles
Step 1
To finish your handles, stretch out the straps as far as they'll go. This will not only make the raw edges curl in (to give them a finished appearance), but it will also stretch your straps out to their final length. Bear in the mind that you're going to lose some of this length when you tie the straps together, so if you'd like longer straps, fold your shirt in half and cut a little bit more below the original cut you made in Step 2.

Step 2
Finally, double tie the straps together tightly.


And, just like that, your no-sew T-shirt tote is ready to fill with fresh goodies from your local farmers market!