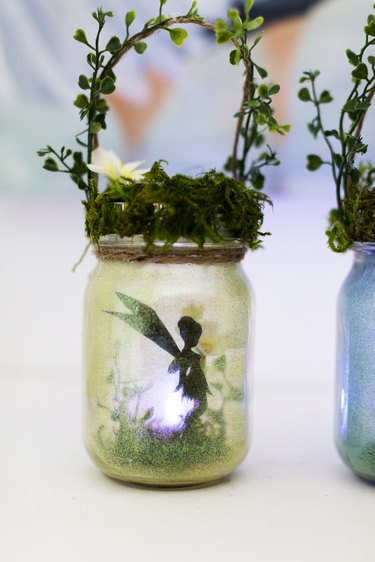
These charming fairy lanterns are not only easy to make, but look adorable in a garden or when used as a night light. They'll be sure to spark your child's imagination.

Video of the Day
Things You'll Need
Various size jars
Moss
Artificial flowers and plants
Jute rope
Fine glitter
Fairy silhouette cutout
Cardboard
White glue
Foam brush
Hot glue
Flameless tea light
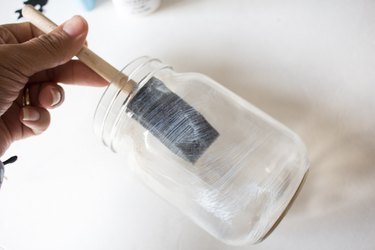
1. Add glue to the jar
Using a foam brush, spread a thin layer of white glue inside a clean jar.
Video of the Day
2. Add glitter
Prior to the glue hardening, pour some fine glitter inside the jar.

3. Shake the jar
Close the lid and shake the jar so that the glitter adheres to the glue. Discard remaining glitter and allow glue to dry.

4. Prep the plants and cardboard
Cut a piece of cardboard to fit inside the opening of the jar and sit on the base of the jar. Trim various pieces of faux plants and flowers.

5. Glue the plants
Hot glue moss and plants onto cardboard.

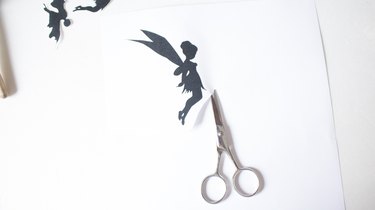
6. Create the fairy
Cut out the silhouette of a fairy.
Tip
You can find a variety of free fairy silhouettes online.
7. Glue the fairy in cardboard
Hot glue the fairy to cardboard, ensuring you place it as close to the edge as possible.

8. Add the fairy to the jar
Insert the cardboard and fairy into jar.

9. Add the handle
Make a loop with jute rope and attach it to the lid using hot glue. At this time, you can also glue some moss.

10. Add the vine
Glue some artificial vine onto the jute rope if desired.

11. Add candles
Place a flameless candle into the jar.

12. Close the lid
Secure the lid in place and enjoy!