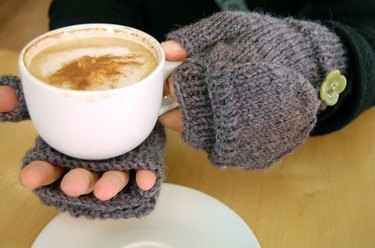
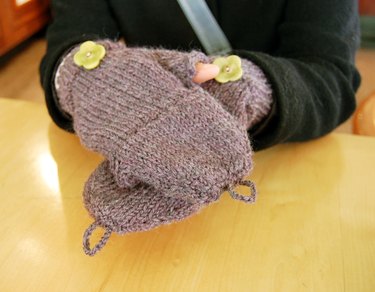
Fingerless mittens are a great compromise between warmth and having the dexterity to check a cell phone or use a set of keys when opening the car door. Button back the flap to check your phone or pull it snugly in place while driving or waiting for the bus. These mittens are designed to fit a hand with a 3-inch wide palm.
Video of the Day
Things You'll Need
200 yards of DK wool
#6 straight knitting needles + 1 spare one
C crochet hook
2 buttons
2 stitch markers
Tapestry needle
Sewing needle
Sewing thread
Scissors
Ruler or tape measure
Step 1
Check your gauge by knitting a swatch, or a small square. You should have 4.5 stitches and 7 rows in a 1-inch square.
Video of the Day
Step 2
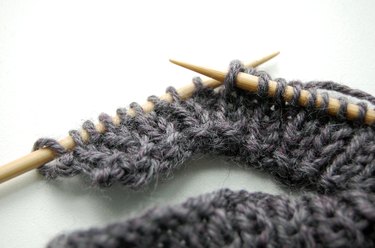
Cast on 40 stitches. Work these stitches in a 1x1 rib for 2.5 inches. Work the next two rows in stockinette starting with a knit row.
1x1 rib:
*Knit 1, Purl 1, repeat from * across the rest of the stitches. Turn work, *Purl 1, Knit 1, repeat from * across the rest of the stitches.
Stockinette: Knit 1 row. Turn work, purl 1 row.
Step 3
Shape the thumb gusset: Knit 20, place a stitch marker, Make 1 after marker, Knit 2, Make 1, place a stitch marker, knit 18 stitches – 42 stitches. Knit to stitch marker, Make 1 after marker, knit 4, Make 1, knit remaining stitches – 44 stitches. Knit to stitch marker, Make 1 after marker, knit 4, Make 1, knit remaining stitches – 46 stitches. Knit to stitch marker, Make 1 after marker, knit 6, Make 1, knit remaining stitches – 48 stitches. Knit to stitch marker, Make 1 after marker, knit 8, Make 1, knit remaining stitches – 50 stitches. Purl 1 row. Remove markers.
Step 4
Knit thumb: Knit 32 stitches across. Cast on two stitches at the beginning of the next row using the knitted cast on method. Purl 14 stitches (including the 2 you just cast on). Turn and cast on 2 more stitches using the knitted cast on method. Knit across 16 stitches for the thumb. Continue working in stockinette until the thumb measures 1 inch, ending with a purl row. Bind off all stitches and leave a 6-inch tail. Sew up the thumb thumb seam using the tapestry needle.
Step 5
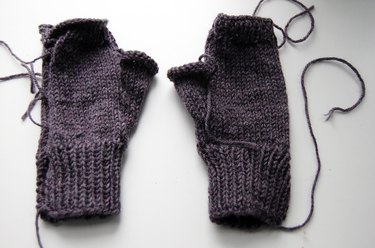
Knit the rest of palm: With the Right side of work facing you, pick up and knit 2 stitches from the base of the thumb. Knit the remaining unworked 18 stitches, giving you a total of 40 stitches. Turn and purl the next row. Knit 2, place a stitch marker, knit 18 and place a 2nd stitch marker, continue knitting remaining stitches. Work in stockinette without further shaping and sliding the marker as you go for 1.5 inches from where you picked up the stitches at the base of the thumb. Knit the next inch in 1x1 rib. Bind off all stitches.
Step 6
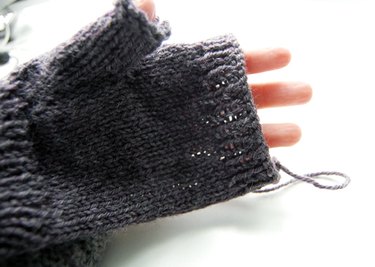
Knit the mitten flap: Cast on 20 stitches. Work 4 rows in 1x1 rib. Slide stitches to a spare needle. With Right Side of work facing, cast on one stitch and pick up 18 stitches between the stitch markers on back of glove. You have a total of 19 stitches. Purl next row. Knit 19 and then knit the 20 stitches on the spare needle. Continue working in stockinette stitch for 2.5 inches.The flap should end about 1 inch below your longest finger. End with a purl row.
Step 7
Shape the top of the mitten flap:
Knit 1, slip slip knit (ssk decrease), knit 14, knit 2 together (k2tog decrease) ssk, knit 14, knit 2 together (k2tog decrease), knit 1. Purl 1 row. Knit 1, ssk, knit 12, k2tog, ask, knit 12, k2tog, knit 1. Purl 1 row. Knit 1, ssk, knit 10, k2tog , ssk, knit 10, k2tog, knit 1. Purl 1 row. Knit 1, k2tog, knit 8, k2tog, ssk, knit 6, k2tog, knit1. Purl 1 row. Bind off all stitches.
Step 8
To work the Left Mitten, repeat as for Right Mitten until you reach the Thumb Gusset.
To shape the Left Thumb gusset: Knit 18, place a stitch marker, Make 1 after marker, Knit 2, Make 1, place a stitch marker, knit 20 stitches – total 42 stitches. Continue knitting the left mitten as you knit the right.
Step 9
Finishing:
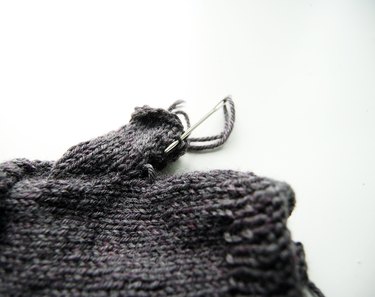
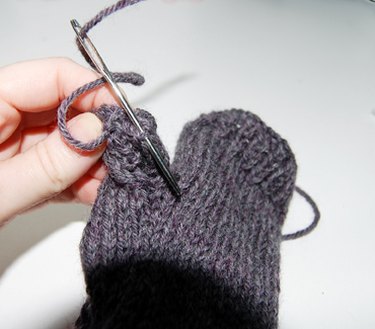
Join the top seam of the mitten flap. Join the side seams of the mitten. Sew in all yarn ends. Crochet a 3-inch chain of yarn. Fasten off. Thread your tapestry needle with one of end of chain, pull through to inside of mitten flap. Make a loop and pull the other end through to the inside of mitten flap. Stitch together the ends. Fold flap over. Position your button and sew it in place. Repeat for the other mitten.
Tip
Always take the time to check your gauge. Cast on 25 stitches. Knit a 4 x 4 swatch in stockinette. If you get more than 4.5 stitches to the inch, go down a needle size. If you get fewer than 4.5 stitches to the inch, go up a needle size.
Have fun with color! Knit the cuff one color, the main body another and the thumb and flap another color. In the stockinette areas, try out some fun cables or other stitches for more texture.