How to cook chicken tenders in the oven for crispy results
Most dry chicken tenders aren't a seasoning problem. They're a thickness problem. Tenderloins taper from a thick end to a thin one, so the skinny tip reaches a safe temperature well before the thick end does, and a cook who waits for the whole tray to "look done" usually overcooks the thin pieces in the process.
This guide covers how to cook chicken tenders in the oven so the crust turns genuinely crisp and the center stays juicy, using even thickness and an instant-read thermometer instead of a fixed clock time. The method, at a glance:
- Pound the thick end of each tender down until the piece is an even thickness throughout, roughly half an inch
- Bread with flour, then egg, then panko
- Bake at 400°F (204°C) on a wire rack
- Pull the tenders at 165°F (74°C)
- Rest 5 minutes on the rack before serving
Temperature matters more than the timer here. The FSIS poultry lethality table, as summarized by Serious Eats, lists 165°F as requiring no additional hold time for the pathogen reduction it's built around, which is why that number remains the simplest endpoint for a home kitchen (earlier this year). Breading complicates the timing side of things: it acts as a layer of insulation between the heat source and the meat, typically adding 15 to 20 percent to total cook time compared with unbreaded chicken, according to Plainpaper.blog (earlier this year). That figure comes from research on breaded chicken breast, not tenders specifically, so treat it as a reasonable estimate rather than a guarantee.
Four things separate a good tray of tenders from a sad one: even thickness going in, a crust that survives the heat, a bake that doesn't guess at the clock, and a doneness check that doesn't dry out the meat. Handle those in order and everything else follows.
Before you start: what you'll need
Video of the Day
An instant-read thermometer is non-negotiable for this method. Golden color and a firm bite tell you the outside is done. They say nothing about the inside, and that gap is exactly what turns tenders dry.
A note on the amounts below: this is an editorial formula, scaled down for tenderloins rather than lifted directly from one tested recipe. A comparable Serious Eats katsu recipe calls for an 8-ounce chicken breast (or two thighs), 1 cup flour, 2 eggs, and ¾ cup panko, pounded to a quarter inch (published last year). Tenderloins start smaller and thinner, so the proportions here are adjusted accordingly. Treat them as a starting point to scale, not a strict ratio.
- About 1 pound chicken tenderloins (8 to 10 pieces)
- ½ cup all-purpose flour
- 1 egg, beaten
- ¾ cup panko breadcrumbs
- Salt
- A light coat of oil or cooking spray
- A wire rack set inside a rimmed baking sheet
- A zip-top bag or sheet of plastic wrap for pounding
This method assumes raw, fully thawed tenderloins. If they came from the freezer, thaw them completely in the refrigerator before pounding; a still-frozen center won't flatten evenly and will throw off the thermometer reading later. Keep the chicken cold until it's time to bread it, and if the kitchen is warm, work in smaller batches so nothing sits out longer than it needs to.
Most metal cooling racks are oven-safe at 400°F, but check the manufacturer's rating if in doubt. Lining the sheet underneath with foil makes cleanup easier without affecting airflow to the tenders above it.
Video of the Day
Getting chicken tenders to an even thickness
-
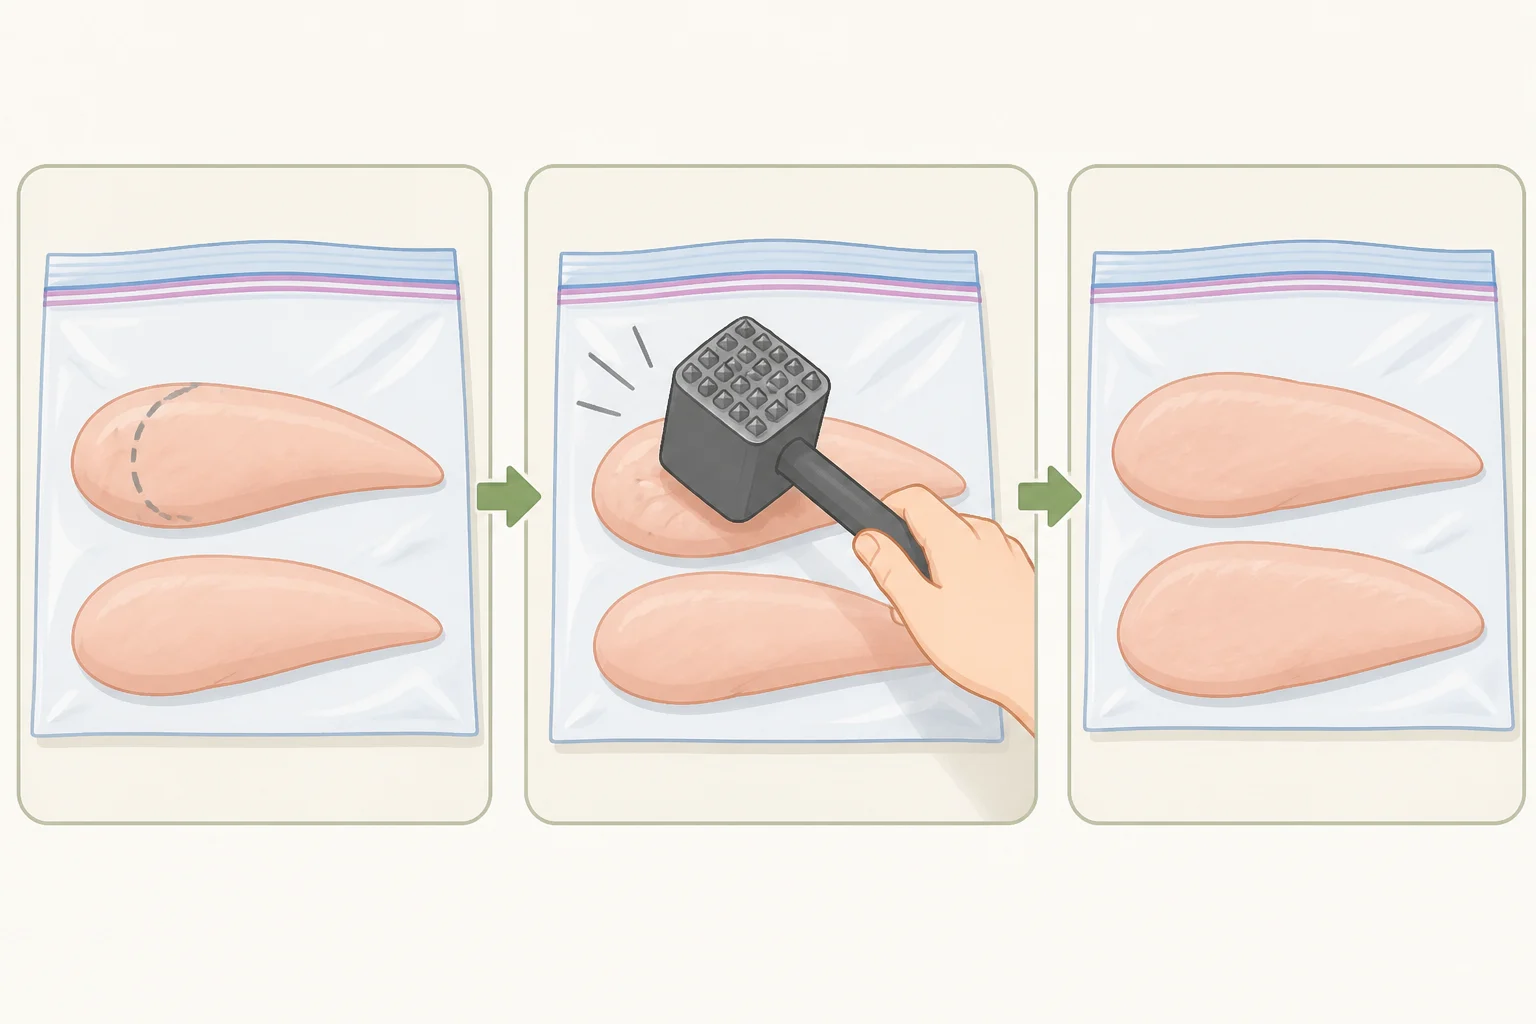
Pound the thick end down. Place the tenders in a zip-top bag and flatten the thicker end with a meat pounder, rolling pin, or the bottom of a heavy skillet until each piece is roughly even from tip to tip, somewhere around half an inch. The underlying principle is well established: pounding meat to a uniform thickness promotes quicker, more even cooking, according to Serious Eats. The half-inch target itself is a practical starting point for tenderloins, not a number pulled from that source.
-
Salt the tenders and let them rest. Fifteen minutes at room temperature is the minimum; at least four hours in the fridge, up to overnight, is better. Testing on a comparable breaded cutlet found that this step improves the meat's ability to hold onto moisture during cooking (Serious Eats).
Skipping the pounding step is a common reason a batch cooks unevenly: the thick end and thin end are no longer racing toward the same finish line. Even thickness is what lets one check-in time work across the whole tray.
How to make crispy chicken tenders: building the crust
-
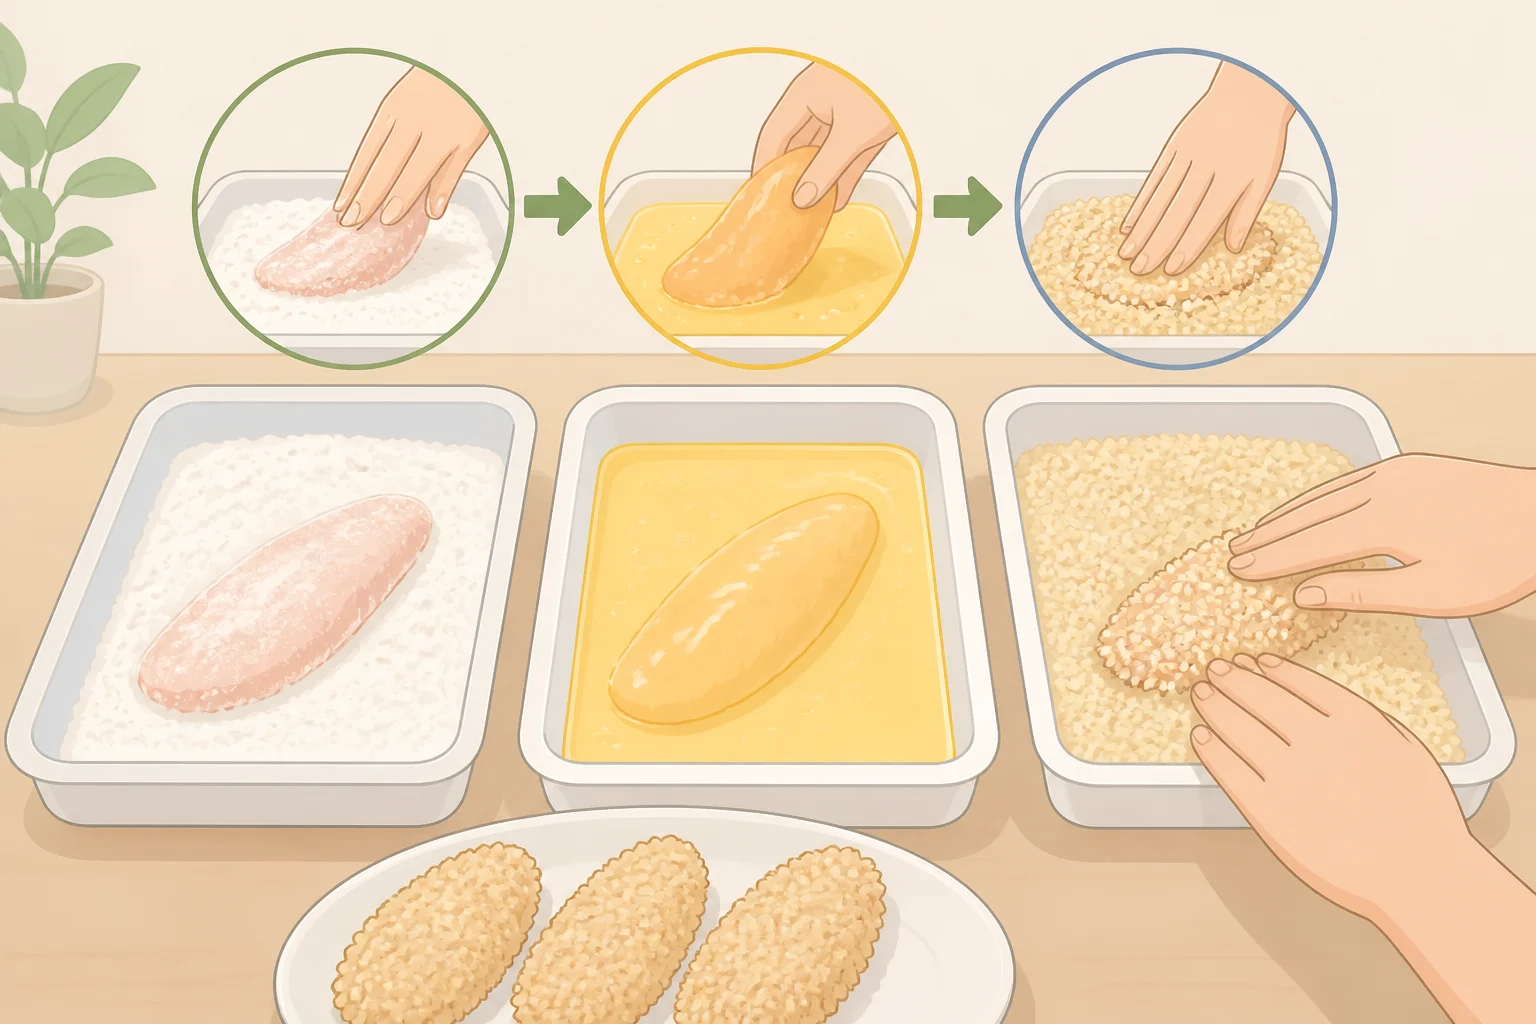
Set up a three-stage breading station. Flour first, then beaten egg, then panko. Panko's craggy, irregular structure gives it more surface area than fine breadcrumbs, which is part of why it produces a crunchier crust (Serious Eats).
-
Press the crumbs in instead of just dipping. Coat each tender in flour, shake off the excess, dip in egg, then press it firmly into the panko so the crumbs pack into an even layer instead of scattering thinly across the surface.
Two mistakes show up most often at this stage. The first is clumping: flour and egg build up on the fingers and start dropping wet clots into the panko, which then stick to the next tender in uneven globs. Keeping one hand dry for the flour and panko and one hand wet for the egg mostly solves it. The second is skipping the press; a light dip leaves a thin, patchy layer that browns unevenly and flakes off in the oven.
A study of frozen chicken nuggets found that higher cooking temperatures and longer times increased both measured and perceived crispness (University of Milan study, published last year). That study used factory-breaded, frozen nuggets rather than fresh, hand-breaded tenders, so read it as support for the general idea, heat and time both matter to crunch, rather than validation of this recipe's exact numbers.
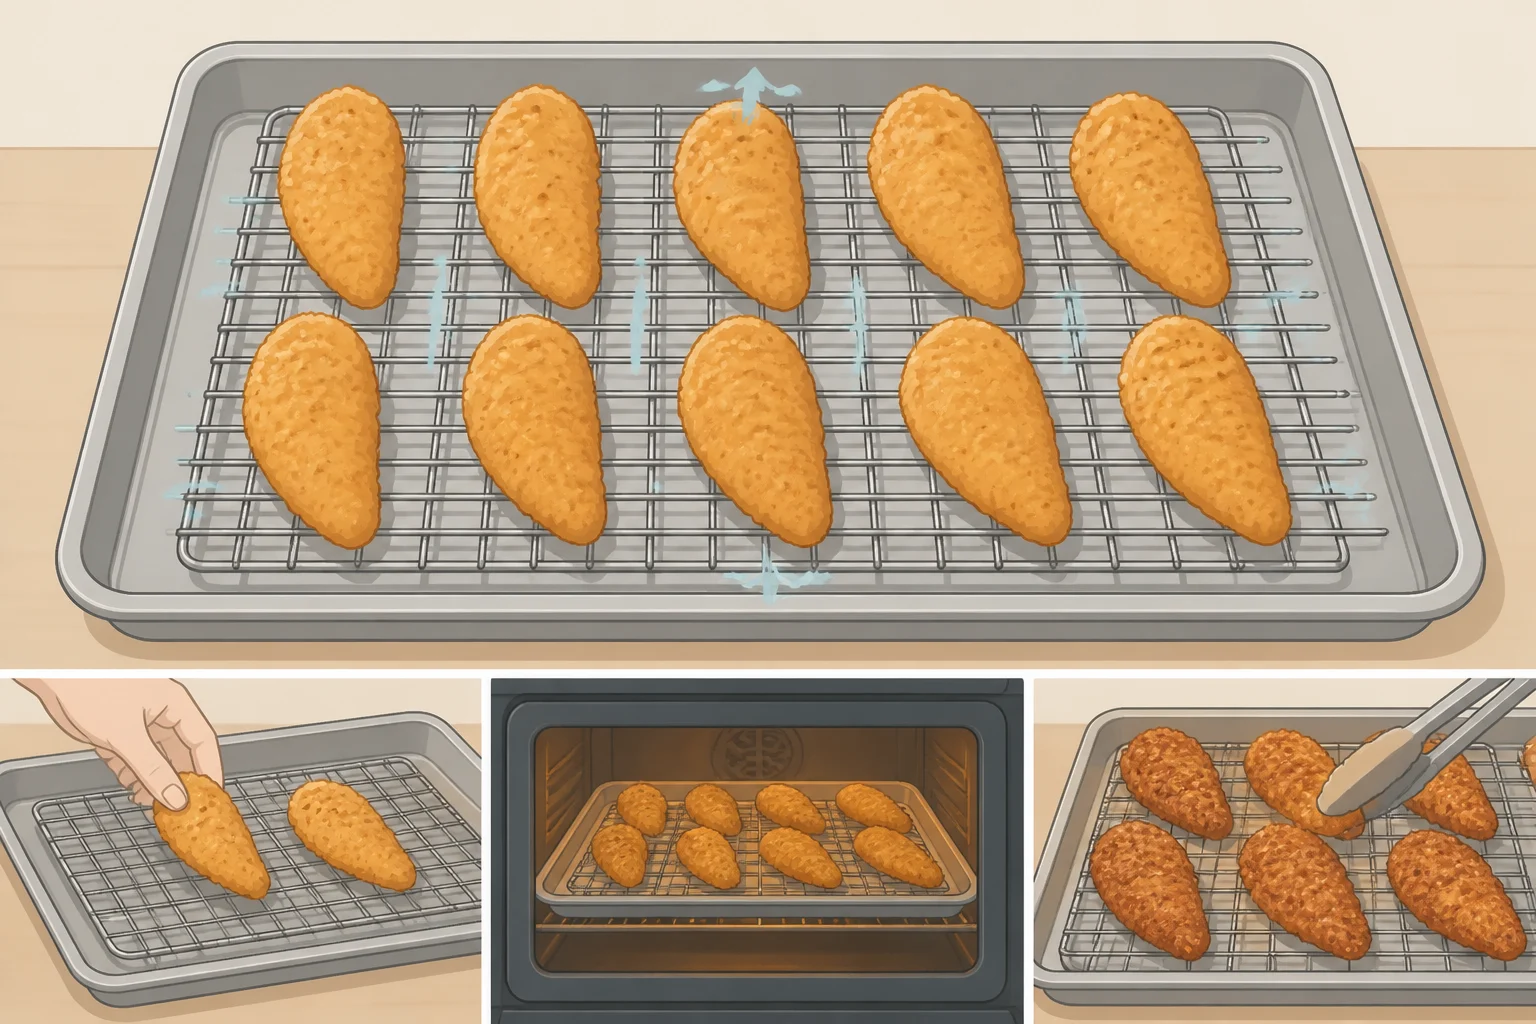
- Rack the breaded tenders before they go in the oven, not just after. A rack over a rimmed baking sheet keeps the underside from sitting in condensation while the oven preheats, extending the same logic behind resting cooked chicken on a rack instead of a plate (Plainpaper.blog). No rack on hand? Flip the tenders once, halfway through baking, so both sides get direct heat.
A light mist of oil or cooking spray over the tops helps the crust brown more evenly, following the same reasoning used in oil-assisted air-fryer methods for similar cutlets (Serious Eats). How dark that crust gets by the time the center hits temperature depends on more than the dial setting: oil coverage, an oven's actual calibration, and where the rack sits inside it all shift browning speed. That's part of why two ovens set to the same 400°F can finish a tray of tenders looking noticeably different.
How to cook chicken tenders in the oven: temperature and timing
-
Preheat the oven to 400°F (204°C). That number is a deliberate choice: a 400°F to 425°F oven pushes the crust through the Maillard browning reaction in roughly the same 8 to 12 minutes it takes thin, breaded chicken to reach a safe internal temperature, so the outside and inside finish close together instead of one waiting on the other (Plainpaper.blog). Arrange the tenders on the rack with space between each piece. Crowded pieces trap steam against the breading, which can leave the crust soft instead of crisp.
-
Start checking internal temperature around the 12-minute mark. Treat that as a practical starting point for half-inch tenders, not a figure drawn from a controlled test, and let the thermometer make the actual call. For reference, similarly thin, pounded cutlets reached a safe temperature in about 6 to 8 minutes in a preheated air fryer, a different appliance running at a different heat profile than this guide's oven method (Serious Eats). Broader guidance for thicker, unpounded breaded chicken breasts baked in a standard oven runs closer to 20 to 25 minutes (Plainpaper.blog). Neither figure matches half-inch, oven-baked tenders exactly, which is the whole reason to keep a thermometer in hand instead of watching the clock.
If the first check comes in under 165°F, close the oven door and check again in a few minutes rather than pulling the tenders early and hoping. Pieces near the edges of the pan also tend to run ahead of pieces in the middle, since they catch more direct airflow. If one check shows a wide spread across the tray, rotate the pan and give the slower pieces extra time before checking the whole batch again.
If the crust browns before the center is close to done, loosely tent the pan with foil and lower the oven to around 350°F, letting the interior finish cooking without the coating scorching further (Plainpaper.blog).
If the tenders don't fit on the pan without touching, cook them in two batches instead of crowding one tray. Touching pieces block airflow to whatever's underneath them, a straightforward way to end up with a soft, pale bottom no matter how accurate the oven temperature is.
Chicken tenders internal temperature: confirming doneness
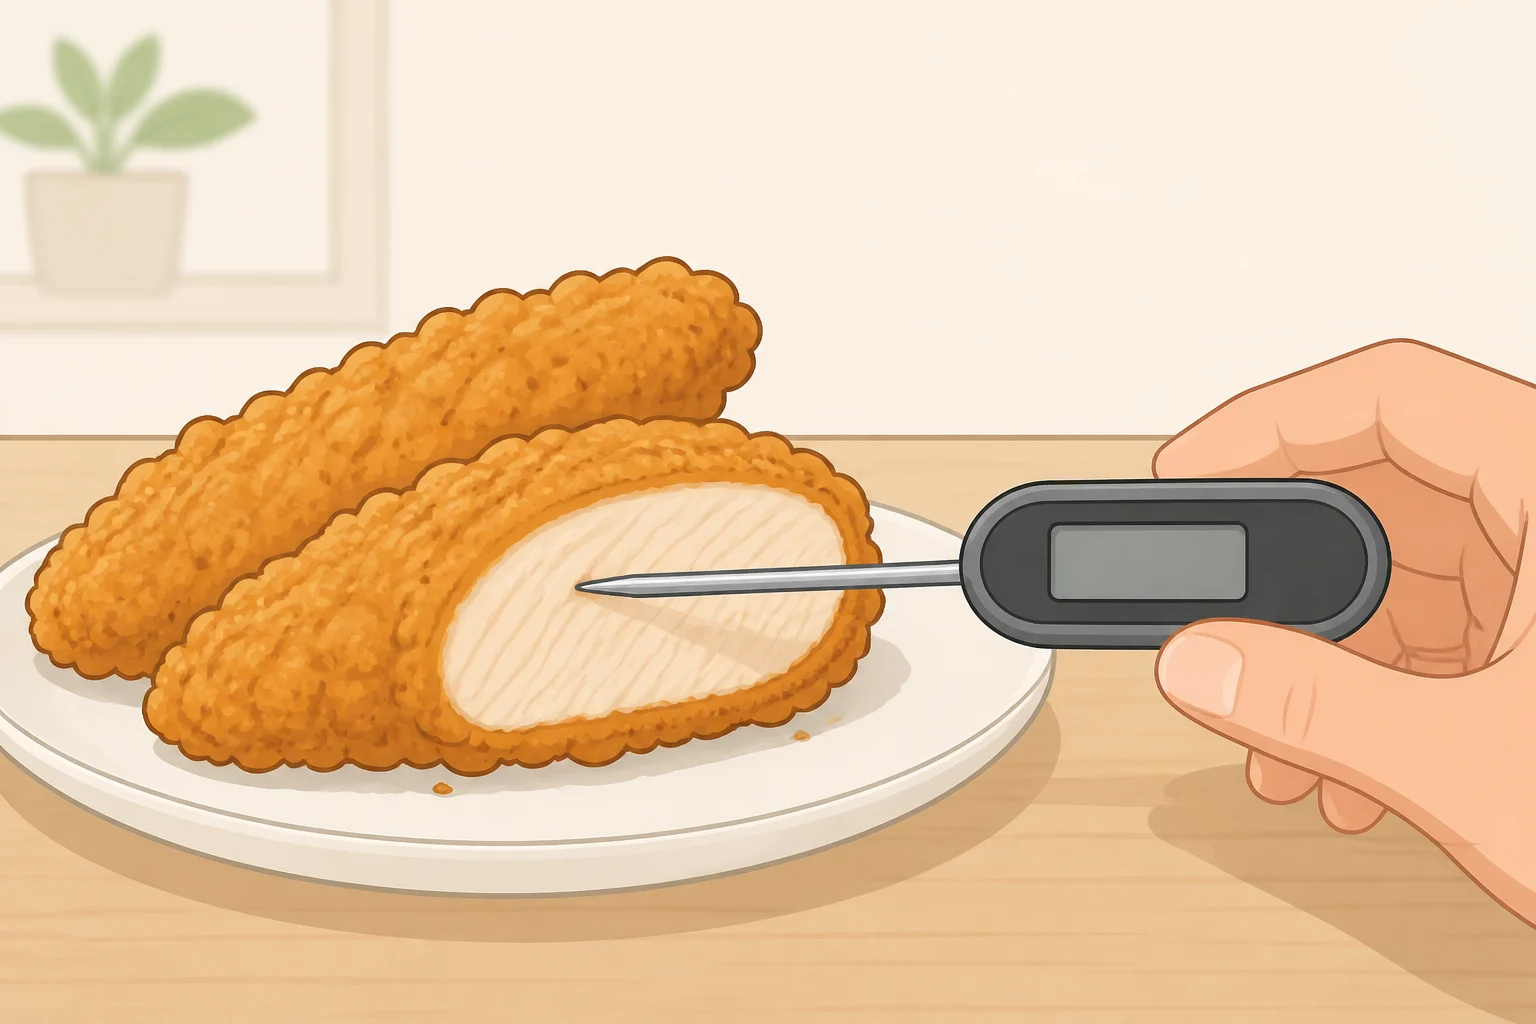
- Probe from the side, not the top. Insert the thermometer horizontally into the thickest tender, aiming for the center, instead of pushing straight down through the crust. Probing from the top is a common mistake, and it can crack the coating or give a false reading if the tip hits the rack or pan underneath (Plainpaper.blog). Check the thickest piece first, since it's the last one to reach temperature; if the tenders vary noticeably in size, probe a second, smaller piece too. It's common for one or two pieces in a batch to lag behind the rest even after pounding.
Pull the tenders at 165°F (74°C). The FSIS table, as summarized by Serious Eats, lists 165°F as requiring no additional hold time for the 7-log pathogen reduction it's built around, which is what makes that number the simplest endpoint for a home cook to aim for. Hit it, and there's no more math left to do.
There's a lower-temperature option worth knowing about, even though it isn't what this guide builds around. The same FSIS data, again as summarized by Serious Eats, show the equivalent safety margin can be reached at 155°F, provided the meat holds that temperature for about 54 seconds. It's a legitimate, government-sourced method, but it requires continuous monitoring most home cooks aren't doing with a hand-held thermometer, so this guide sticks with the straightforward 165°F target instead.
Pulling breaded chicken at 160°F and tenting it so residual heat carries it to 165°F is a real technique, sometimes suggested for thicker cuts of breaded chicken breast (Plainpaper.blog). On a tender this thin, there's less margin for that math to work out, so cook straight to 165°F rather than relying on carryover.
- Rest for 5 minutes on the rack, not on a plate. A rack keeps air moving underneath the crust so it stays crisp. A plate traps steam against the bottom and softens whatever crunch just got built.
Troubleshooting: pale crust, soggy bottoms, overbrowned coating
Pale crust at 165°F: this usually points to an oven running cooler than its dial suggests, or tenders packed too close together to brown evenly. Many home ovens run several degrees off from their setting. Spacing the pieces out and giving the tray a few extra minutes tends to fix the color without overcooking the inside.
Soggy bottoms: this usually traces back to the rack, not the temperature. If the tenders sat directly on the baking sheet, moisture had nowhere to go. Switch to a wire rack next time, and if one still isn't available, flip the tenders partway through so the side that was down gets a turn facing up.
Coating browns before the center is ready: this shows up most on thicker or unevenly pounded pieces, since more mass takes longer to reach 165°F while the surface keeps browning regardless. Tent the pan with foil and drop the oven to around 350°F, as covered above, and let the interior catch up.
Use the first batch to learn the oven, not just the recipe. Note the time it actually took to hit 165°F and how the rack position affected browning. That record is a better starting point for the next batch than any generic time range, since oven calibration, tender size, and batch count will always nudge the numbers a little.
The same logic, even thickness plus a thermometer instead of a fixed clock, carries over to other ways of cooking breaded chicken, including air frying, which runs at higher heat over a shorter time. Get comfortable with the oven version first; the rest is a matter of applying the same principle to a faster appliance.