Espresso Martini Cookies Recipe: Make Them Taste Like the Cocktail
This espresso martini cookies recipe walks through the exact build that makes the cocktail reference land: Dutch-process cocoa in the dough, espresso powder bloomed into butter, a 30-minute chill, pulled from the oven while the center still looks soft, finished with a Kahlúa glaze, and topped with three espresso beans and a dusting of cocoa. Everything below explains why each choice matters and what to do when you want to deviate.
The risk is a specific one. Too much chocolate and you lose the coffee flavor entirely. A baker testing an espresso chocolate ganache filling found it pushed the result so far toward chocolate that the coffee taste disappeared completely (Easy Gay Oven, published last December). The fix isn't adding more espresso powder to compensate. Keep the chocolate subordinate from the start.
What you'll need before starting: espresso powder (strongly preferred over brewed espresso, explained below), Dutch-process cocoa, confectioners' sugar, unsalted butter, and Kahlúa or another coffee liqueur. Minimum chilling time: 30 minutes. For readers skipping the alcohol, the substitution options are addressed at the finish step with an honest account of what they produce.
How to make espresso martini cookies: step 1 build the dough
Video of the Day
Use espresso powder, not brewed coffee, as your default. Instant espresso powder is concentrated and dry, which means it integrates without changing how the dough behaves. Brewed coffee adds liquid, which softens the dough, makes it stickier, and affects how far the cookies spread. CookSizzle puts the practical logic plainly: instant espresso powder incorporates directly without altering dough hydration, while brewed coffee changes the texture in ways that are hard to control. Espresso powder doesn't.
Quantity matters. Delish uses 1 teaspoon present but not dominant. Food55 pushes to 3 tablespoons for a deliberately aggressive coffee hit. For a cookie that tastes like the cocktail rather than straight espresso, somewhere between those two extremes is the target; based on comparing those approaches, 1.5 to 2 tablespoons is a reasonable starting point that keeps the coffee prominent without overwhelming the glaze.
Bloom the powder into the butter first. Stir the espresso powder into the softened butter and let it sit for about a minute before adding other ingredients. Coffee flavor distributes more evenly through fat than through a wet or dry mix, so this step produces consistent intensity in every bite rather than uneven concentration (Food55). Sixty seconds. Worth doing.
Keep the chocolate in a supporting role. Around 6 tablespoons of Dutch-process cocoa per batch the Delish baseline provides richness and a dark background note without competing with the espresso. Sift it to avoid bitter clumps, as Food55 recommends. Don't add melted chocolate to the dough. The cocoa is there for body and color; the espresso is the lead flavor.
⚠ Pitfall: Scale up the cocoa or fold in melted chocolate without adjusting the espresso, and you'll bake a genuinely good cookie that tastes nothing like an espresso martini. When in doubt, dial the chocolate back before reaching for more powder.
If you prefer fresh espresso: Mer's Good Eats uses a 2-ounce shot and describes the result as richer and more complex. The tradeoff is a softer, stickier dough. Go this route and chilling becomes non-negotiable rather than recommended.
Video of the Day
Step 2: Chill and bake how long you wait determines what you get
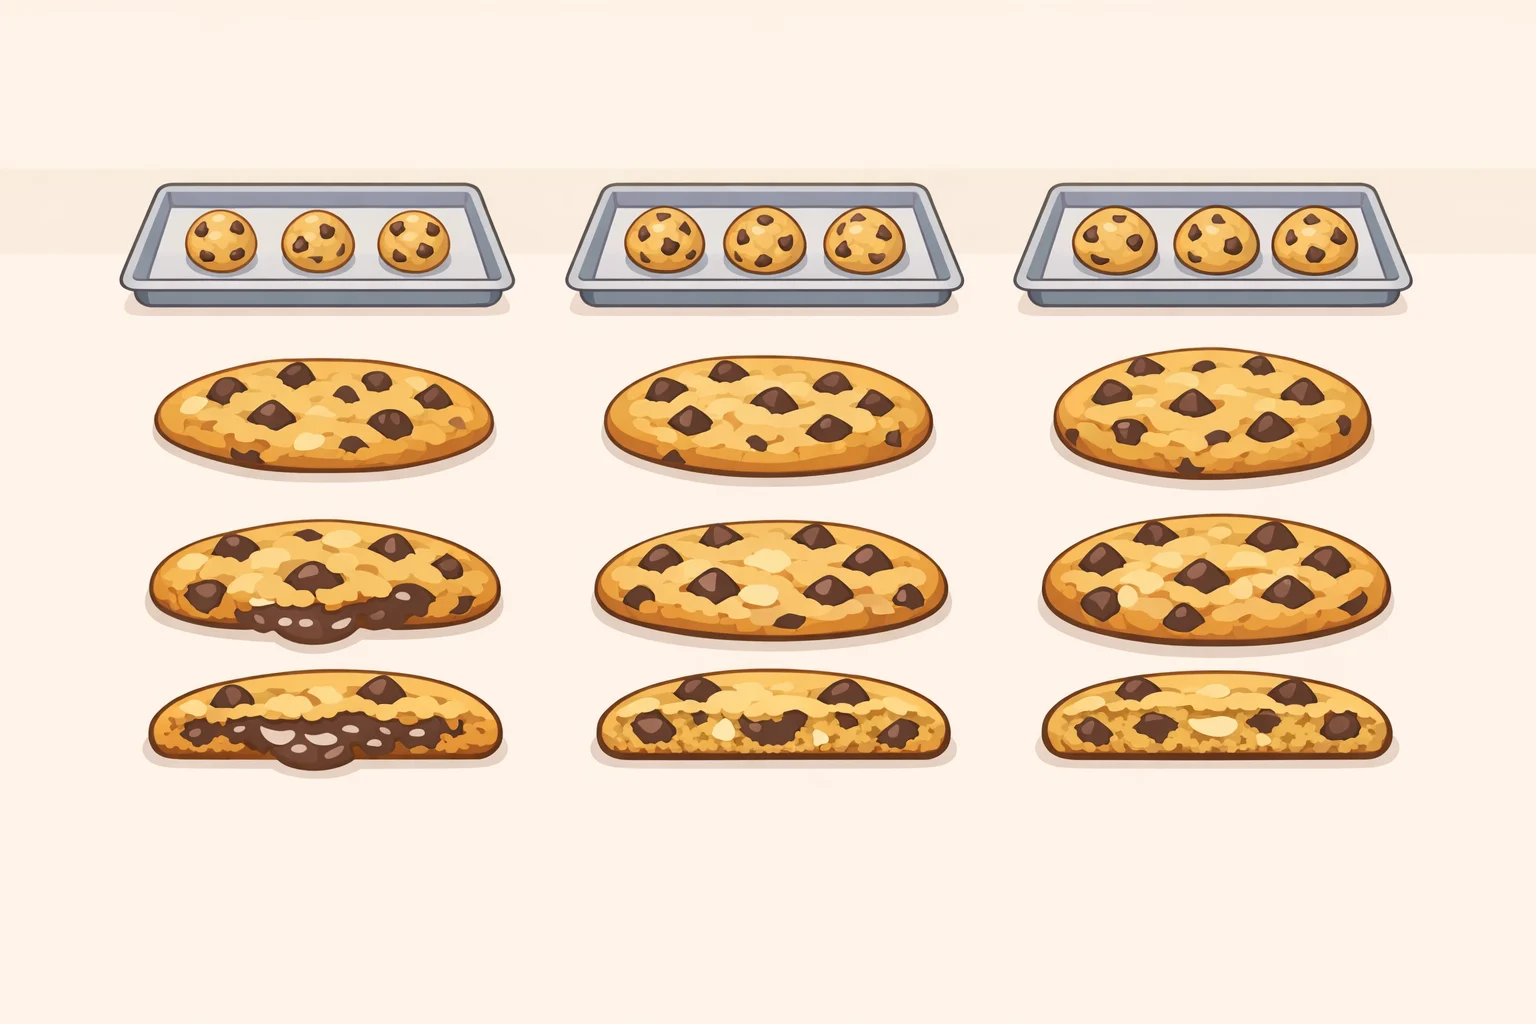
Chilling time is a texture decision. Three outcomes are meaningfully distinct:
- No chill: Cookies spread during baking, producing thinner edges and crispier texture throughout. A different style of cookie.
- 30 minutes: The recommended default. Cookies hold their shape better, centers stay soft, and the espresso and cocoa have time to begin integrating. Both Mer's Good Eats and CookSizzle point to this window for shape stability and deeper flavor.
- Overnight: Food55 notes that extended chilling develops complexity more from the brown sugar, more from the espresso in a way that's noticeable. Worth the lead time for a dinner party or a batch where the extra effort shows.
Make-ahead note: The unbaked dough can be shaped into a log and refrigerated for up to 3 days or frozen for up to a month, then sliced and baked on demand (Delish). Delish yields 14 cookies with a 3-hour total time; Food55 runs a 30-minute active recipe that yields 24. Baking for a crowd, Food55's scale is the more efficient starting point.
Baking:
- Preheat oven to 350°F. Line baking sheets with parchment.
- Scoop chilled dough into balls about 1.5 tablespoons each spaced 2 inches apart.
- Bake 11 to 13 minutes, rotating sheets halfway through. The target is edges that are just firm while centers still look underdone.
- Leave cookies on the tray for 5 minutes before moving to a wire rack. They continue setting as they cool.
⚠ The most common mistake: Pulling cookies when they look done rather than when the timer says. Centers that look fully set in the oven will be overbaked once cooled. Both Delish and Mer's Good Eats flag this: take them out while the center still looks soft.
Step 3: Apply the finish the glaze is what makes this an espresso martini cookie recipe
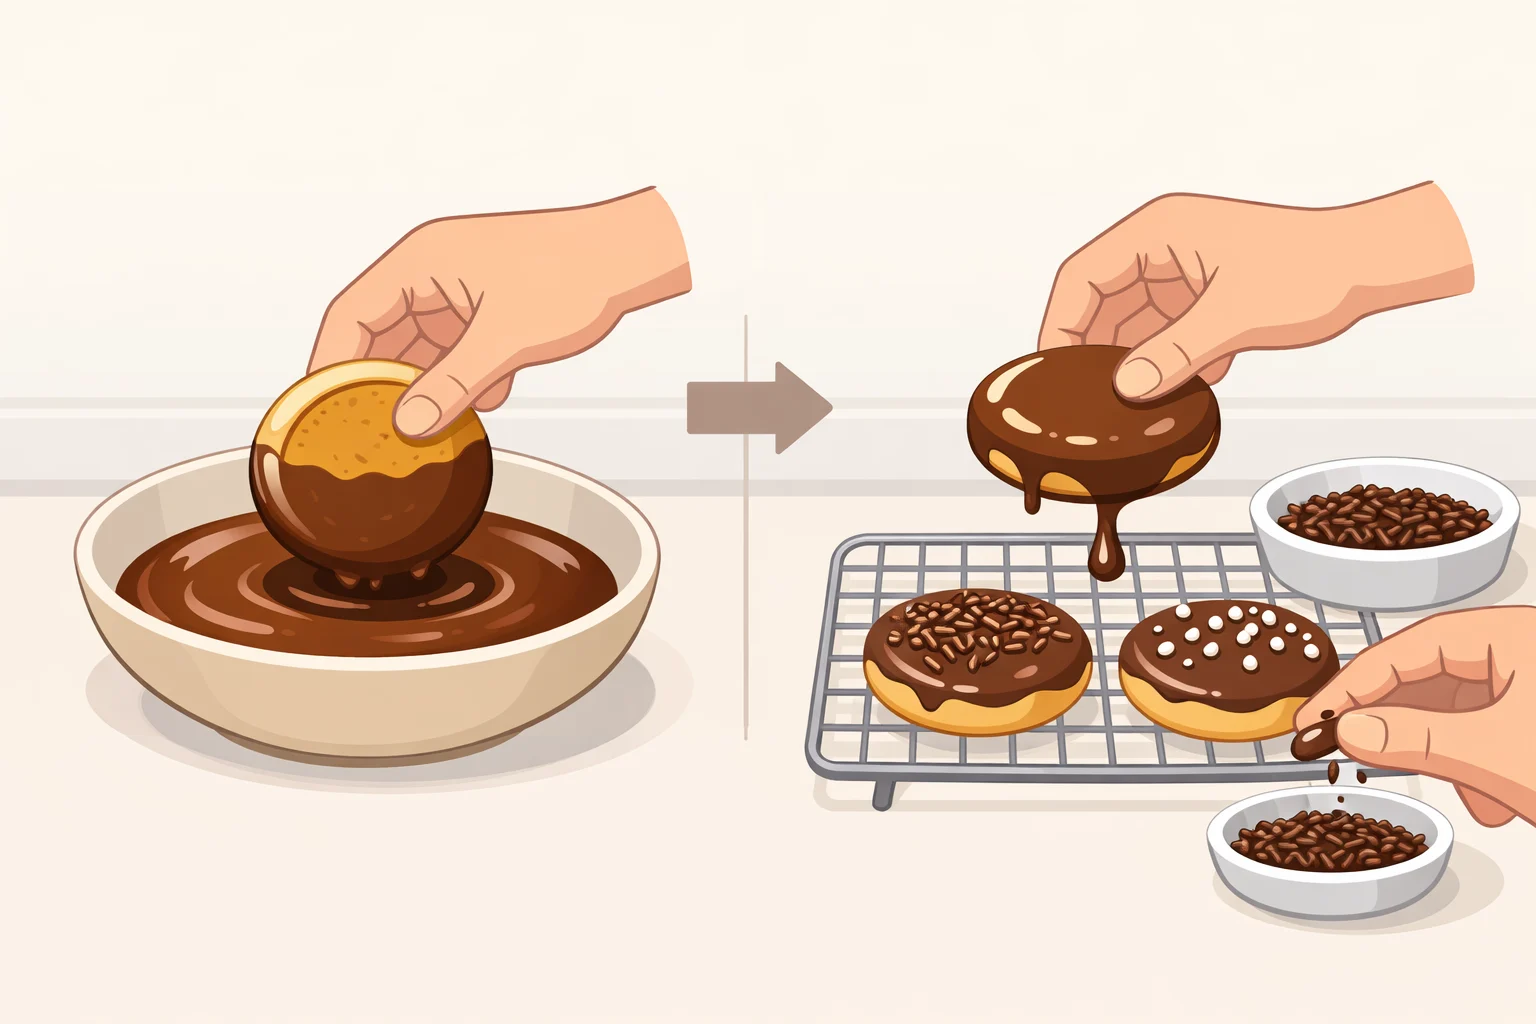
The recommended finish: Kahlúa glaze. Confectioners' sugar, espresso powder, a tablespoon of Kahlúa, and enough boiling water to thin it to a shiny, pourable consistency. Coffee liqueur is the defining spirit in an espresso martini, and its bittersweet character comes through in a thin glaze in a way it doesn't in thick buttercream. The Delish test kitchen developed this through multiple rounds of testing. For the coffee cocktail cookies that read most clearly as espresso martini, this is the right finish.
Assembly timing matters. Dip three to four cookies into the glaze face-down, let the excess drip off, then go back and decorate them in the same order you dipped. The glaze will have set slightly but still be tacky enough to hold the garnish (Delish). Don't dip the whole batch before decorating; the glaze dries faster than it seems.
Alternative finishes choose based on what you're optimizing for:
- Vodka crema glaze (sharpest coffee finish): Powdered sugar, heavy cream, a teaspoon of espresso powder, and a tablespoon of vodka, whisked to a honey-like thickness. The alcohol carries aromatic compounds differently than water does, producing a cleaner, brighter coffee note Food55 attributes this to the way ethanol moves aroma molecules faster than water-based liquids. If the coffee flavor feels muted in the glaze, vodka sharpens it. Drizzle over fully cooled cookies and garnish immediately.
- Irish cream buttercream (richest; best for dessert table presentation): Butter, confectioners' sugar, and Bailey's Irish Cream beaten on high for 7 minutes until light and fluffy. The most visually substantial option, holds up well on a serving table. The tradeoff: the richness softens the coffee note rather than reinforcing it. Apply the day of serving buttercream on a warm cookie melts, and frosted cookies stored overnight become dense (Mer's Good Eats).
Quick decision guide:
- Most like the cocktail → Kahlúa glaze
- Sharpest coffee flavor → Vodka crema
- Best for a table display → Irish cream buttercream
- Alcohol-free → Substitute milk or heavy cream with a splash of vanilla extract in place of the liqueur (Mer's Good Eats). The cookie is still fudgy and coffee-forward, but the finish that makes the cocktail reference legible is absent. Worth being upfront about that with whoever you're serving.
The garnish is not optional. Three espresso beans per cookie and a dusting of cocoa across one side reproduce the visual cue of the drink in the glass. Delish describes the half-moon cocoa coating as mimicking the top-down look of a classic espresso martini; Mer's Good Eats and Food55 both call for three coffee beans per cookie. Without the garnish, the cocktail association exists only in the ingredient list. With it, anyone who recognizes the drink knows immediately what they're looking at.
⚠ Timing: Cookies must be completely cool before any finish is applied minimum 20 minutes on the rack, 30 is safer. Warm cookies cause glaze to absorb into the surface and buttercream to melt on contact.
Make-ahead plan and storage
Glazed or frosted cookies are at their best the day they're baked. The fudgy center equalizes over time and the texture becomes more uniform still a good cookie, but the distinguishing quality fades (Delish). Build the schedule around that fact.
- Unbaked dough log: Refrigerate up to 3 days or freeze up to 1 month. Slice and bake same-day, then finish (Delish).
- Baked, unfrosted cookies: Refrigerate in an airtight container for up to 4 to 5 days and bring to room temperature before finishing (Mer's Good Eats). Apply glaze or frosting the day you serve them.
- Baked, unfrosted cookies (frozen): Up to 3 months (Food55). Thaw, then finish.
For most situations, the practical path is to freeze the dough log, pull it the morning of the party, bake same-day, and glaze an hour before serving. That schedule protects the texture and keeps the finishing work manageable. Pick the Kahlúa glaze if the cocktail flavor is the point; go vodka crema if coffee intensity is the priority; choose the Bailey's Irish Cream buttercream if the cookies need to hold up on a table for a couple of hours. Whatever the finish, three espresso beans and a half-moon of cocoa are what close the loop between the cookie and the drink it's named for.