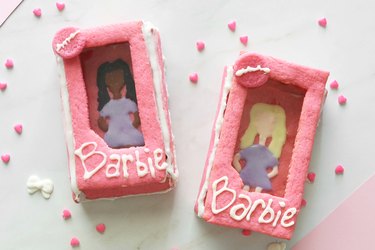
Is there anything sweeter than the nostalgia of Barbie? Yes, actually: Barbie cookies! This project isn't just any old dessert recipe, though. Made with multiple sugar cookie panels, gelatin plastic and royal icing, this tutorial explains how to make Barbie boxes that are 100% edible.
Video of the Day
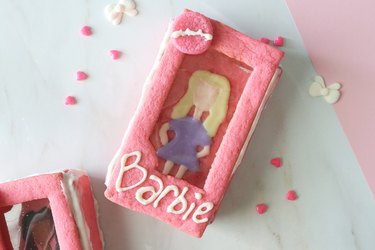
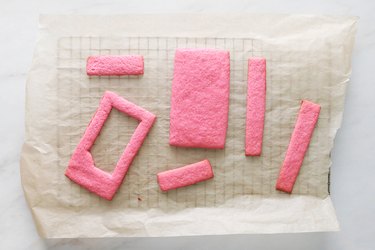
The Barbie-themed cookies start with a basic sugar cookie dough dyed with bright pink food coloring. Next, the dough is rolled out into a thin sheet and then cut into rectangle pieces. The front panel even has a cut out so you can see Barbie inside the box! On that note, Barbie is entirely made of royal icing, so you can customize her features and clothes as much as you'd like.
But what about the "plastic" in the front of the box? It's actually made of gelatin and water...that's it! The trick is to use the right proportion of ingredients; this will ensure the gelatin dries into a hard, plasticlike material. So cool!
Finally, to construct the actual box, the sugar panels are attached using royal icing, much like a gingerbread house would. However, since it's a lot smaller than a gingerbread house, it's easier to do. Consider this great practice for making larger cookie houses come holiday season.
So, whether you're celebrating the launch of the new Barbie movie or hosting a Barbie party, you're going to love this cookie project. Let's get baking!
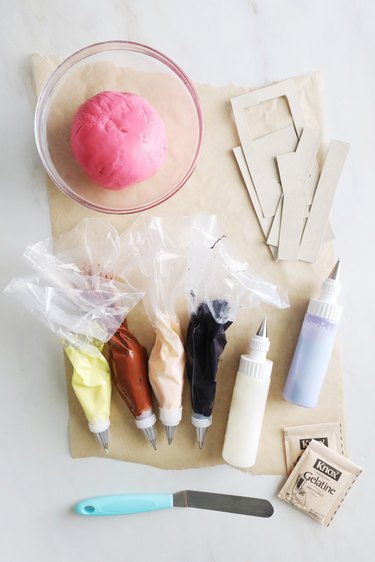
Things You'll Need
Sugar cookie dough
Bright pink food coloring
Royal icing in different colors (in piping bags/bottles)
Stiff white royal icing
Smooth white royal icing (see Tip below)
Cardboard pattern (see Step 2)
2 packets gelatin powder
6 Tbsp. water
Acetate sheet
Offset spatula
Mini spatula
Parchment paper
Scissors
Pizza cutter or sharp knife
Baking sheets
Sprinkles, mini chocolate chips and other edible toppers (optional)
Tip
Stiff royal icing has a thick, claylike consistency that’s helpful for “gluing” cookies together. You can use it as is or thin it out with water to make smooth royal icing.
1. Make edible gelatin plastic
Place a sheet of acetate on a baking sheet. Set aside.
Tip
Acetate is simply a clear, stiff plastic used for crafts. It’s similar to the material used in some food packaging. You can usually find acetate sheets near the Cricut machines at the craft store.
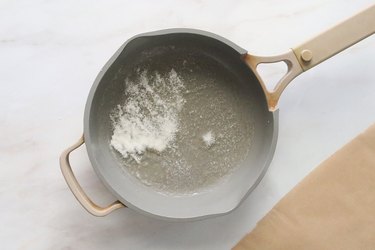
In a small pan or pot, add 6 Tbsp. water. Sprinkle two packets of gelatin on top and let sit for five minutes.
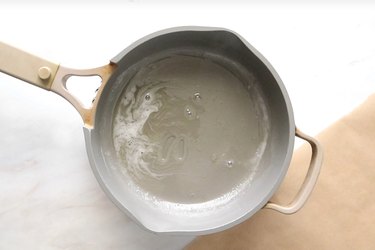
Over low heat, warm the mixture until the gelatin completely dissolves, about 3 to 5 minutes. Avoid stirring it too much. Instead, gently break up clumps of gelatin with a spatula.
Tip
On a scale from 1 to 10, the heat should be at 3 or 4. Keep a close eye on the gelatin; do not let it boil or bubble.
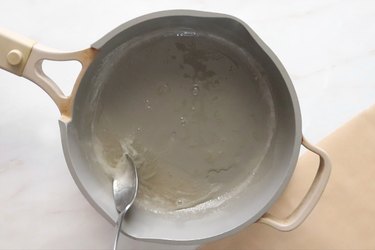
Tilt the pan or pot and then scoop out as much foam as you can. It's not possible to remove all the bubbles, so just try your best!
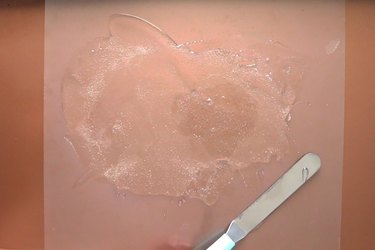
Working quickly, transfer the mixture to the acetate. Use an offset spatula to spread it into a thin, even layer.
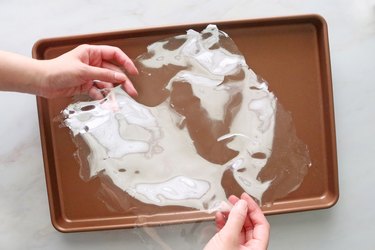
Let dry at room temperature uncovered for 1 to 3 days. The gelatin plastic is ready once it easily separates from the acetate.
2. Prepare cardboard templates
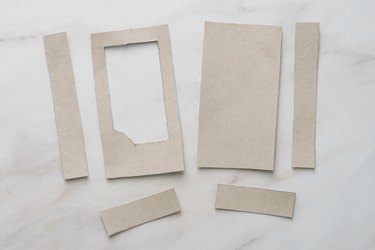
Using scrap cardboard, cut out two rectangles about the size of a smartphone. (For reference, we traced around an iPhone 12 Mini, which measures about 5 in. high and nearly 3 in. wide.) For one rectangle, add about 1/4 in. to the top and bottom. This will be the front panel.
In the front panel, cut out a window, leaving about 1/2 in. along the top and sides. Leave a larger space along the bottom plus a rounded section in the left hand corner of the window. This is where you'll eventually write "Barbie."
For the side panels, cut out two 1-in.-thick rectangles that are the same height as the main panels. For the top and bottom, cut out two 1-in.-thick rectangles that are same width as the main panels.
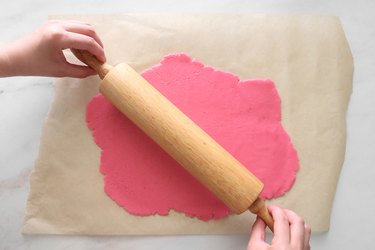
If you haven't already, dye sugar cookie dough with bright pink food coloring. Keep in mind that food coloring intensifies over time, so avoid adding too much. Also, feel free to use gluten-free or vegan cookie dough.
On a sheet of parchment paper, roll out the cookie dough.
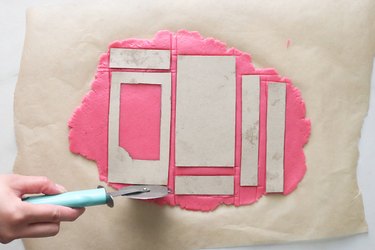
Place the cardboard patterns on top of the dough, leaving 1/4 to 1/2 in. between the panels. Cut out the dough using a pizza cutter or sharp knife and then remove the excess dough. You can re-roll this for additional panels.
Tip
If you'd like to make the Mattel logo, take a small ball of scrap dough and flatten it into a circle, or if you have a small circle cookie cutter, use it when cutting out the panels.
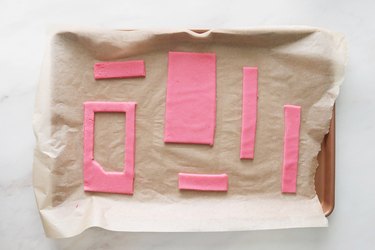
Carefully pick up the parchment paper and place it on a baking sheet. Chill in the freezer for 20 to 30 minutes. Once chilled, separate the cookie panels, leaving about 2 in. between each one.
Preheat the oven to 350° F. Meanwhile, leave out the cookies for 5 to 10 minutes to let the baking sheet reach room temperature.
Bake for the least amount of time listed in your recipe. For example, if the recipe says to bake for 8 to 10 minutes, bake it for 8 minutes. The sides and front panel can quickly overbake due to thinner widths.
Place the parchment paper on a wire rack and let the cookies cool completely.
5. Construct Barbie box
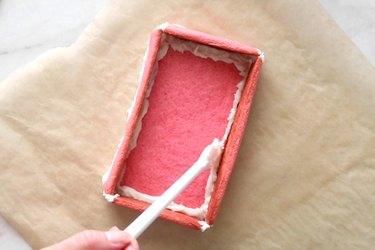
Now, it's time to flex your cookie decorating skills! Spread stiff royal icing around the edge of the back panel and then repeat on the bottom of the side panels. Stick the side panels onto the back cookie, adding more royal icing in the corners as needed. Gently press to secure.
Tip
Don't worry about making this step super neat. The front panel will hide the icing along the edges.
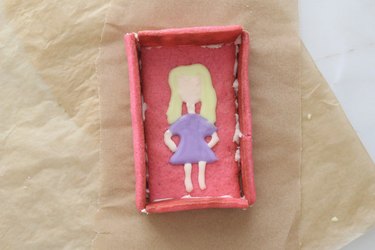
Using smooth royal icing in different colors, create a Barbie figure on the back panel.
Tip
We recommend making Barbie quite big in proportion to the box, especially if you’re new to royal icing. This way, you won’t have to worry too much about tiny details.
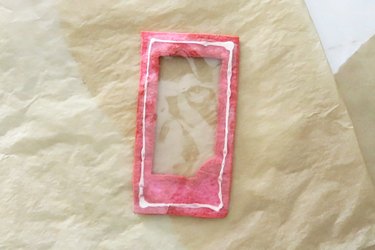
Cut a piece of gelatin plastic using the front panel as a guide. Add royal icing around the perimeter of the back of the panel. Place the gelatin plastic on top and gently press to secure.
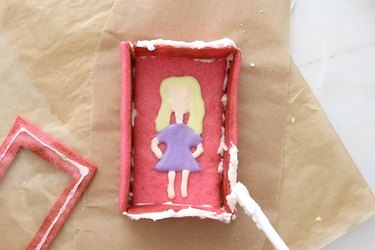
Add stiff royal icing to the edges of the Barbie box.
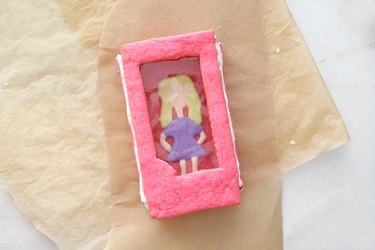
Place the front panel on top, pressing lightly.
6. Decorate
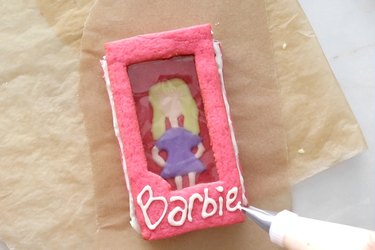
Using smooth royal icing, write "Barbie" on the front panel under the window. If you're making birthday cookies or giving them out as Barbie birthday party favors, you could even write the name of the recipient.
Tip
Practice writing with royal icing on a plate or scrap parchment. This will help you determine how much pressure to use.
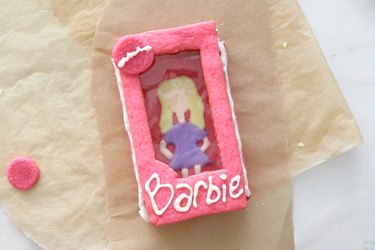
Add the mini round cookie to the top left corner. Use royal icing to add a scribble for the Mattel logo. (It will be difficult to write "Mattel" with icing at such a small scale.)
Tip
Instead of a mini round cookie, fondant or a candy wafer also works. You can also just leave it out.
At this point, the Barbie box can be left as is or decorated with sprinkles, mini chocolate chips and other edible toppers. You could even use the Barbie box as a cake decorating item and place it on top of a birthday cake or cookie cake. So fun!