
Animation is everywhere! And if your dream is to work for a major animation studio, create unique character voices or simply use the medium to share ideas and stories, you're in luck. Our user-friendly article will help you learn more about animation tools and get started with your 2D or 3D animation, flip book or cutout animation project—even if you're a true beginner.
Creating 2D and 3D animated films can be an exciting journey for newcomers or professional storytellers of all ages. With the right tools, resources and workflow, anyone can bring their imagination to life. We'll provide an overview of the essential steps for beginners looking to embark on their animation journey, taking into consideration both 2D and 3D animation techniques.
Video of the Day
Video of the Day
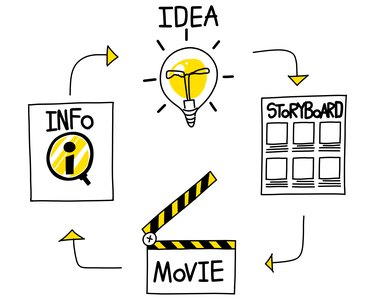
Our goal is to detail significant milestones of the animation pipeline and workflow while explaining terms that will help you explore drawing tools and animation tutorials.
Let's get creative!
Choosing the Best Animation Software...
For beginning cartoon animators, open-source software like Blender provides an excellent starting point. Blender is a powerful 3D animation software available on Windows, macOS and Linux. It offers a wide range of tutorials and an active online community, making it an ideal choice for newcomers.
For 2D animation, Pencil2D and Synfig are popular free animation software options. Pencil2D is user-friendly and supports frame-by-frame animation, while Synfig provides a rich set of features for professional animators.
1. Create a Workflow
Establishing a solid workflow is essential for efficient and organized animation production. For example, you'll want to develop a script and storyboard to plan your narrative. Then you'll want to break down the animation into scenes and explore premade templates to streamline the process. OpenToonz, a free software available for Windows and macOS, offers a range of features for both 2D and cutout animation. It supports integration with other software such as Photoshop and allows scripting and plug-ins for enhanced capabilities.
2. Develop the Story
Maintaining a solid story and a high-quality vision for your animated film or project is crucial. Once you've established a workflow, dive right in by developing a concept, including story, characters and themes. Consider the message or emotions you want to convey through animation. What do you want to say as a storyteller? Who is your audience? Which platform would you prefer for sharing your work?
Tip
After choosing the platform(s) for uploading your animation, check the video aspect ratio, upload size, length and any music usage conditions so you can consider these during the early stages of project planning. Android vs. iOS platforms and apps may also be something you'll need to consider.
Final Draft is one of the top professional scriptwriting programs; however, the price might be a deterrent. Some software, like Celtx, offer free versions with limited scripts you can create in the program. Movie Magic Screenwriter, WriterDuet, Fade In and Scrivener are all considered reliable programs for screenwriting.
After developing a story, many people assemble a team, since making an animated film is rarely a one-person job. Building a team of like-minded individuals will help distribute the workload and bring diverse perspectives to your project. You can handle multiple roles if you have the necessary skills, but collaborating with others can enhance the final result.
3. Think About Character Development
As you draw characters, consider the full development of their story and how their visual identity aligns with their personality and actions. You might notice that many villains have more angles, while the "best friend" or "nice guy" have more rounded features. This is just one example of an endless array of possibilities. Color palettes, wardrobe, backgrounds, pets or friends also represent your character. If you didn't develop them enough during the story phase, use this part of the process to get specific.
Tip
The emotional beat shows us what will motivate our character's following action. A story's emotional moments help outline a character's arc.
Professional and experienced animators take time to design their characters and establish their visual identity before the storyboard process. Several team members will be involved with storyboarding, character development and background layouts.
Again, don't be afraid to look for references while determining what your characters look like. Start with line work and grayscale shading once you have a character you like, then add color. Creating a turnaround sheet is the next reasonable step during the storyboard process.
Tip
As the name suggests, a turnaround is a 360-degree view of a character that provides all the information we need to know to draw them in their respective environments.
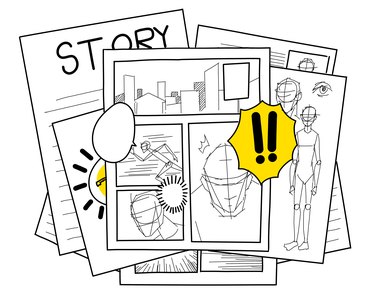
4. Storyboard the Story
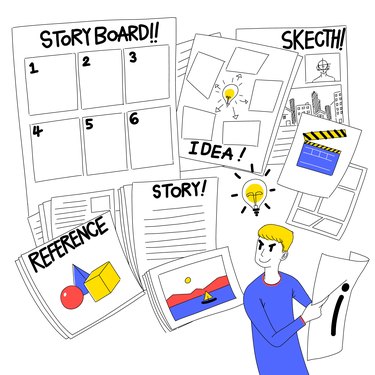
Create a storyboard or grayscale visual script that outlines key scenes and transitions. A storyboard is a shot-by-shot graphic representation of your story. In the 2D and 3D pipeline, this sets the foundation for the entire production process.
Tip
A production pipeline is an industry term for organizing production steps to maximize efficiency and keep everyone involved on task and, notably, on time.
If you're a beginner and feel overwhelmed by this process, research your favorite live-action and animated films that share a similar visual identity with your story and gather keyframe references for inspiration.
There might be a learning curve when beginning storyboarding, but keep going and seek out beginner tutorial videos online. Start making small doodles, rough thumbnails on a whiteboard, drawing paper or even in a digital drawing app to capture the emotional beats of your script.
After creating your thumbnails using digital programs like Photoshop, Procreate, Toon Boom Harmony, Storyboard Pro or any digital drawing app, import rough drawings, lower the opacity and clean up sketches by tracing.
5. Cast & Record Audio
If you're using voices, music and ambient sounds, creating an initial recording of those sounds is a good idea after the storyboarding process to provide an idea of how your story will present. You can cast your friends or professional actors, but you can also make up character voices yourself and have fun with them.
6. Create an Animatic
After the storyboard process, aligning and timing your boards with scratch sound, including voiceover and music, results in what's known as an animatic—a preliminary version of your animation project. The animatic allows you to adjust your project's early lip-synching and timing.
What's the Difference Between 2D & 3D Animation?
In 2D animation, you draw only what will be visible in the shot. For instance, when a character has their hand in a pocket, that hand isn't drawn. If something is not shown, it doesn't need to be drawn when using a 2D animation approach. In 2D animation, you draw the first key pose, following by remaining key poses.
However, with a 3D animation approach, all of a character's parts are created and built. It might be helpful to think about your character as a digital puppet. Once the character (or puppet) is built, you'll design and program their movements using 3D animation software (such as Blender).
7. Design Environments
In this step, you're essentially creating the world of your story. You'll work from scripts, concept art and references or bring backgrounds, layouts and environments to life from abstract concepts and descriptions.
Use the doodle to sketch line art and grayscale. Once you have a layout that suits your vision, it's time to consider color palettes and determine how your environment will be impacted by lighting, fog, atmosphere, ambient effects and time of day.
Tip
Limiting the number of locations and characters in your story will streamline things, especially if you are a beginner.
8. Animate Your Work
To create high-quality animations, beginners can explore various techniques and effects. In 2D animation, hand-drawn animation offers a unique charm, while cutout animation allows for more efficient character movements. Software like OpenToonz, Animaker, Procreate, Clip Studio Paint and Pencil2D can help beginners with these techniques. For 3D animation, Blender's real-time rendering capabilities and built-in visual effects provide endless creative possibilities. Adobe's Creative Cloud industry-standard software, such as After Effects, can be used for compositing and adding visual effects, sculpting, animated videos, vector graphics, motion capture, motion graphics and even 3D models.
There are many animation program options. By browsing free software, online tutorials, explainer videos or asking other animators for recommendations, you'll find the right fit.
Once your animation is complete, it's time to add the final touches. Use video-editing software such as Adobe Premiere Pro, Adobe Character Animator or free alternatives like Shotcut or Davinci Resolve to refine timing and add sound effects and music. Export animated film in a suitable format (such as MP4), and consider optimizing it for social media platforms, where animated GIFs and short videos thrive.
Embarking on the journey of creating 2D and 3D animated films can be daunting for beginners. With the right tools and resources, though, it's an accessible and rewarding experience. By leveraging open-source software, tutorials and user-friendly interfaces, newcomers can unleash their creativity and produce captivating animations. Remember to experiment with different techniques, collaborate with other animators and continue learning to refine your skills. We can't wait to see what you create!