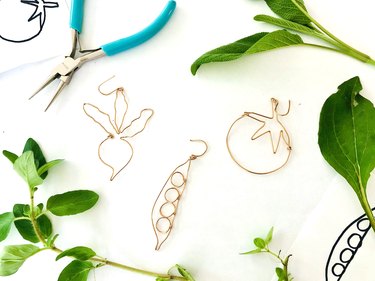
Want to wear your love for garden veggies on your sleeve—or should we say your ears? Look no further! Our garden-inspired jewelry project combines two of life's simple pleasures: fresh veggies and fun jewelry. In this step-by-step earrings tutorial, you'll learn how to make simple wire earrings shaped like beets, pea pods and tomatoes.
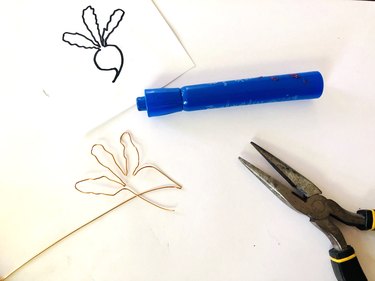
Making jewelry doesn't have to be intimidating or expensive. In fact, this DIY tutorial for wire jewelry is beginner-friendly and only requires a few simple materials. There's no soldering, no beads and no gemstones—all you'll really need are round-nose pliers, flat-nose pliers and brass or copper wire (or another craft wire of your choice).
Video of the Day
Video of the Day
Ready to harvest some of the coolest jewelry around? Take on this trio of DIY earrings and you'll be the talk of the neighborhood garden in no time!
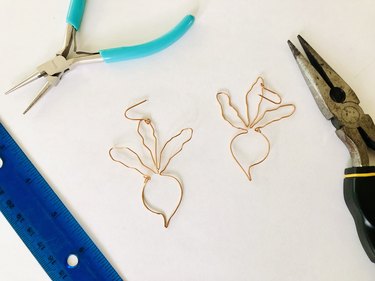
Design 1: Beet Earrings
Things You'll Need
Round-nose pliers
Flat-nose pliers
Wire cutters (if your pliers aren't able to cut wire)
20- to 22-gauge brass, copper or other craft wire
Ruler
Marker or pen (for shaping beet)
2 ear wires
How to make Beet Earrings:
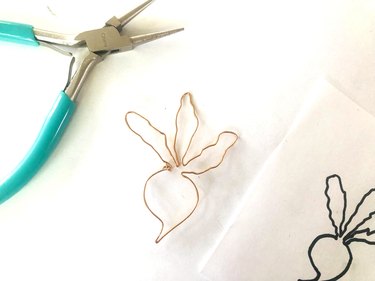
1. Create leaves
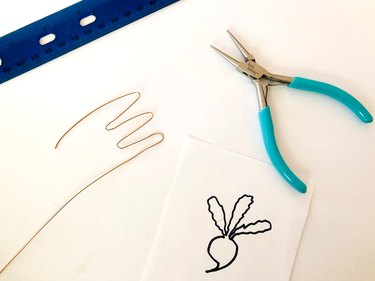
Start your design by forming beet leaves. Leaving about 1 in. of excess wire at beginning of first leaf, use round-nose pliers to form three leaves. Each leaf should be about 1.25 in. long.
Tip
If you want, use a photo or drawing of a beet as a reference for your earring. Print an image from the internet or simply draw one yourself!
2. Refine leaf shapes
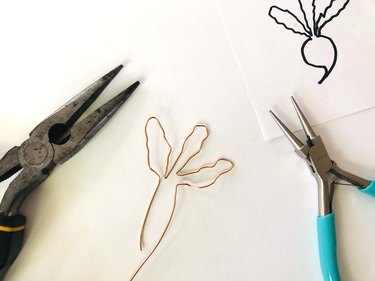
To make leaves look, well, leafier, use flat-nose pliers to pinch folded wire at bottom of each leaf. Add texture by gripping wire with pliers at various points and twisting slightly.
3. Make beet root
Use a thick pen or marker to shape beetroot. To make tail at bottom of beet, use flat-nose pliers to fold and pinch wire.
Tip
Some flat-nose pliers have indentations on the inside of their jaws. If you don’t want your pliers to make marks on wire, use smooth pliers.
4. Connect wire ends
Use wire cutters to trim ends of wire, leaving about 1/4 in. of wire at either end. Next, use round-nose pliers to shape wire ends into open loops. Trim any excess wire and then hook loops together and use flat-nose pliers to flatten the connection.
5. Add finishing touches
Use flat-nose pliers to flatten and work-harden your new handmade earrings. When design is complete, attach ear wires (aka earring hooks) to these sweet beet pendants!
Tip
Ear wires come in all kinds of metals. If you have sensitive ears, look for wires made of stainless steel, gold, sterling silver or surgical-grade stainless steel.
Design 2: Tomato Earrings
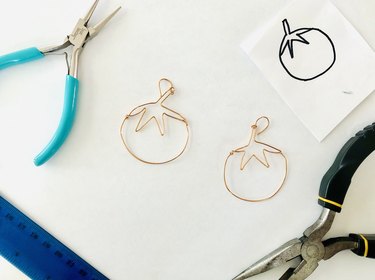
Things You'll Need
Round-nose pliers
Flat-nose pliers
Wire cutters (if your pliers aren't able to cut wire)
20- to 22-gauge brass, copper or other craft wire
Ruler
2 ear wires
How to make Tomato Earrings:
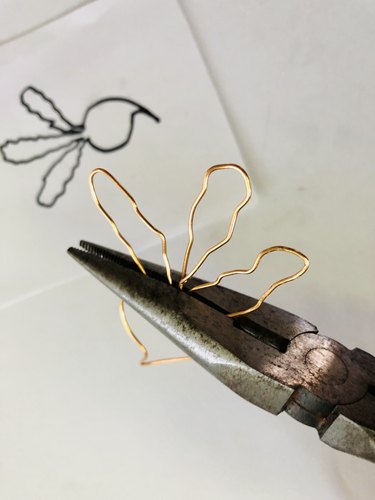
1. Create top of tomato
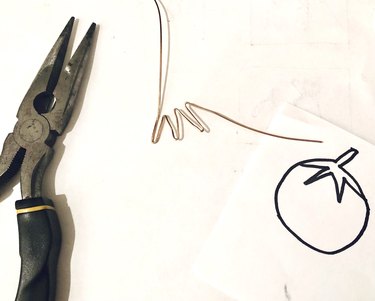
To form top of tomato, use flat-nose pliers to make six folds about 1/2 in. apart, leaving about 2 in. of wire before first fold.
Tip
If you use a reference image, try to make it the same size as your finished earring (in this case, about 1.75 in. in diameter).
2. Make stem
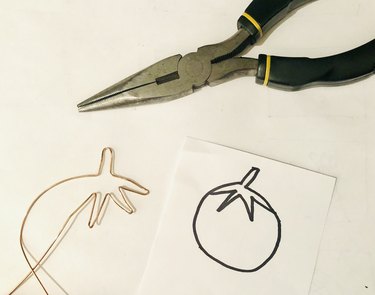
Next, use flat-nosed pliers to form stem.
3. Attach ends of wires
Close shape at top of tomato by wrapping short end of wire around longer one several times. Use flat-nose pliers to pinch wrapped wires closer together.
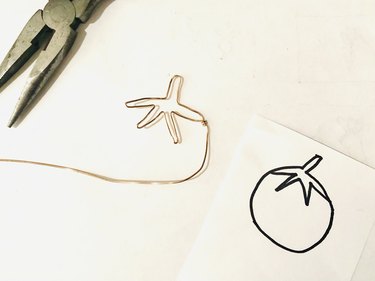
4. Add finishing touches

Tip
Use a round object, like a jar or bottle, as a guide for your tomato form.
Form bottom part of tomato. To finish the shape, trim any excess wire and then loop loose end of wire around top of tomato. Use pliers to close the loop. Flatten tomato with flat-nose pliers. If you want to flatten and harden your DIY earrings even more, hit them with a hammer or mallet. Finally, attach ear wires to stems of your new handmade earrings.
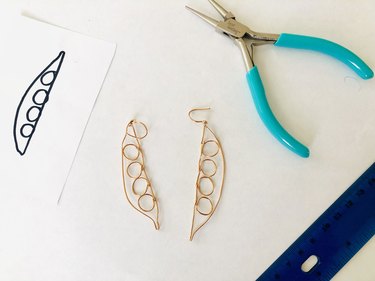
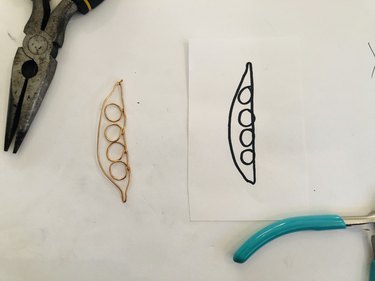
Design 3: Pea Pod Earrings
Things You'll Need
Round-nose pliers
Flat-nose pliers
Wire cutters (if your pliers aren't able to cut wire)
20- to 22-gauge brass, copper or other craft wire
Ruler
2 ear wires
How to make Pea Pod Earrings:
1. Create first pea
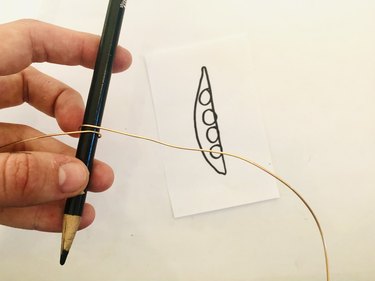
Last but not least, it's time to make pea pod-shaped DIY earrings! The wirework in this tutorial is slightly more advanced than in the first tutorials, but don't worry—even beginners can master it in no time.
Start by making wire loops to represent peas. Leave about 2 in. of excess wire before first loop. To create a pea, wrap wire around a pen or pencil.
Tip
Make sure you’re using a round pencil or pen, not a hexagonal pencil.
2. Twist loop
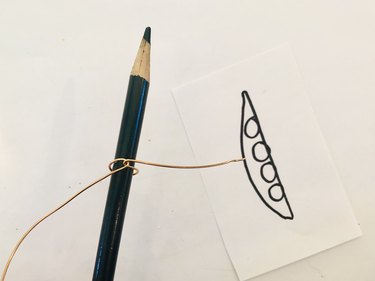
Once you've created a complete loop, twist pencil counterclockwise (180°) so the pencil tip faces opposite direction.
3. Make remaining wire loops
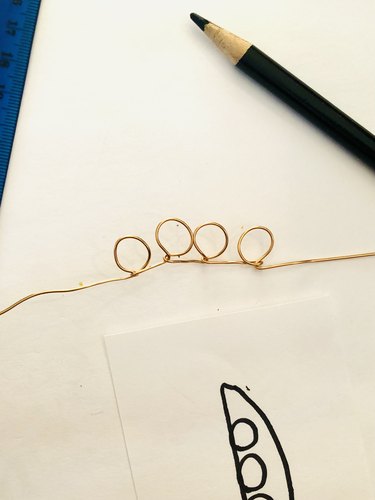
Repeat three more times to create four peas. Start each new loop about 1/2 in. from previous loop; when you twist wire, loops will get closer together. Flatten peas against edge of pea pod with flat-nose pliers. Remember to wrap wire the same way and twist loop in same direction each time.
4. Complete pea pod
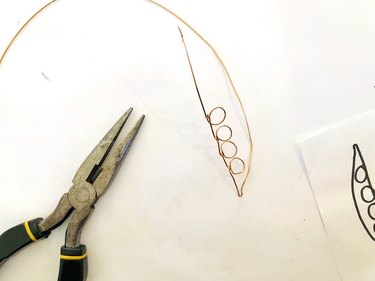
About 1/2 in. away from final pea, fold wire and pinch with flat-nose pliers. Then, make second curved edge of pea pod.
Tip
As with the tomato portion of our DIY earring project, use a large, round object, like a jar or bottle, to shape round edge of pea pod.
5. Attach ends of wire
Trim excess wire. To attach ends of wire, use round-nose pliers to make a loop at the end of straight wire (you'll attach ear wire here). Next, use round-nose pliers to fold end of curved wire around straight wire just below previous loop.
6. Add finishing touches
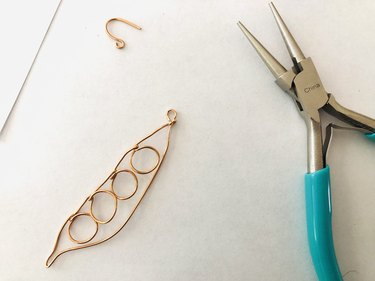
Use flat-nose pliers to flatten and work-harden completed shapes. Now, you're ready to add ear wires and show off this funky new pair of earrings at your next garden party.
Tip
If you'd like your completed earrings to swing a bit more, attach a jump ring to the earring first and then attach ear wire to the jump ring.
You're officially the proud owner—and maker—of a beautiful garden of veggie earrings! Now that you know how easy it is to make earrings at home, let your creativity flow.