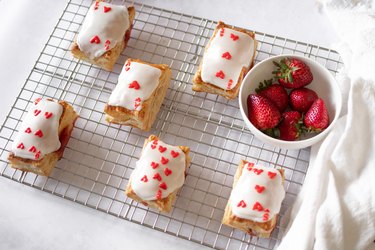
Store-bought toaster pastries are such a nostalgic treat. Many of us have fond memories of sampling the latest flavors, splitting packs with friends or enjoying them as sweet breakfast treats. Want to enjoy a bit of nostalgia and add a fun twist to the tart-eating experience? Allow us to present...homemade toaster tarts! Making your own tarts leaves plenty of room for innovation with creative flavors, fillings and designs—such as our adorable playing card–themed recipe. Or, as we like to call them, Queen of Hearts Tarts! These are perfect for an Alice in Wonderland party, Alice's Wonderland Bakery birthday party or Queen of Hearts party—and, of course, a game night or card-playing party!
Intimidated by the idea of making homemade tarts? You'll be glad to learn that they're relatively easy to whip up, especially if you work with premade puff pastry or pie crust dough from the grocery store. For this tutorial, we opted for puff pastry to create buttery tarts. As for the filling, you can add chocolate chips, Nutella or any fruity flavor you'd like, such as blueberry or raspberry jam. For our DIY tarts, we made homemade strawberry jam that called for just three ingredients: strawberries, lemons and sugar.
Video of the Day
If you're craving toaster pastries, take a peek at this delicious how-to. We've outlined everything you need to whip up a beloved breakfast (or card game night!) treat at home. Have fun, get creative and let those flavors pop.
Video: Queen of Hearts Tarts With Homemade Strawberry Jam
How to Make Homemade Toaster Tarts:
Quick Recipe Overview
SERVINGS: 6 tarts
PREP TIME: 30 minutes
COOK TIME: 35 minutes
DECORATING TIME: 20 minutes
TOTAL TIME: 1 hour 25 minutes
Part 1: Strawberry Jam
Things You'll Need
Saucepan
Rubber spatula
Heat-safe jar
1 lb. strawberries, roughly chopped
3/4 c granulated sugar
Juice and zest of one small lemon
1. Heat strawberries and granulated sugar
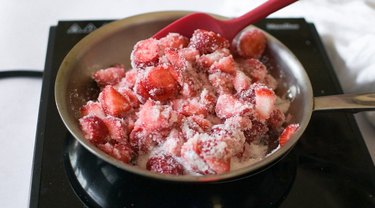
In a saucepan on medium heat, stir chopped strawberries and sugar. Within a few minutes, the sugar should melt and the mixture should begin to boil.
2. Add lemon juice and zest
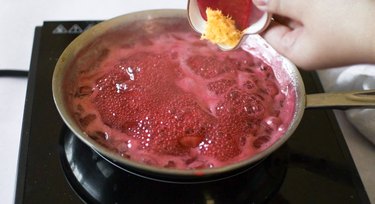
Mix in lemon juice and zest. Continue boiling mixture for about 15 minutes, stirring every few minutes. The jam should darken in color and thicken slightly. It will thicken more once cooled.
3. Transfer jam to heat-safe container
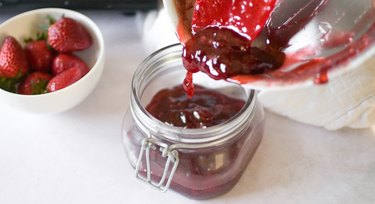
Pour jam into a heat-safe container and let cool. Cover and refrigerate.
Part 2: Jam Tarts
Things You'll Need
Ruler
Rolling pin
Knife, pastry cutter or pizza cutter
Parchment paper or silicone mat
Baking tray
Pastry brush
Fork
All-purpose flour, for dusting
1 sheet of premade puff pastry, thawed
Homemade strawberry jam
1 egg, beaten
1. Roll out puff pastry sheet
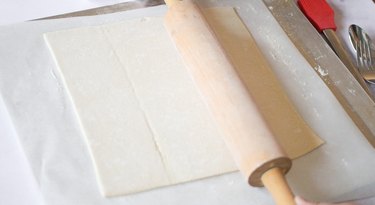
Preheat oven to 400°F/204°C. Lightly dust work surface with all-purpose flour. Place thawed sheet puff pastry on the floured surface, then add a bit of flour atop dough. Using rolling pin, roll out the sheet to about 10.5 by 10 in.
2. Cut out rectangles

Using a knife, pastry cutter or pizza cutter, cut out twelve 2.5 by 3.5-in. rectangles. Pair pieces in rows on lined baking tray.
3. Apply egg wash to puff pastry
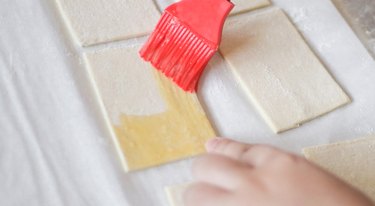
With your pastry brush, apply the beaten egg (aka egg wash) on one rectangle's edges.
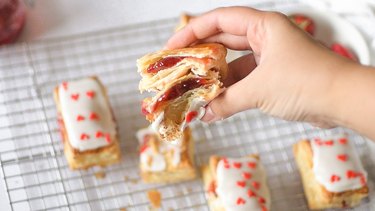
4. Add strawberry jam
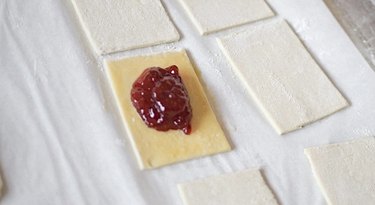
Add 1 or 2 Tbsp. (depending on how much filling you prefer) homemade strawberry jam to middle of rectangle.
5. Cover with puff pastry
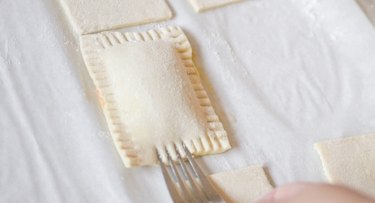
Slightly stretch top piece of dough so it will fully fit over jam, then place on top of jam and base dough. Seal bottom and top dough edges by pressing down with your finger, ensuring there are no gaps.
Use a fork to crimp edges.
6. Poke holes in dough
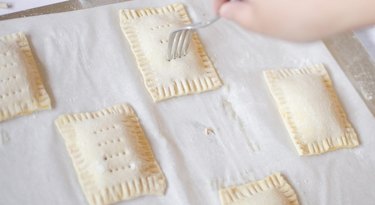
Use a fork to poke a few holes atop each filled pastry.
Tip
This step helps steam escape and makes your tarts super flaky. Yum!
7. Apply egg wash to tops of filled tarts
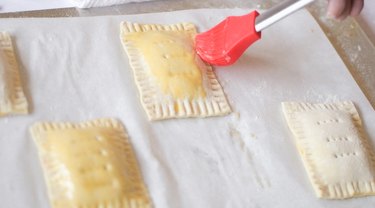
Apply thin layer of egg wash to top of each tart. Bake at 400°F/204°C for 20 minutes or until tarts are golden brown.
Part 3: Homemade Icing
Things You'll Need
Rubber spatula
Small mixing bowl
Two piping bags
Scissors
Cookie scribe or toothpick
1/2 c powdered sugar, or more as desired
1 1/2 Tbsp. milk, or more as desired
Red food coloring
1. Combine milk and powdered sugar
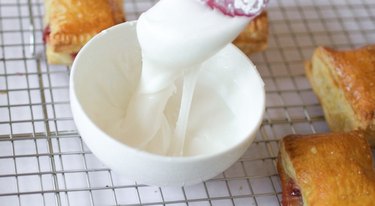
In a small bowl, add powdered sugar. Stir in milk, 1/2 Tbsp. at a time, until you get a thick but pipable icing consistency. Transfer to a piping bag and cut a small-medium tip.
Tip
If icing is too runny, add powdered sugar 1 Tbsp. at a time until it thickens. Alternatively, if it’s too thick, add 1 tsp. of milk at a time until you reach desired consistency.
2. Pipe borders

Pipe a thin white rectangular border on each tart.
Tip
The border acts as a barrier when you flood the middle of the rectangle with icing. This will help prevent icing from running off the edges.
3. Fill rectangles with icing
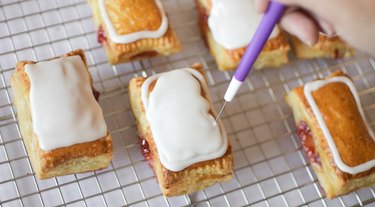
Flood rectangles with white icing. Let dry for a few minutes.
Tip
Use a cookie scribe or toothpick to move icing around to your liking.
4. Make red icing
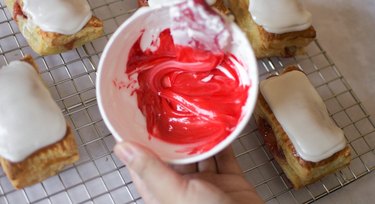
Transfer remaining white icing back into small bowl. Stir in red food coloring, then place icing in new piping bag. Cut a small tip off piping bag.
5. Pipe on card designs
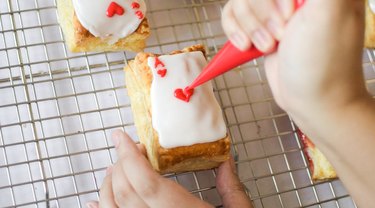
Use red icing to pipe on playing card designs—the specific cards are up to you!
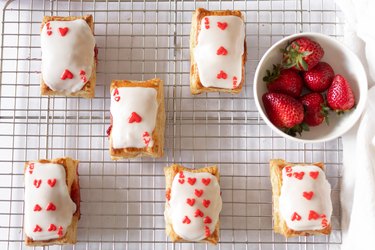
Store tarts in an airtight container at room temperature for up to three days or in the fridge for up to a week. You can reheat them in a toaster oven or bake in the oven at 400°F/204°C for 5 minutes.
When you serve these homemade tarts, you'll be setting a royal flush on the table. After all, nothing beats nostalgia—especially when it's served with plenty of fruity, flaky, sugary sweetness.