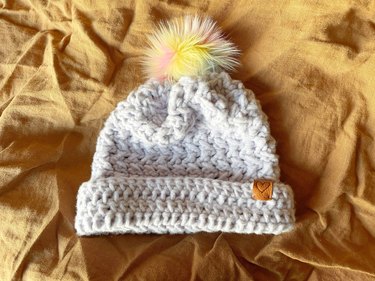
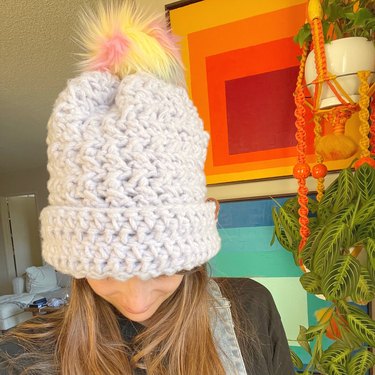
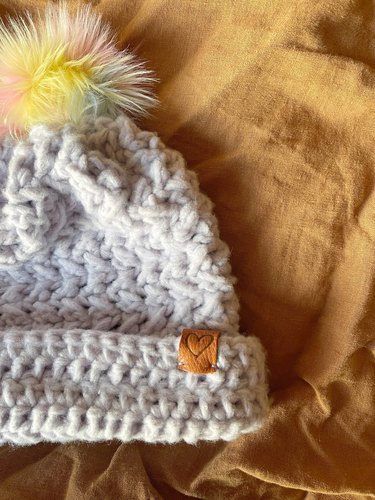
Nothing says "I love you" like a handmade beanie with a pretty pom pom. No, really! A crafted hat brings literal warmth, while a pom pom tells your loved one that they're spunky and fun enough to pull off such a colorful design. If making a pom pom beanie sounds intimidating, we're here to help with an easy tutorial that will help you crochet something special, even if you're a beginner.
And trust me—when it comes to tackling beginner-friendly crafting projects, I speak from experience. My first foray into the world of crochet crafts was driven by a desire to make gifts for friends and family. This crochet beanie, complete with a fluffy pom pom and personalized leather tag, is inspired by one of my very first projects. The hat is crafted with ultra-soft chunky yarn, making it the perfect cozy winter accessory or holiday gift. To elevate the design, I added texture with a criss-cross crochet stitch.
Video of the Day
Video of the Day
If you're new to crochet, you might find it easier to forgo this stitch style and use double crochet stitches on every row. Not into crochet at all? You can skip ahead and simply learn how to add a leather tag to your favorite hat. No matter how you approach it, this DIY crochet beanie with a rainbow fur pom pom makes for a wonderful winter craft.
Part 1: Crochet a Beanie
The first step in this DIY crochet beanie project is to make the beanie itself. We'll get into how to crochet a beanie and share tips for creating texture using a criss-cross double crochet stitch. Not confident about your crochet skills? Feel free to use a thrifted or store-bought beanie and skip ahead to parts 2 and 3 to learn how to embellish it with a pom pom and custom leather hat tag.
Things You'll Need
How to make a Beanie:
1. Crochet a chain
To get started, create a slip knot and chain. Chain length will depend on head size—I recommend using your own head as a guide. The chain should fit comfortably around your head without stretching, and you'll need an odd number of loops in your chain to properly complete this crochet pattern. For example, my head circumference is 22 in., and I ended up making a chain of 51 loops.
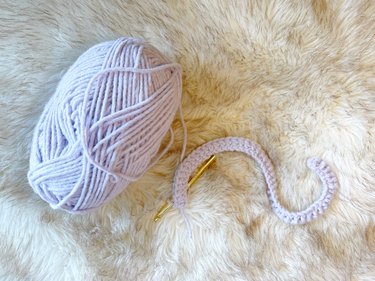
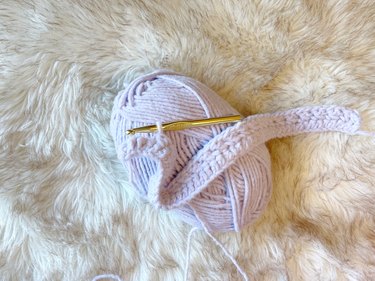
2. Create a row of double crochet stitches
Once your chain is complete, skip the first loop and add a double crochet stitch into the second loop on the chain. Double crochet across the entire chain so that you end up with a row of double crochet stitches.
Tip
Since you skipped the first loop, you should now have an even number of stitches on each row. For example, I started with 51 loops on my chain and ended up with 50 stitches on each row.
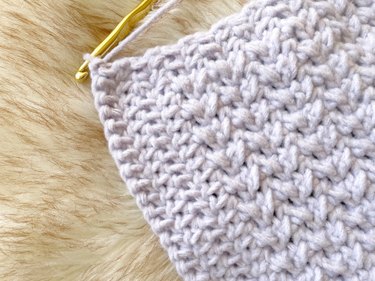
3. Create 14 rows of criss-cross stitches
After you complete the first row, chain one and double crochet into the first two stitches. Next, it's time to create the criss-cross stitch. To do this, skip the third stitch and double crochet into the fourth stitch. Then, double crochet into the third stitch—this will create a criss-cross effect.
Skip the fifth stitch and double crochet into the sixth stitch. Then, go back and double crochet into the fifth stitch. Repeat this pattern of skipping a stitch and going back to the skipped stitch until you have two stitches left on your row.
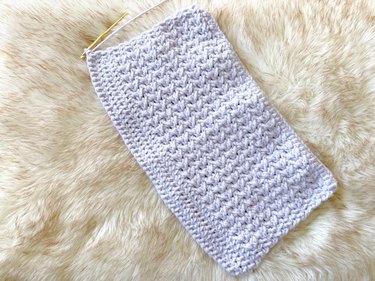
When you get to the end of your first criss-cross row, add two double crochet stitches into your last two stitches just like you did at the beginning of this row. Chain one and repeat the pattern of two side-by-side double crochet stitches followed by a row of criss-cross double crochet stitches and two more side-by-side double crochet stitches. Continue until you have 15 rows (one row of double crochet stitches and 14 rows of criss-cross stitches).
4. Create "cuff" rows
Now that the criss-cross rows are complete, it's time to move on to the last four rows—what I call "the cuff rows." Once the beanie is assembled, these last four rows will fold upward and create a nice cuff around the head. You can continue on with the criss-cross stitches if you'd like, but I prefer to add a different texture to the cuff. I recommend creating four rows of side-by-side double crochet stitches.
5. Tie off your work
After your last crochet stitch, snip your yarn tail and tie it off. You should be left with a rectangle made up of one side-by-side double crochet row, 14 criss-cross double crochet rows and four more side-by-side double crochet rows.
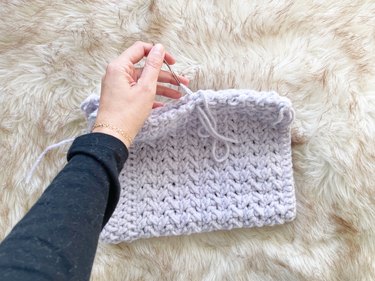
6. Stitch sides together
Fold your rectangle in half and cut a piece of yarn twice the size of your rectangle side. Next, thread the yarn through the yarn needle and stitch up the side to turn your rectangle into a tube.
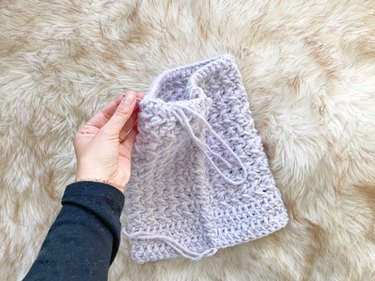
7. Cinch top of hat
Find the top of the hat—where the single row of double crochet stitches is—and cut a piece of yarn that's twice the width of the rectangle. Then, thread yarn on your needle and create a running baste stitch all around the top. Once you've stitched all the way around, grab both tail ends of the yarn and gently tug to cinch the top of the hat together. Tie a knot with the tails, weave in your ends and snip off any excess yarn.
Tip
If you're left with a small hole at the top, you can stitch it closed by creating four or more cross stitches.
8. Weave in ends
Before moving on to creating a pom pom and leather tag, finish your crochet work by weaving in any yarn ends and snipping off the excess. This will give your piece a clean finish.
Part 2: Add a Rainbow Pom Pom
A beanie without a pom pom is like a cupcake without frosting—sweet but not exactly a showstopper. You can buy premade faux fur pom poms at Joann, but if you're feeling extra crafty, it's actually quite easy to sew one on your own, even if you're a true beginner. Read on for all the details.
Things You'll Need
Faux fur fabric cut to at least 8x8 in.
Bowl (about 7 in. across)
How to make a Pom Pom:
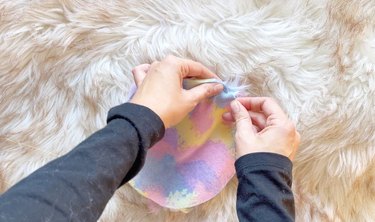
1. Trace and cut out a circle
First, flip over the fabric so the fur faces down. Then, reach for the bowl and place it in the center of the material. Next, grab the tailor's chalk and draw an outline of the bowl directly onto the fabric. Using sharp fabric scissors, cut out a circular shape.
Tip
The bigger your bowl, the bigger your pom pom will be! You can use a bigger or smaller bowl depending on how large you want your pom pom.
2. Create a running baste stitch
Once you have a cut-out circle, it's time to get threading! Grab your needle and thread and create a simple running baste stitch along the edge of the circle. For more durability, try doubling up the thread and securing it with a big knot on the end.
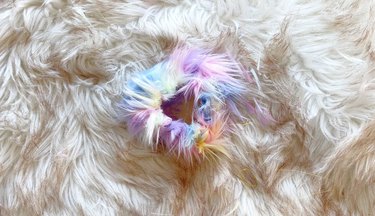
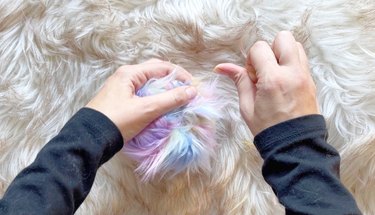
3. Cinch the circle together
Once the circle has stitches all the way around, gently pull the thread and cinch the circle together. At this point, you should start to see the rainbow fur pom pom come to life.
4. Fill with Poly-Fil
Grab a small handful of Poly-Fil stuffing and begin to fill the pom pom. This will help give it a more defined shape.
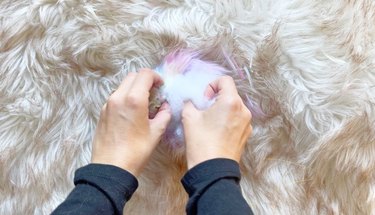
5. Stitch pom pom closed
When the pom pom is stuffed to your liking, gently pull the thread again to close up the opening. To secure, use your needle and thread and stitch up the sides in a criss-cross manner. Repeat this until you have at least four stitches going across and diagonally to close up the hole.
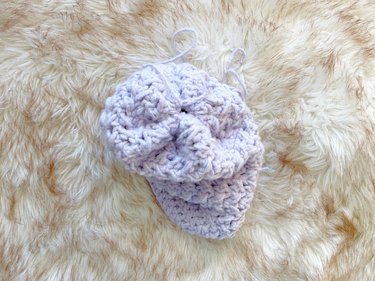
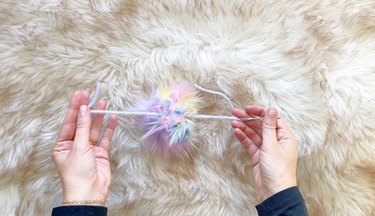
6. Attach pom pom to beanie
To secure the pom pom to the beanie, thread a piece of yarn through your yarn needle. Then, with a bit of force, push the needle through one side and out the other on the bottom of the pom pom. You should be left with a piece of yarn that extends across the pom pom.
Next, thread one yarn tail into the top of the beanie right next to the cinched opening. Thread the other tail into the top of the beanie on the other side of the cinched opening and flip the beanie inside out to tie it off inside. Weave your ends in before trimming any excess yarn.
Part 3: Make a Leather Hat Tag
While it's totally optional, adding a leather tag to a hat lets people know who made it and that it was handcrafted with love. Although it might look tricky, it's actually a lot easier than it appears. I used a simple heart symbol for this project, but initials or a tiny illustration sketched out with the branding tool would also look amazing. For extra personalization, stitch a note onto a piece of fabric and include it on the inside of the beanie. You could even have one created on Etsy.
Things You'll Need
A wooden cutting board (one that you don't use for cooking or don't mind getting scratched)
Needle
Thread
How to make a Leather Hat Tag:
1. Cut out the tag
Using sharp scissors, cut a 2-in.-long rectangle of leather. The width is up to you; ours was about 1/2 in.
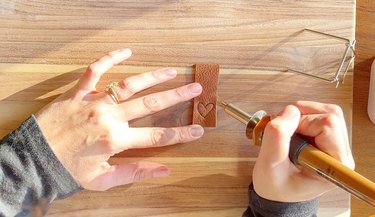
2. Brand your leather tag
Plug in the Walnut Hollow leather branding tool and wait five minutes for it to heat up. Once it's warm, place the leather strip on an old wooden cutting board and write your initials or draw a symbol to "sign" the finished product. The great thing about the Walnut Hollow leather branding tool is that it's super easy to use and essentially glides onto the leather like a pen. There's also no need to press down hard, as it effortlessly brands while being dragged across the material.
Tip
The Walnut Hollow leather branding tool comes with a few different tips to create designs. For tags, I recommend the pointed tip that comes preattached to the tool.
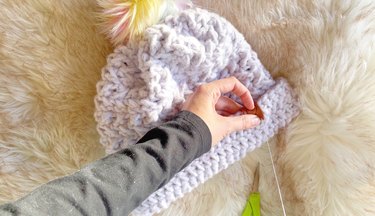
3. Punch holes and attach tag
To attach a finished tag to the handmade beanie, reach for a leather hole punch and create four small holes on each corner of the branded rectangle. Next, position the tag in place and use a needle and thread to attach it to the hat cuff.
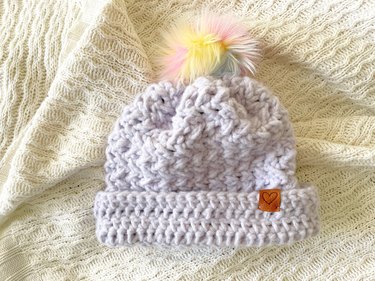
Just like that, you've created a thoughtful, personal and downright lovely pom pom beanie that makes a perfect holiday gift (or even a gift to yourself). It doesn't get much cozier than this.