
For weeks ahead of the holiday, you'll see articles everywhere offering tips for the best possible Thanksgiving dinner. Some of them are well-thought-out techniques and hacks that will work for any cook, while some are more dubious ("my aunt's grandma swore by this one...") or require skills and kitchen gadgets that most of us don't have. One thing they all have in common, though, is that they assume you're reading them before you start your Thanksgiving meal. But what if you're facing a culinary disaster—an overcooked turkey, a soupy pumpkin pie—RIGHT THIS MINUTE? Relax, you've got this. Take a deep breath, wipe the sweat from your face and try these Thanksgiving tips to get your family's feast back on track.
Turkey Troubles
Video of the Day
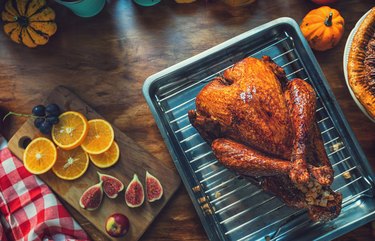
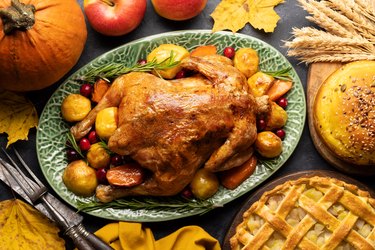
The star of the meal is the roast turkey (people call it "Turkey Day" for a reason), so let's start with that. There are a number of ways the bird can go wrong, and just as many ways to make the best of it—if not fix it completely.
Video of the Day
1. "My turkey is overcooked and dry!"
Holiday meals have a lot of moving parts, including appetizers, side dishes and desserts to cope with, and it's far too easy to be distracted at exactly the time the turkey is approaching perfection. If that moment has come and gone without you noticing, the turkey breast in particular will be overcooked and dry. It may even shred as you slice it. There are a few things you can do to improve the situation.
The solutions:
1. Remove the skin: The layer of breast just under the skin will be the driest, because it's closest to the oven's heat. Remove the skin, trim away the outer half-inch or so, and then slice the rest. If your family loves the roasted skin, portion that as well and rest it on top. The extra-dry portions you remove can be reserved for uses like soups or turkey-salad sandwiches, where the mayo will lubricate it.
2. Moisten the sliced turkey by drizzling it with broth. Turkey broth is best, either homemade or store-bought, but chicken broth will do just fine if that's what you've got. If you're still waiting for guests, cover the meat to keep the broth from evaporating as you keep it warmed. If necessary, replenish the broth a time or two.
3. Double down on your turkey gravy. This is the oldest trick in the book, but it bears repeating. The drippings from your turkey contain a lot of flavor, and an overcooked bird will give up more drippings (that's where some of the lost moisture ends up, a kinda-sorta silver lining). Stretch your gravy by adding turkey broth—or chicken broth if you don't have turkey broth on hand. The drippings will make it all taste like turkey anyway, so nobody will know.
2. "My turkey is undercooked!"
This can happen, especially with a frozen turkey that's not completely thawed. First, double-check that the meat is in fact undercooked and not just pink. Color is a misleading guide, so if the flesh is pink but has the correct texture (and more importantly, tests at the correct temperature with a thermometer), you're good to go. If the bird is genuinely undercooked, you can do the following.
The solutions:
1. Rely on broth: Carve the turkey, moisten it with a bit of broth to protect it from drying out, and return the sliced meat to the oven in a shallow pan. In just a few minutes, it will finish cooking.
2. Use the microwave to your advantage: If you don't have oven space (because what are the odds it's full of Thanksgiving side dishes?), give the offending portion of the bird a couple of minutes in the microwave, then a couple of minutes' resting time.
Mashed Potato Issues

The turkey may be the star of your Thanksgiving table, but the big day just wouldn't be the same without your family's favorite side dishes. It's a partnership between the veggies, the mashed potatoes and especially the gravy, which all play a role in the meal and the memories.
Unfortunately, mashed potatoes are one of those deceptively simple dishes that can trip up a novice cook who's hosting a big Thanksgiving feast for the first time, or an experienced cook who's having a bad day or lost focus at the wrong moment.
1. "My mashed potatoes are watery!"
This can happen if you've cut them too small, boiled them too long or added too much milk or cream.
The solutions:
1. Add more potatoes: Depending how much time you have before dinner, boil or microwave a large russet (in large chunks if you boil, whole if you microwave) until it's tender, then mash it and add it to the rest. If you have a really big batch, you might need to add two.
2. Use Instant Mashed: Sprinkle some instant mashed powder, like Idahoan's version, into your soupy potatoes, a tablespoon or two at a time, and fold them in. When your potatoes are almost at the right consistency, stop and let them finish setting.
2. "My mashed potatoes are gluey!"
Bad news! This means you've overworked your poor spuds, and they're now a pasty mass of broken starch granules. You can't really fix them, but you can mask their texture.
The solutions:
1. Turn to butter: Stir in melted butter, a tablespoon at a time, until the texture is acceptable. They'll be rich, but the fat helps "unstick" the stodgy potatoes.
2. Use Instant Mashed: Make up a small batch of instant mashed, and fold them (gently!) into your gluey mashed. They'll add texture and help hide the problem, especially in potatoes that have already had the butter treatment.
Tip
Preparing the big Thanksgiving Day feast can be stressful at the best of times, but try to cut yourself some slack. Everybody, however experienced the cook or host, has had those days when nothing goes right. And you know what? Even those days can still turn out to be the “best Thanksgiving ever” for you and your guests. Time with friends and family is a big part of what makes the holiday season special, and a failed dish or two won’t affect what’s really important.
Side Dish Complications

Every family has its own set of side dishes, and we can't cover them all, but there are a handful of special favorites that can go awry if you're not careful.
1. "Uh-oh. My stuffing is sooo soggy!"
Many stuffing recipes, especially the more traditional ones, suggest cooking the stuffing in the bird. The USDA discourages that, for food safety reasons, though many of us still do it the traditional way. The rest bake it separately in its own dish, moistening it with turkey or chicken broth. Either method may occasionally produce stuffing that's soggy—rather than just moist—and doesn't have the right texture. There are a couple of options for fixing this, depending on how much time you have.
The solutions:
1. Dry the stuffing in your oven: Spread the stuffing on a parchment-lined sheet pan or a shallow baking dish, and return it to the oven for as long as you can manage before you absolutely have to serve the meal. The excess moisture will cook out in the form of steam, and you'll develop some pleasantly caramelized, crunchy edges at the top and sides. Those will help with the texture.
2. Dry the stuffing in your microwave: Transfer the stuffing to a microwaveable bowl, with enough extra room that you can stir it. Microwave it for 3 to 5 minutes, depending how powerful your microwave is, stirring it lightly every 30 seconds to release steam and make sure it heats evenly. This won't give quite as good a result as the oven method, but it's faster and will still improve the stuffing's texture.
A bonus benefit of either method, if you've cooked your stuffing inside the bird, is that it ensures your stuffing is cooked fully and food-safe.
2. "My cranberry sauce didn’t gel."
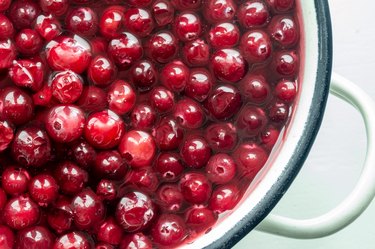
This is an easy one. Cranberries are naturally loaded with pectin, the stuff you have to buy separately when you're making jam. Pectin needs sugar, acidity and cooking time in order to gel. The cranberries themselves have lots of acidity, so if your sauce didn't gel it means you either didn't cook it long enough or skimped on the sugar.
The solutions:
1. If you used less than the required amount of sugar: Cutting back on your sugar consumption is a worthwhile goal, but this isn't the time or place. Using less sugar than the recipe calls for, or replacing it with an alternative sweetener, means you won't have enough in the pot to make your sauce gel properly (through a chemical reaction you just can't fake). The fix is simply to bring it up to the correct quantity of sugar, then put it back on the stove until it gels. If you can't bring yourself to use that much sugar, or if you've already used an alternative sweetener, you'll have to thicken it manually instead with cornstarch (like a pie filling) or some other gelling agent.
2. If you used as much sugar as the recipe called for: Just put it back on the stove and give it a few more minutes. It will start to gel, we promise. If it's already the last minute or your stove is occupied, put it in a microwaveable bowl or large measuring cup and nuke it to bring the sauce back to a boil.
3. "My green bean casserole is watery."
You may have added too much milk, or maybe your green beans released more moisture than usual. Either way, it's not a hard fix.
The solution:
1. Do "casserole surgery": Scoop off the onion-y top layer and set it aside, then scoop the rest into a saucepan over medium heat. Whisk a tablespoon or two of Wondra into cold water or milk (or half that amount of cornstarch, for a gluten-free option) and then stir it into the casserole. Cook until thickened, then return it to your casserole dish, replace the onion layer (you may need some additional onions) and return it to the oven just long enough to brown and crisp the topping.
Pie Problems

1. "My pie crust failed!"
You won't (usually) know about this until it's too late, so it's prudent to bake a small piece of leftover pastry separately and then nibble it so you'll know you have a problem before it gets to the table. At this point your choices are to a) serve an emergency store-bought dessert; b) serve it anyway and hope for the best; or c) reimagine your dessert. If you opt for the last, here are a few ideas on how to fix.
The solutions:
1. Go with gingersnaps: Spoon pumpkin pie filling onto gingersnaps, and top with whipped cream.
2. Turn it into apple crisp: Transfer your apple pie filling to a baking dish, cover it with a streusel topping, and make apple crisp instead.
3. Put a modern spin on it: Coarsely crumble graham crackers into small bowls, spoon in the pie filling, top with whipped cream, and breezily announce that you've gone with "deconstructed" pies this year.
4. Unleash the power of ice cream: Spoon the pie filling over vanilla ice cream and drizzle with your choice of syrup to make sundaes.
2. "My pumpkin pie is soupy or didn’t set."
You've probably taken your pie from the oven too soon. This is a tough one to fix at the last minute, because pumpkin pie needs to cool for at least four hours before it's ready to slice (which in reality just means your definition of "last minute" changes to "four hours ahead of time"). That being said, there are a couple of things you can do.
The solutions:
1. Put your pie back in the oven: This works best if the pie hasn't had a chance to cool completely. Bake it until it's just a bit wobbly in the very center, then take it out again and let it cool. You may need to cover the crust to keep it from over-baking and getting dark.
2. Recook the filling: Pour your filling into a saucepan, then place the saucepan itself into a pot of boiling water. Stir frequently as the mixture cooks and thickens, until your spatula leaves stiff trails in the pumpkin mixture. Pour it back into your pie shell, smooth the top, and return it to the oven for a few minutes to brown the top. The top won't be perfectly smooth, as it normally is, so plan to top it with whipped cream for aesthetic reasons.

Happy Thanksgiving!