Not everybody loves turkey. If you ask the haters what their issue is, more often than not their succinct answer will be "Because it's too dry!" That's not a problem with the poor bird itself, but with the way it's prepared. A roasted turkey will be juicy and flavorful if it's done well, and many preparation methods result in a beautifully crisp and golden skin. The good news? Plenty of well-proven paths lead to a juicy Thanksgiving turkey, so it's just a question of choosing a method that feels right for you.
Luckily we've got plenty of methods to choose from below—plus a brief explanation of why turkey is so dry in the first place! So read on to take your turkey to the next level this Thanksgiving.
Video of the Day
Video of the Day
So... Why Is Turkey Sooo Dry?

"White meat or dark?" is a traditional question when you're serving slices from the bird, but it's also a core question for the cook. The big problem with turkeys—the reason so many cooks dread roasting one…and so many diners dread eating one—is that the white meat and the dark aren't ready at the same time. The flavorful dark meat is filled with connective tissue that takes longer to cook, while the white meat of the breast is done relatively quickly. If they're in your oven for the same length of time and at the same temperature, the breast meat will inevitably be overdone by the time the legs are fully cooked. Only one or the other gets to be perfectly cooked.
The big problem with turkeys—the reason so many cooks dread roasting one…and so many diners dread eating one—is that the white meat and the dark aren't ready at the same time.
"But wait," as the infomercials say, "there's more!" That big roasting pan you pull out for your Thanksgiving meals? Its deep sides block the flow of hot air to the lower half of the bird: the dark meat, or the very part that already takes longer to cook. Do you like to cook your stuffing inside the bird, or pack the turkey cavity with onions, citrus and herbs? All of those things impede airflow and also slow the cooking.
So, yes, there are some challenges involved (especially if you're committed to bringing a golden brown whole turkey to the table). With that in mind, let's break down several ways you can achieve a juicy turkey with minimal fuss.
11 Methods for Cooking a Juicy Turkey
1. Brine (or dry-brine) the turkey
One much-hyped technique that can help—no matter your cooking method—is brining your bird. Salt helps retain water within the muscle tissues, so the bird stays juicier, and the salt is in every slice rather than just at the surface. The downside? Traditional brining is a pain. It means putting your whole turkey in salted water, refrigerating it to keep it food-safe, then drying the bird again before roasting it. Also, while it stays moist, much of that moisture is the water from your brine and, frankly, turkey tastes better than water.
A better option is to dry-brine. That just means sprinkling the bird with a tablespoon or two of pickling or kosher salt, along with black pepper and any other seasonings you like. As it sits overnight in your fridge, the salt will draw moisture from the bird, dissolve in that moisture and then be reabsorbed. You'll still get a moist turkey but without the fuss or excess moisture.
Tip
Some turkeys are sold already brined. Check the label on your bird: If it says “seasoned,” “self-basting” or “kosher,” you should skip the brining step. Otherwise your Thanksgiving turkey and its drippings will be too salty.
2. Use countertop roasters or roasting bags
Countertop roasters and roasting bags from the supermarket essentially do the same thing: They provide an enclosed environment where the moisture evaporating from your turkey is trapped, creating moist heat. This helps keeps the bird from drying out and—because moist air conducts heat more effectively than dry air—speeds cooking. A large slow cooker would do this as well, but the end result is more "turkey pot roast" than a roasted turkey.
The downside: Neither method will give you crisp, golden skin, though there are some work-arounds.
3. Try the “Butter and Baste” technique
If you search some variation on "roast a turkey" or "cook a juicy turkey," the top results usually follow this method. It calls for loosening the skin and packing the bird with a lot of herbed or unsalted butter (sometimes 2 or 3 sticks—we're not talking "just a pat of butter" here) and rubbing the skin with even more. Then, in the late stages of cooking, you'll baste the turkey with the buttery drippings. It works, because melting the butter—and evaporating its water content—uses thermal energy that would otherwise go to (over) cooking the breast. Similarly, the drippings contain some water content that must evaporate before cooking and browning resume. Also, your bird and your gravy will be rich and flavorful.
The downside: Other methods are better at evening out the breast vs. leg cooking time problem, are less work, don't add a ton of cholesterol and brown the skin evenly.
4. Flip the turkey
Some recipes call for you to start with the bird breast-side down rather than upright, as it will be on the serving platter. The recipe writers often speak of the breast being kept moist by the juices that accumulate in the pan, but that's not the big factor. The most important thing is that the breast is sheltered by the roasting pan, while the legs are exposed to the oven and cook faster. Partway through cooking you'll flip the bird breast-side up, to brown the skin as it finishes cooking. If you time it right and use a rack in your roaster, both the top and bottom should develop nicely golden skin.
The downside: It's extra work, opening the oven lets out heat and slows overall cooking time, and it's awkward to handle the hot turkey (also, there's a high risk of damaging it and ruining that perfect look you're going for).
Top Turkey Tips & Tricks
Add these Thanksgiving hacks to your cooking routine for a delicious, juicy turkey every time.
- Shop smart: Don’t know how many pounds of turkey to buy? The rule of thumb is a pound of whole, bone-in turkey per person, but you can bump that up to 1 1/2 pounds if you’re serving big eaters or want lots of leftovers.
- Go for timeless flavors: Want to know what flavorings to use on your turkey, either directly or in the form of herb butter? The classic “Simon and Garfunkel” mixture of parsley, sage, rosemary and thyme is always a good alternative to commercial poultry spice. Sprigs of fresh herbs are best (fresh rosemary, for example, is much more aromatic than dried). If you want to keep things simple, sage and thyme will work nicely. A less common alternative, if you can find it, is summer savory. It tastes like a peppery mixture of thyme and sage.
- Ditch the twine: Many recipes suggest trussing the turkey with twine after you’ve stuffed it. This makes for a neat appearance, but—like many other longstanding traditions—it impedes airflow and slows cooking.
- Pat the turkey dry: Don’t leave any moisture visible on the skin when the turkey goes into the oven. Use paper towels to pat dry any damp surfaces inside and outside of the bird, before you roast it.
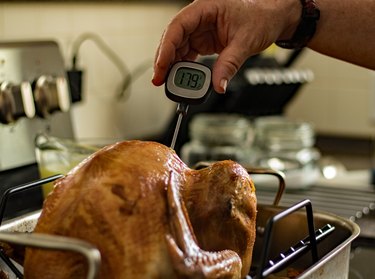
- Consult a thermometer: Don’t use a time-and-temperature chart to tell when your turkey is done, especially if this is your first time cooking one by a new method. They’re a rough guesstimate at best, flat-out wrong at worst. The color of the juices and the turkey’s flesh are also unreliable guides. Instead, use a meat thermometer or instant-read thermometer (inserted into the thickest part of the thigh or breast, but not touching a bone) to get an accurate temperature.
- Use the browned-on bits: Don’t waste the browned-on bits at the bottom of the pan. Place the pan over a burner and pour in some water or turkey broth, then stir vigorously as it comes to a boil. You’ll reclaim a lot of flavor that would otherwise go down your sink.
- Give it a rest: Let the turkey rest for at least 15 to 20 minutes before you start slicing it, and even 30 to 40 minutes is fine. Just don’t cover it loosely with a “tent” of foil, as many recipes advise. That traps steam and turns the skin soggy.
- Protect the drumsticks: Cover the tips of the drumsticks with foil to keep them from getting too dark.
- Add some baking powder...really! For really brown, crispy skin, stir a teaspoon of baking powder into your dry brine or seasoning rub. You won’t taste it, but it makes the skin slightly alkaline and makes a dramatic difference in the skin of the finished bird.
5. Chill or cover the turkey breasts
A turkey "hack" that works is laying bags of ice over the breast of your turkey to chill it for at least an hour before it goes into the oven. Having the breast iced but the legs closer to room temperature evens out their cooking time, making it easier (and likelier) that they'll be done in about the same length of time. Another option is covering the top of the turkey with a sheet of folded-to-shape aluminum foil, which shields the breasts and slows their cooking, so the legs can catch up.
The downside: Either option is a bit of extra work, and chilling means the turkey will spend at least an hour sitting out and taking up space you could be using to prepare side dishes. The foil option is easier but less effective.
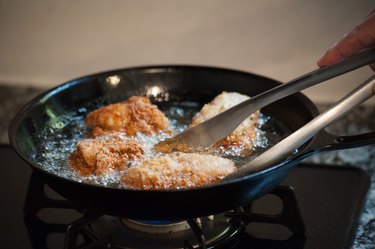
6. Deep-fry the turkey
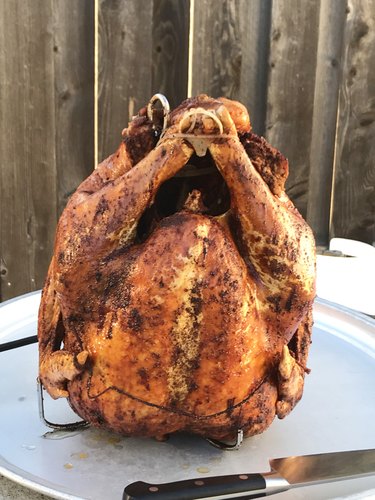
Another heavily hyped option is deep-frying your turkey. This should happen outdoors, partly because you'll need an inconveniently large pot (hoisting it on and off of the stove would be a forbidding prospect) and partly because of the potential for a catastrophic fire if you don't do it juuuust right. That being said, it's hard to argue with the end result, which is a juicy, crisp-skinned turkey in a fraction of the usual cooking time.
The downside: It takes a lot of oil, which isn't cheap, and you won't have any drippings to make your turkey gravy. Also, what part of "catastrophic fire" was unclear?
7. Add heat from the bottom
Did you go all in on the artisan baking craze during the first year of the pandemic? If so, you may have the very tool needed for this technique: A large, heavy-duty baking stone or baking steel. You've used smaller, lighter ones ("pizza stones"), but these take up most of the bottom rack in your oven. They're designed to mimic the slate-hearth ovens found in commercial kitchens, which retain a ton of heat. You'd start by preheating your oven, with the stone or steel in place, at its highest temperature (usually 500° F).
Put your turkey on a V-shaped roasting rack and place it on a large baking sheet, which will allow the all-around airflow you don't get with a roasting pan. Once the stone is fully up to temperature (it can take up to an hour), turn the oven down to 300°F and slide your sheet directly onto the surface of the stone or steel. The underside of the bird will cook quickly due to the retained high heat of the stone, while the breasts cook normally in the relatively mild 300°F air of the oven. Problem solved!
The downside: There are extra steps involved, and the lengthy preheat will take up oven time you might otherwise use to cook other dishes for your Thanksgiving dinner.
8. Carve the turkey early
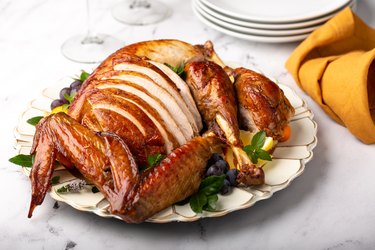
Roasting the best turkey ever is a whole lot easier if you don't sweat bringing a whole picture-perfect bird to the table. It's easier to carve the bird ahead of time, it means you don't keep everyone waiting for their meal while you ply the carving knife and it's a lot easier carrying a platter or two of sliced meat than the whole bone-in turkey. More important, it stacks the deck in your favor because you can work with the bird's nature rather than against it. You'll also use a higher roasting temperature with these methods, typically 375°F to 400°F, which shortens your cooking time and helps crisp the skin.
9. Split the turkey in half
One option is to split the bird in half horizontally. Cut along the side of the cavity, through the ribs and then around the shoulder joint at the base of the wing. The wings will stay with the legs and back, leaving the wingless, bone-in breast behind. Put them on separate sheet pans, and roast them. The USDA's recommended internal temperature is 165°F for poultry, but you can pull your breast from the oven at 155°F to 160°F and it will reach 165°F as it rests. The legs and back will also be done when they reach 165°F, but you may find you prefer the texture if they hit 175°F or 180°F. The breast "half" is thicker than the leg "half," which will even out the cooking time if you're good with everything being at 165°F.
There are some bonuses to this method. One is that all of the skin gets crispy and golden. A second is that your total time in the oven will drop by 1/3 to 1/2. Finally, if you like your stuffing done in the bird, you can put it in the cavity under the bone-in breast. With the bird halved, it will be cooked when the breast is done.
The downside: It takes extra work and extra prep time, requires a sharp knife and some knife skills, and assumes you have an oven big enough for two pans rather than one.
10. Buy and roast turkey pieces
Another option is to simply buy turkey breasts, legs and thighs, which are available from most supermarkets, rather than a whole bird. Season the pieces according to your favorite recipe, place them on separate sheets (or in suitable casserole dishes) and bake them until they're ready. The end result is much like roasting your bird in halves but without the extra work. Also, this is a great option for smaller households where a full-size turkey would be overkill.
The downside: You don't get the bones for making broth, drippings will be in short supply and you won't have the giblets to add flavor to your turkey gravy.
11. Try butterflying or “spatchcocking” the turkey
This is a real professional chef's trick. With the turkey's breast facing down on the cutting board, use a sharp knife or kitchen shears to cut out the backbone, neck and tail. Grasp the bird firmly and open it up like a book, cracking the breastbone. Optionally, remove the wishbone and the central "keel" bone (the one that divides the two breast halves). Place a flat wire rack or a loose bed of coarsely chopped aromatics (carrots, celery and onion traditionally, plus garlic if you want it) on a sheet pan, and place the turkey on it. Season it as you choose, and slide it into a prepared oven.
The flattened-out bird will cook in about half the time, and—as with halving the bird—it more or less eliminates the difference in cooking time between the white and dark meat. All of the turkey skin will be crispy and golden, and you'll have the backbone and giblets to roast separately for broth- and gravy-making.
The downside: Again, you'll need a sharp knife, some knife skills and extra prep time.
Whatever method you choose, we hope you have a happy Thanksgiving!