When it comes to décor, fruit patterns continue to make a splash and for good reason — they're a simple and easy way to add a pop of color to just about any space, from the family room to your home office. Unlike fruits themselves, these patterns have no expiration date stylewise and can work for virtually any season. Really, who isn't charmed by a good fruit pattern?
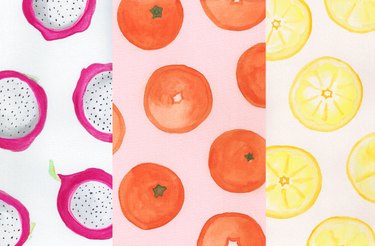
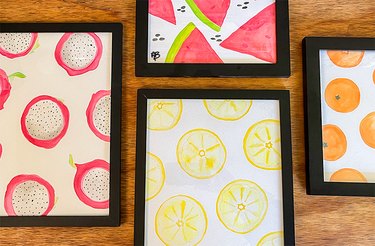
If you don't want to go too bananas (sorry, we couldn't help ourselves!) with the fruit theme, try framing just a colorful print or two and hanging them on your walls. This watercolor fruit tutorial will help you do just that. We focused on dragon fruit, lemons, mandarins and watermelon for our fruit watercolor DIYs, but the options are literally endless: blueberries, blackberries, pomegranate, grapefruit, citrus, tropical fruit — the sky's the limit! Best of all, you don't have to have Cézanne-level skills to make these watercolor paintings and art prints. Just grab your watercolor paint, water and some fruit and let's get painting!
Video of the Day
Video of the Day
Things You'll Need
Fruit
Camera
Knife
Printer
Printer paper
Tracing paper, wax paper or parchment paper
Pencil
Watercolor paper
Masking tape or washi tape
Watercolor paint
Paintbrushes
2 or 3 jars for water
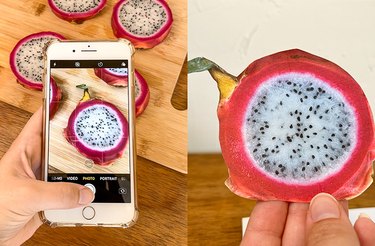
Step 1: Take a Photo of Your Fruit
If you haven't worked with watercolors often and the thought of working from a still life makes you want to run for the hills, have no fear. We have what painters in the 1800s didn't have: ridiculously high-quality cameras built right into our phones!
First, set up your fresh fruit. For the purpose of this tutorial, we'll talk about a dragon fruit. Take a photo of the dragon fruit from a few angles. Then, slice it and take a few more snapshots. We left on the dragon fruit skin so that the green and pink hues would show up nicely against the black and white of the fruit's juicy flesh.
Tip
When you’re picking fruits for your art prints, consider ones that have intriguing or contrasting color palettes. Dragon fruit is a good bet because the hot pink and green tones stand out and vibe with just about any décor theme.
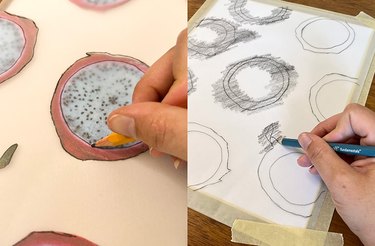
Step 2: Use an Old-School Tracing Technique
Print out the photos to the sizes that you'd like the fruits to appear in your pattern. Cut out the images from the printed paper, play around with your pattern by placing the cutouts where you want them and then copy them onto tracing paper with a pencil. Use a mix of fruit angles to create a more dynamic pattern or keep things all one shape for a more uniform look.
Once the pattern is copied onto the tracing paper, flip over the tracing paper and tape it to the watercolor paper using masking tape or washi tape. You might want to tape it onto an artist's board or simply your table so that the paper doesn't move.
Lightly use your pencil to shade over the entire piece of tracing paper. This will transfer the lead from the reverse side onto the watercolor paper and create your template. Remove the tape, lift off the tracing paper and ta-da! The pattern will be revealed underneath. If any lines are missing or appear too faint, you can fill them in.
Tip
To keep your watercolors vibrant, be sure to use one container for clean water and a different one for cleaning the paint off brushes. Some people prefer to use one jar for cleaning warm-toned colors and one jar for cleaning cool-toned colors.
Step 3: Now, It's Time to Paint!
There are generally three techniques for watercolor painting: wet on wet, wet on dry and dry on dry (see our little guide below for more information). We're a big fan of wet-on-dry watercolor painting. That means your paint is wet, but the paper is dry. This prevents watercolor bleeding (when the paint runs on the paper from too much water) and allows you more freedom in creating highly pigmented hues. Generally, if you want to create more concentrated color, dip your brush in less water.
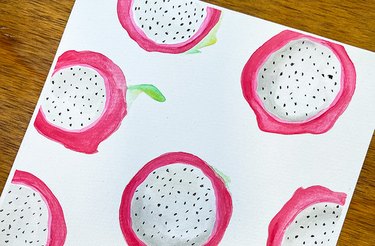
For our dragon fruit, we used the wet-on-dry method. We started by adding concentrated bits of yellow and green for the leaves. Once that dried, we filled in the skin of the dragon fruit in a concentrated pink. Then, we moved on to adding little black seeds to the white flesh of the fruit. A word to the wise: Try to wait for the paint to dry before moving on to the next fruit in your pattern. This prevents the mishap known as "my hand smudged my painting!"
Tip
Watercolor Techniques
Wet on wet: Apply water on the paper and then apply wet paint on top for a watery effect.
Wet on dry: Apply wet paint to dry paper to create bolder colors with more control.
Dry on dry: Apply dry (well, mostly dry) paint on dry paper for detail work and even more concentrated colors.
A note about backgrounds: This is the trickiest part to paint on a watercolor painting. If your background is light — say, a sky blue — it makes sense to paint this before you paint your pattern. However, if your background is darker, paint your pattern first and then carefully (and we mean carefully!) paint the background. We also recommend using a wider brush for backgrounds to cover surface area more quickly.
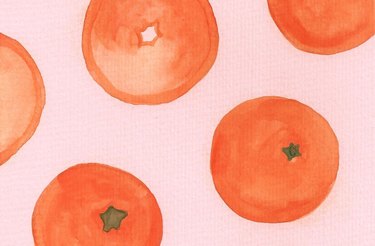
If you plan on using your watercolor painting as a print that's framed, you can also scan or photograph the image and then add a background digitally using a graphic design tool, like Canva. That's how we got the peppy pink background on our mandarin oranges. Scanning the image also allows you to print it in a frame-friendly size plus apply filters to change up the color scheme or brighten up your work.
Step 4: Add a Frame and Show Off Your Work!
Once you've finished painting and have signed your name (we always sign our name — what if our artwork becomes famous one day?!), it's time to think about how to arrange your work on your wall. We like to group paintings in pairs or families of three or more. This isn't because we think our art will get lonely. It's simply a good way to contrast different colors and themes to tell a cohesive story. For instance, for our watercolor series, we intentionally went with pinks, yellows and oranges that complemented one another.
For your watercolor fruit series, think about which colors will pick up other hues in your space. If you have a mostly blue-toned family room but your throw pillows have touches of yellow, go with watercolor pineapples, papaya or a lemon-blueberry pattern that combines both colors. You can use our handy color wheel for more inspiration.
